1. Einleitung
The AUTOOL X60 OBD computer is a smart and powerful automotive meter designed to provide essential vehicle data. It is particularly useful for vehicles that lack a built-in speedometer, engine temperature gauge, oil thermometer, boost gauge, or fuel consumption meter. The X60 monitors and displays critical information such as battery voltage, Motor-Ladevolumentage, and provides warnings for over-speed and engine temperature. It also features real-time data stream reading, trouble code scanning, and clearing capabilities.
2. Hauptmerkmale
- Unterstützte Fahrzeuge: Compatible with petrol vehicles using standard OBD-II protocol, especially those manufactured after 1996 (US), 2002 (EU petrol), 2004 (EU diesel), and 2009 (Asia).
- Einfache Installation: Simple plug-and-play setup via the OBD port, requiring no wire modification. Includes a mount and dual-sided tape for secure placement.
- Erweiterte Hardware: Powered by a 32-bit ARM CORTEX-M3 kernel CPU with a maximum operating frequency of 72MHz, supporting multiple high-speed auto communication protocols.
- Warnfunktionen: Features water temperature warning, over-speed alarm, shifting reminders, and vehicle malfunction warnings to enhance driving safety.
- Multifunktionsanzeige: Displays various parameters including driving speed, engine RPM, battery voltage, coolant temperature, oil temperature, oil pressure, driving distance, fuel consumption, clock, engine load, and intake pressure.
- Diagnosefunktionen: Reads real-time data streams, scans, and clears trouble codes.
3. Packungsinhalt
The AUTOOL X60 package includes the following items:
- 1 x AUTOOL X60 Digital Meter
- 1 x OBD-Kabel
- 1 x Dual-Sided Tape
- 1 x Benutzerhandbuch
- 1 x -Zertifikat

Video: Unboxing the AUTOOL X60 and reviewing its package contents.
4. Einrichtung und Installation
Follow these steps to properly install your AUTOOL X60 Digital Meter:
- OBD-II-Anschluss lokalisieren: Identify your vehicle's OBD-II diagnostic port, typically located under the dashboard on the driver's side.
- OBD-Kabel anschließen: Plug the provided OBD cable into the vehicle's OBD-II port.
- Kabelroute: Carefully route the OBD cable to the desired mounting location for the X60 unit, ensuring it does not interfere with driving controls or safety features. You may tuck the cable into seams for a cleaner look.
- Connect to X60: Plug the other end of the OBD cable (USB port) into the AUTOOL X60 unit.
- Mount X60: Use the provided mount and dual-sided tape to securely fix the X60 unit on your dashboard or preferred location. Ensure the display is clearly visible and does not obstruct your view der Straße.

Image: Step-by-step visual guide for connecting the OBD adapter and mounting the AUTOOL X60 unit.

Image: Various angles of the AUTOOL X60 and its mounting base, showing how it attaches to the dashboard.
Video: Demonstrates the installation process and how the Autool Dashboard Meter functions in a vehicle.
Video: Shows the AUTOOL X60 Multi-Function Digital Meter in action, including its installation and various display modes.
5. Bedienungsanleitung
5.1. Ein-/Ausschalten
The AUTOOL X60 automatically powers on when the vehicle is started and powers off when the vehicle is turned off, as it draws power directly from the OBD-II port.
5.2. Menünavigation
The unit features a single multi-directional button (often a scroll wheel or rocker switch) on the top or side for navigation. Pressing the button typically confirms a selection, while tilting it left/right or rotating it allows you to scroll through options or change display modes.
5.3. Anzeigemodi und Parameter
The X60 offers multiple display interfaces and a wide range of parameters. You can cycle through different display layouts and select which parameters are shown on the screen.

Bild: Examples of different interface displays available on the AUTOOL X60, showing various data points like speed, RPM, and temperatures.

Image: Icons representing the various displayable functions (e.g., Driving Speed, Engine RPM, Battery Voltage) and alarm functions (e.g., Speed Alarm, Coolant Temp. Alarm).
Common Displayable Parameters:
- Motorkühlmitteltemperatur (ECT)
- Average Fuel Consumption (AVG)
- Revolutions-per-Minute (RPM)
- Turbo Pressure (PSI)
- Bandtage (VLT)
- Inlet Pressure (MAP)
- Air-Fuel Ratio (A/F)
- Driving Time (MIN)
- Driving Distance (DIS)
- Engine Load (ELD)
- System Time (TIM)
- Gesamtkilometerstand (ODO)
- Oil Temperature (OIT)
- Altitude (ASL)
- Drosselklappenstellungssensor (TPS)
- Transmission Temperature (CVT)
- Driving Direction (DIR)
5.4. Alarmfunktionen
The X60 provides audible and visual alerts for various conditions:
- Water Temperature Warning: Alerts if engine coolant temperature exceeds a set limit.
- Over-Speed Alarm: Notifies the driver if the vehicle speed surpasses a pre-set threshold.
- Shifting Reminding: Provides prompts for optimal gear shifting.
- Vehicle Malfunction Warning: Alerts to detected engine or system malfunctions.
- Alarm bei Müdigkeit beim Fahren: Reminds the driver to take a break after extended driving periods.
- Drehzahlalarm: Alerts if engine RPM exceeds a set limit.
- Bandtage-Alarm: Warns if battery voltage falls outside optimal range.
5.5. Systemeinstellungen
Access the system settings menu to customize various aspects of the X60, including:
- Sprachsatz: Ändern Sie die Anzeigesprache.
- Soundschalter: Akustische Warnmeldungen aktivieren oder deaktivieren.
- Helligkeit: Adjust screen brightness (manual or automatic).
- Einheit: Switch between Metric (km/h, Celsius) and Imperial (mph, Fahrenheit) units.
- Alarmschwellen: Configure specific values for speed, RPM, voltage, and temperature alarms.
- Zeiteinstellung: Set or adjust the clock.

Image: Illustrates the automatic light sensor feature, which adjusts screen brightness for optimal visibility during both daytime and nighttime driving.
6. Wartung
To ensure the longevity and optimal performance of your AUTOOL X60 Digital Meter, follow these maintenance guidelines:
- Reinigung: Use a soft, dry cloth to clean the display screen and the unit's exterior. Avoid abrasive cleaners or solvents that could damage the device.
- Kabelinspektion: Periodically check the OBD cable for any signs of wear, fraying, or damage. Replace if necessary to maintain a secure connection.
- Umgebungsbedingungen: Vermeiden Sie es, das Gerät extremen Temperaturen, direkter Sonneneinstrahlung über längere Zeiträume oder übermäßiger Feuchtigkeit auszusetzen.
- Firmware-Updates: Check the official AUTOOL webAuf dieser Website finden Sie alle verfügbaren Firmware-Updates, um sicherzustellen, dass Ihr Gerät über die neuesten Funktionen und Fehlerbehebungen verfügt.
7. Fehlerbehebung
If you encounter issues with your AUTOOL X60, refer to the following common troubleshooting steps:
- "Failed to Connect" Message:
- Ensure the OBD cable is securely plugged into both the vehicle's OBD-II port and the X60 unit.
- Verify your vehicle is compatible with the X60 (12V OBD-II standard, manufactured after specified dates).
- Turn off the vehicle, unplug the X60, wait a few seconds, and then plug it back in and restart the vehicle.
- Check for any loose connections or damage to the OBD cable.
- Ungenaue Messwerte:
- Ensure the correct units (Metric/Imperial) are selected in the system settings.
- Some parameters may require calibration or adjustment in the system settings (e.g., speed adjustment).
- If specific sensors are not reading, try unplugging and replugging the unit.
- Bildschirm schaltet sich nicht ein:
- Vergewissern Sie sich, dass die Zündung des Fahrzeugs eingeschaltet ist.
- Überprüfen Sie die OBD-Kabelverbindung.
- Stellen Sie sicher, dass die Fahrzeugbatterie ausreichend geladen ist.
- Annoying Beeping Sounds:
- Access the system settings to adjust or disable specific alarm sounds (e.g., over-speed, RPM alarm).
8. Spezifikationen
| Besonderheit | Beschreibung |
|---|---|
| Betriebslautstärketage | 10-18V DC |
| Betriebsstrom | <80 mA |
| CPU | 32-bit ARM CORTEX-M3 kernel |
| Max. Betriebsfrequenz | 72 MHz |
| Artikelgewicht | 5.6 Unzen |
| Verpackungsabmessungen | 3.8 x 3.3 x 3.1 Zoll |
| Herstellerteilenummer | X60-AMZ-101 |
| UPC | 733810027102, 714583379629, 733810044451 |
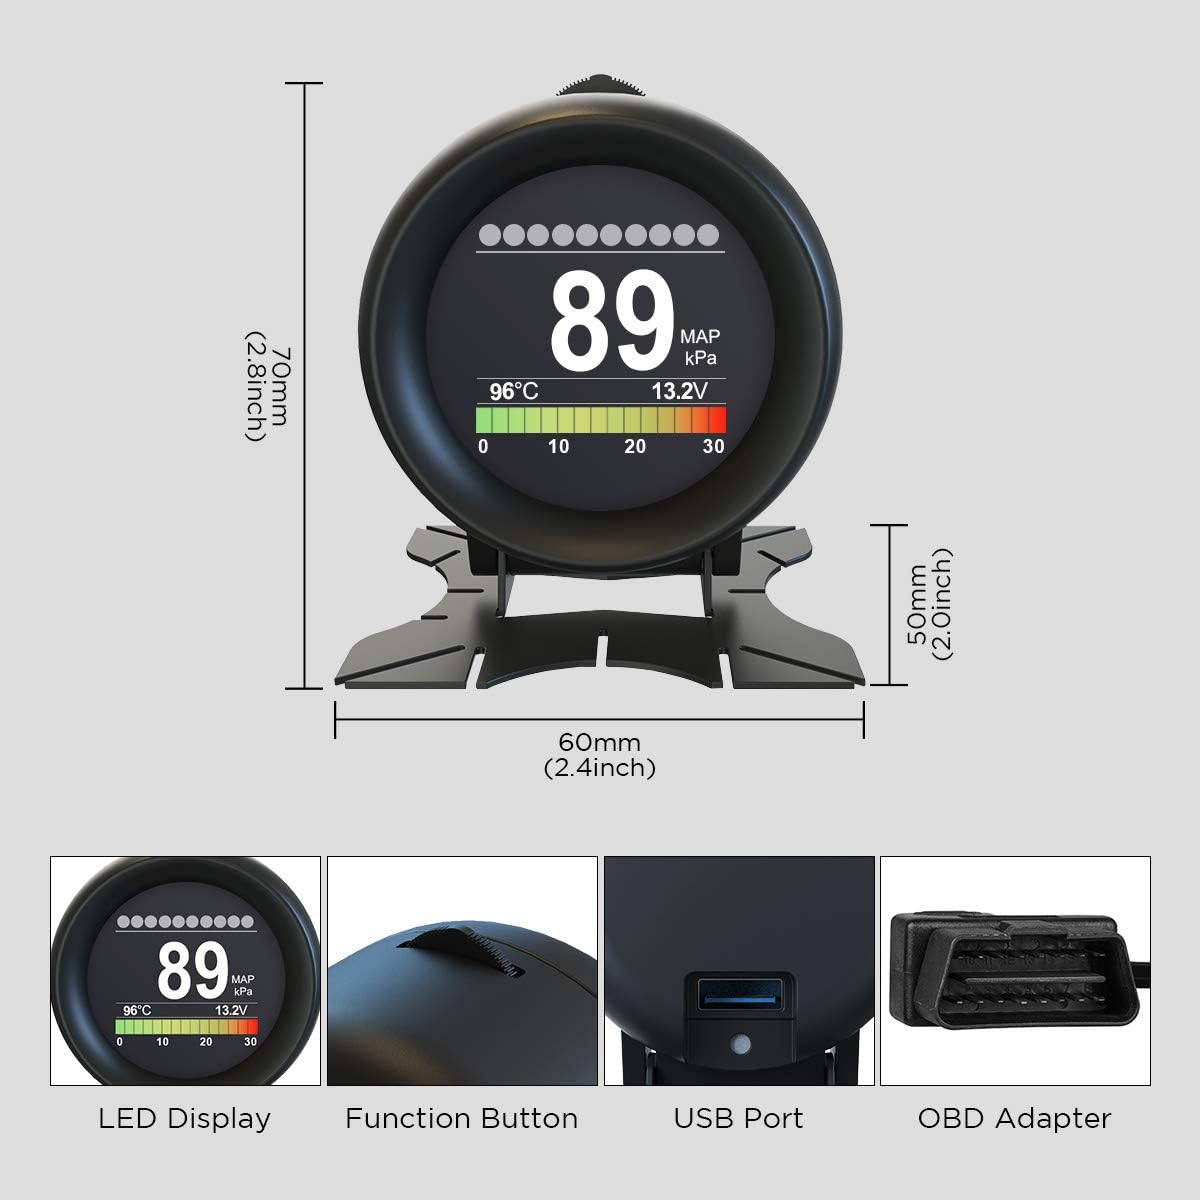
Bild: Detailliert view of the AUTOOL X60 showing its dimensions (70mm height, 60mm width) and key components like the LED display, function button, USB port, and OBD adapter.

Image: Diagram illustrating the pinout of a standard OBD-II connector, indicating which pins are used for various signals like SAE J1850 Bus+, Chassis, Signal Ground, CAN High/Low, and Vehicle Battery Positive.
9. Garantie und Support
For warranty information, technical support, or service inquiries, please refer to the contact details provided in your product packaging or visit the official AUTOOL webBewahren Sie Ihren Kaufbeleg als Kaufnachweis für Garantieansprüche auf.