
TENVIS T3875D
TENVIS T3875D WLAN-IP-Kamera – Benutzerhandbuch
Modell: T3875D
1. Einleitung
This manual provides detailed instructions for the installation, operation, maintenance, and troubleshooting of your TENVIS T3875D WiFi IP Camera. Please read this manual thoroughly before using the product to ensure proper setup and optimal performance. Keep this manual for future reference.
The TENVIS T3875D is a Full HD 1080P outdoor motorized IP camera featuring 5X optical zoom, speaker, microphone, and MicroSD card support, compatible with ONVIF protocols.
2. Produktüberschreitungview
2.1 Packungsinhalt
- TENVIS T3875D WiFi IP Camera
- Power Adapter (AC 220V with Italian socket, output DC 12V 1A)
- Befestigungsschrauben und Dübel
- Ethernet-Kabel (für die Ersteinrichtung oder kabelgebundene Verbindung)
- Benutzerhandbuch (dieses Dokument)
2.2 Kamerakomponenten
Familiarize yourself with the main components of your TENVIS T3875D camera:

Shows the camera lens, infrared LEDs, and light sensor. The camera is mounted on a wall bracket with an antenna visible at the top.

Another perspective of the front, highlighting the dome shape and the array of infrared lights around the central lens.

Displays the back of the camera, revealing the speaker grille and the covered MicroSD card slot at the bottom.

Shows the camera from a side angle, emphasizing the wall mount arm and the antenna connection point.
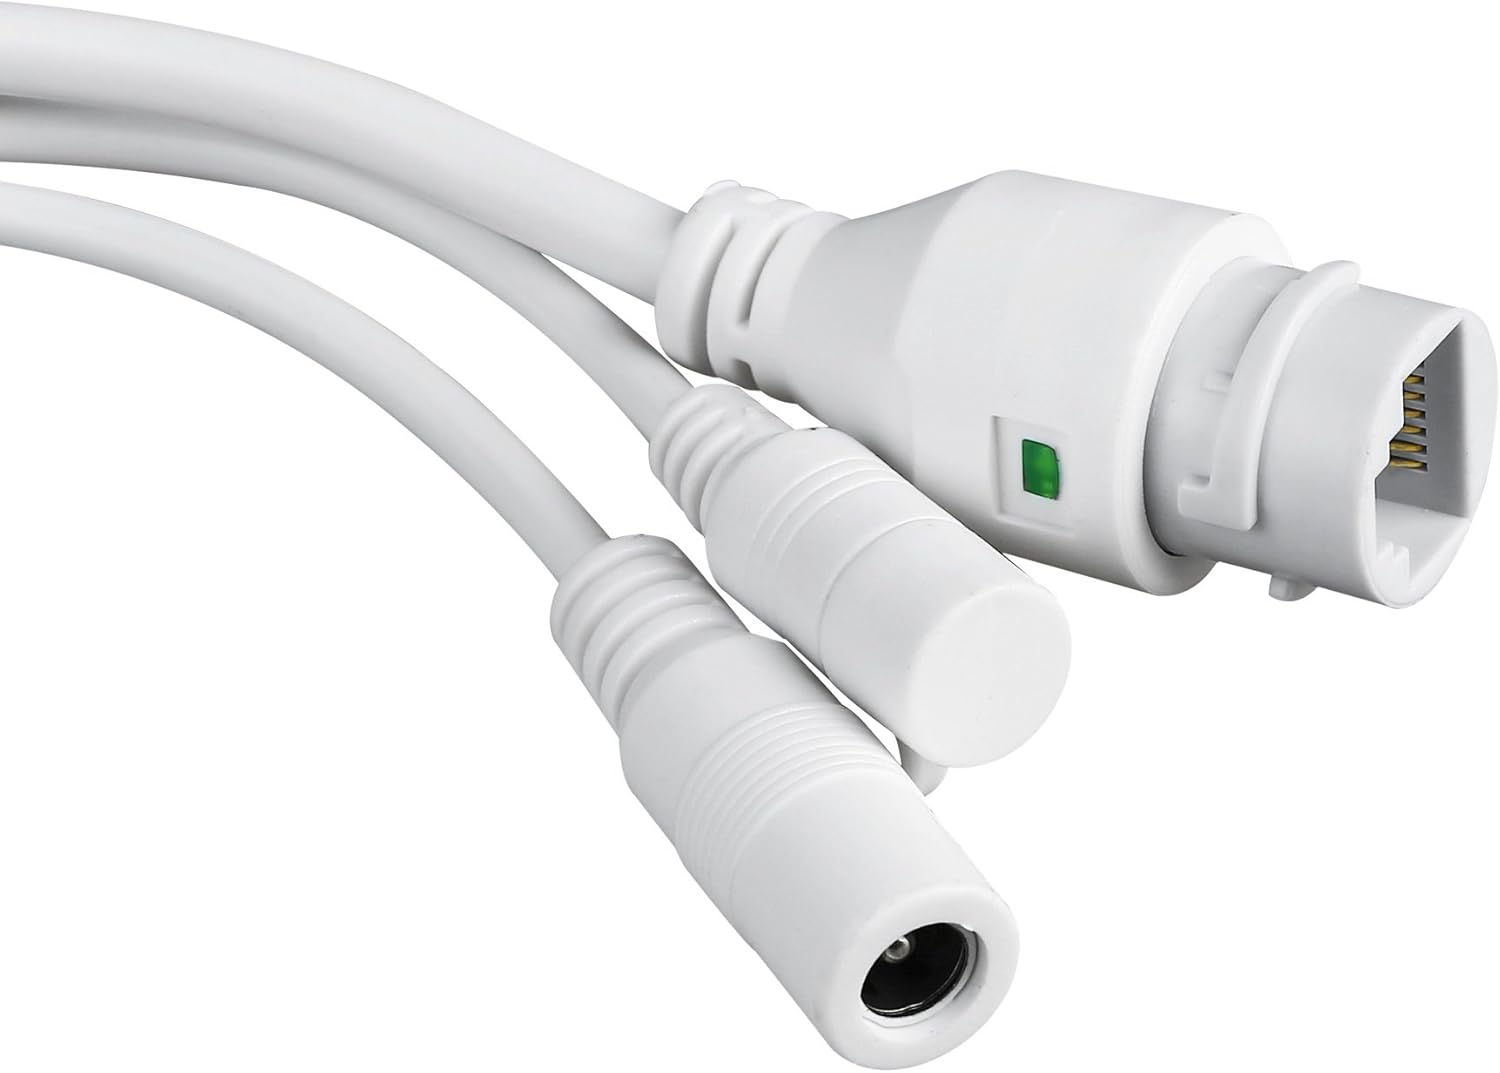
Close-up of the camera's power input and Ethernet port, essential for connectivity.
3. Einrichtung und Installation
3.1 Montage der Kamera
The TENVIS T3875D is designed for outdoor use and is IP66 weatherproof. Choose a suitable location for mounting, ensuring a clear field of view and access to a power source.
- Markieren Sie die Bohrpunkte an der Wand, indem Sie die Montagehalterung als Schablone verwenden.
- Bohren Sie Löcher und setzen Sie die mitgelieferten Dübel ein.
- Befestigen Sie die Montagehalterung mit den Schrauben an der Wand.
- Befestigen Sie die Kamera an der Montagehalterung.
- Adjust the camera's angle as needed after initial setup.
3.2 Einschalten
Connect the provided power adapter to the camera's power input and then plug it into a suitable electrical outlet. The camera will initiate its self-test sequence.
3.3 Netzwerkverbindung
The camera supports both Wi-Fi (802.11n, WPA, WPA2) and Ethernet (10/100M) connections.
3.3.1 Wired Connection (Recommended for initial setup)
- Verbinden Sie ein Ende eines Ethernet-Kabels mit dem Ethernet-Anschluss der Kamera.
- Verbinden Sie das andere Ende des Ethernet-Kabels mit Ihrem Router oder Netzwerk-Switch.
- Ensure your router has DHCP enabled for automatic IP address assignment.
3.3.2 Drahtlose Verbindung
Wireless setup is typically done via the mobile application after the camera is initially connected to the network (either wired or via P2P QR code setup).
- P2P (Plug & Play) Setup: Download the "TENVISTY" app (available for Android and iOS). Scan the QR code on the product to quickly connect the camera to your smartphone/tablet. This method simplifies network configuration.
- Manual Wi-Fi Configuration: Bei Verwendung des web interface or a different app, you may need to manually select your Wi-Fi network (SSID) and enter the password.
3.4 Installation der microSD-Karte
The camera supports MicroSD cards up to 128GB for local storage of recordings.
- Locate the MicroSD card slot on the camera (refer to Figure 2.2.3). It is usually protected by a cover.
- Öffnen Sie den Deckel vorsichtig.
- Insert the MicroSD card into the slot with the contacts facing down until it clicks into place.
- Close the cover securely to maintain the camera's weather resistance.
- Format the MicroSD card via the camera's settings in the app or web Schnittstelle für optimale Leistung.
4. Bedienung der Kamera
4.1 Zugriff auf die Kamera
You can access and control your camera using the official TENVISTY app or a web Browser.
4.1.1 Using the TENVISTY App
- Download "TENVISTY" from the App Store (iOS) or Google Play Store (Android).
- Registrieren Sie ein Konto oder melden Sie sich an.
- Add your camera by scanning the QR code or manually entering its ID.
- Nach dem Hinzufügen können Sie view live feed, control pan/tilt/zoom, access recordings, and configure settings.
4.1.2 Verwendung eines Web Browser
The camera supports Internet Explorer 11. Other browsers may have limited functionality.
- Stellen Sie sicher, dass sich Ihr Computer im selben Netzwerk wie die Kamera befindet.
- Find the camera's IP address (can be found via your router's connected devices list or a network scanner tool).
- Open Internet Explorer 11 and enter the camera's IP address in the address bar.
- Enter the default username and password (refer to the camera's label or initial setup guide for defaults).
4.2 Schwenk-, Neige- und Zoomsteuerung (PTZ)
The T3875D features motorized pan (355° horizontal), tilt (90° vertical), and 5x optical autofocus zoom.
- In the TENVISTY app or web interface, use the directional controls to move the camera's view.
- Use the zoom controls to optically zoom in or out. The camera will automatically focus.
4.3 Bewegungserkennung und Alarme
Configure motion detection settings to receive alerts and record events.
- Navigate to "Alarm Settings" or "Motion Detection" in the app/web Schnittstelle.
- Enable motion detection.
- Adjust sensitivity levels and define detection regions to minimize false alarms.
- Configure alarm actions:
- Push-Benachrichtigungen: Receive real-time alerts on your smartphone/tablet via the TENVISTY app.
- E-Mail-Benachrichtigung: Send emails with attached captured images to specified recipients.
- Videoaufnahme: Automatically record video to the MicroSD card, NVR, or FTP server upon motion detection.
4.4 Aufnahme und Wiedergabe
The camera supports continuous, scheduled, or alarm-triggered recording.
- Lokale Aufzeichnung: Recordings are saved to the installed MicroSD card (up to 128GB).
- NVR/FTP Recording: Compatible with ONVIF 2.1 NVRs or FTP servers (NAS, hard drive connected to router).
- Wiedergabe: Auf aufgezeichnetes Foo zugreifentage through the TENVISTY app or web interface. Select the date and time to review Veranstaltungen.
5. Wartung
5.1 Reinigung der Kamera
Regularly clean the camera lens and housing to ensure clear image quality and proper operation.
- Verwenden Sie ein weiches,amp Tuch zum Abwischen des Kameragehäuses.
- For the lens, use a lens cleaning cloth and solution designed for optical surfaces. Avoid abrasive materials.
- Verwenden Sie keine scharfen Reinigungsmittel oder Lösungsmittel.
5.2 Firmware-Updates
Periodically check for firmware updates to improve camera performance, add new features, and enhance security. Firmware updates are typically available through the TENVISTY app or the manufacturer's webWebsite.
- Befolgen Sie die mit dem Firmware-Update gelieferten Anweisungen sorgfältig.
- Ensure the camera remains powered during the entire update process to prevent damage.
5.3 MicroSD-Kartenverwaltung
To maintain recording efficiency, it is recommended to format the MicroSD card periodically (e.g., every few months) through the camera's settings. Back up any important footage vor der Formatierung.
6. Fehlerbehebung
| Problem | Mögliche Ursache | Lösung |
|---|---|---|
| Die Kamera lässt sich nicht einschalten. | Kein Strom, defekter Adapter, lose Verbindung. | Check power outlet, ensure adapter is securely connected to camera and power source. Try a different outlet. |
| Es kann keine Verbindung zum WLAN hergestellt werden. | Incorrect Wi-Fi password, camera too far from router, Wi-Fi interference. | Double-check Wi-Fi password. Move camera closer to router or use a Wi-Fi extender. Reduce interference from other devices. Try wired connection for initial setup. |
| Schlechte Bildqualität. | Dirty lens, low network bandwidth, incorrect resolution settings. | Clean the camera lens. Ensure stable internet connection. Adjust video resolution settings in the app/web Schnittstelle. |
| Bewegungserkennung funktioniert nicht. | Motion detection disabled, sensitivity too low, incorrect detection area. | Enable motion detection in settings. Increase sensitivity. Adjust detection regions. |
| Die microSD-Karte zeichnet nicht auf. | Card not inserted correctly, card full, card not formatted, faulty card. | Reinsert card. Check storage space. Format the card via camera settings. Try a different MicroSD card. |
| Camera offline frequently. | Unstable Wi-Fi signal, power interruptions, network issues. | Improve Wi-Fi signal strength. Ensure stable power supply. Check router and internet connection. |
If the problem persists, please contact TENVIS customer support.
7. Spezifikationen
| Besonderheit | Detail |
|---|---|
| Modellnummer | T3875D |
| Sensor | CMOS with IR Cut Filter |
| Linse | f:2.7-13.5 mm F:2.0 |
| Viewing-Winkel | 25° bis 96° |
| Auflösung | Up to 1920 x 1080p (2.0 megapixels) |
| Videocodierung | H.264 |
| Bildfrequenz | Bis zu 25 fps |
| WDR-Technologie | Ja |
| Wetterbeständigkeit | IP66-Standard |
| Pan & Tilt | Horizontal 355°, Vertikal 90° |
| Zoom | 5x optical Auto Focus |
| Infrarot-LEDs | 6 powerful IR LED flashlights |
| Nachtsichtbereich | Bis zu 60 Meter |
| IR-Sperrfilter | Ja |
| Micro SD Steckplatz | Bis zu 128 GB |
| W-lan | 802.11n (WPA, WPA2) |
| LAN | Ethernet 10/100M |
| P2P | Yes (QR code setup) |
| Videostream | Two streams (main for local, sub for remote) |
| Bewegungserkennung | Customizable sensitivity and ranges |
| Alarmbenachrichtigung | TENVISTY app (push), Email with attachments |
| Aufnahme | On alarms, continuous, programmable (MicroSD, NVR, FTP) |
| Unterstützte Browser | Internet Explorer 11 |
| App | TENVISTY (Android, iOS), TinyCam Monitor (Android), LiveCams (iOS) |
| Unterstützte Protokolle | ONVIF 2.1, RTSP, RTMP |
| Betriebstemperatur | -10 ℃ ~ 50 ℃ |
| Luftfeuchtigkeit | 10 % ~ 80 % (ohne Kondensation) |
| Abmessungen (L x B x H) | 18 x 17 x 10 cm |
| Gewicht | 1.28 kg |
| Stromversorgung | AC 220V input, DC 12V 1A output |
| Energieaufnahme | 5W (day), 12W (night) |
8. Garantie und Support
8.1 Garantieinformationen
Specific warranty details may vary by region and retailer. Please refer to your purchase documentation or the TENVIS official webDie genaueste und aktuellste Garantiebestimmungen finden Sie auf der Website.
8.2 Kundendienst
For technical assistance, troubleshooting beyond this manual, or warranty inquiries, please contact TENVIS customer support:
- E-Mail: support@tenvis.com
- WebWebsite: www.tenvis.com
- For support in Italy, you may also contact DM Soluzioni ICT s.r.l. at info@dm-ict.it oder besuchen Sie www.dm-ict.it.
When contacting support, please have your product model (T3875D) and purchase information ready.
Ask a question about this manual
Ask about setup, troubleshooting, compatibility, parts, safety, or missing instructions. Manuals+ will review the question and use this page’s manual context to help answer it.