
1. Einleitung
Thank you for choosing the XTUGA A4 4-Channel Audio Mixer. This compact and versatile mixing console is designed for various audio applications, including home music production, webcasting, and live sound. It features 4 channels, Bluetooth connectivity, USB recording and playback, 48V phantom power for condenser microphones, and built-in effects. This manual provides detailed instructions for setup, operation, maintenance, and troubleshooting to ensure optimal performance and longevity of your device.
2. Sicherheitshinweise
- Stromversorgung: Use only the specified power adapter or a reliable USB power source that meets the voltage and current requirements (greater than 5V and 1.5A). Incorrect power can damage the device or cause noise.
- Wasser und Feuchtigkeit: Do not expose the unit to rain, moisture, or extreme humidity. Avoid placing liquid containers on or near the mixer.
- Belüftung: Sorgen Sie für ausreichende Belüftung rund um das Gerät. Blockieren Sie keine Belüftungsöffnungen.
- Hitze: Halten Sie das Gerät von Wärmequellen wie Heizkörpern, Heizregistern, Öfen oder anderen wärmeerzeugenden Geräten fern.
- Reinigung: Vor der Reinigung die Stromzufuhr unterbrechen. Ein trockenes, weiches Tuch verwenden. Keine flüssigen Reiniger oder Sprays verwenden.
- Wartung: Versuchen Sie nicht, dieses Gerät selbst zu reparieren. Überlassen Sie alle Wartungsarbeiten qualifiziertem Fachpersonal.
3. Packungsinhalt
Bitte überprüfen Sie nach dem Auspacken den Packungsinhalt, um sicherzustellen, dass alle Artikel vorhanden sind:
- XTUGA A4 4-Channel Audio Mixer
- USB-Stromkabel
- USB Power Adapter

Image: The XTUGA A4 Audio Mixer shown with its included USB power cable and USB power adapter.
4. Produktüberschreitungview
The XTUGA A4 mixer features a compact design with essential controls for audio mixing. Key features include:
- 4 Eingangskanäle: Two MIC/LINE (XLR/TRS combo) inputs with 48V phantom power and two stereo LINE (RCA) inputs.
- Bluetooth-Konnektivität: Streamen Sie Audio kabellos von Ihrem Smartphone oder anderen Bluetooth-fähigen Geräten.
- USB-Audio-Schnittstelle: Connect to a computer for recording and playback. Supports U-Disk (USB drive) for MP3/WAV/WMA/FLAC playback and direct recording.
- Integrierte Effekte: Adjustable DELAY and REPEAT effects for vocal enhancement.
- Überwachung: Dedicated PHONES output for headphone monitoring.
- EQ-Steuerung: HIGH and LOW equalization for each input channel.

Bild: Vorderseite view of the XTUGA A4 Audio Mixer, illustrating its Bluetooth connectivity feature with a smartphone icon.
5. Einrichtung
5.1 Stromversorgung des Mischers
The A4 mixer can be powered via USB. For stable performance and to avoid noise, ensure your power source provides at least 5V and 1.5A.
- USB-Netzteil: Connect the provided USB cable to the mixer's USB port and the USB power adapter, then plug into a wall outlet. This is the recommended method for optimal performance.
- USB-Anschluss am Computer: Connect the USB cable directly to a computer's USB port. Note that some computer USB ports may not provide sufficient power, potentially leading to noise or unstable operation.
- Power Bank: For portable use, connect the USB cable to a power bank with sufficient output.

Image: Illustration of three ways to power the XTUGA A4 mixer: via a computer's USB port, a wall power adapter, or a portable power bank. A note emphasizes the requirement for a USB power supply of at least 5V and 1.5A.
5.2 Anschließen von Audiogeräten
Refer to the diagram below for a general connection overview.

Image: A comprehensive diagram illustrating how to connect various audio equipment to the XTUGA A4 mixer, including condenser microphones, dynamic microphones, wireless microphones, a computer, a power amplifier, passive speakers, and headphones.
5.2.1 Eingangsverbindungen
- Microphones (Channels 1 & 2): Connect XLR or 1/4" TRS cables from your microphones to the MIC/LINE inputs. For condenser microphones requiring phantom power, ensure the +48V switch is engaged.
- Line-Level Devices (Channels 3 & 4): Connect devices like CD players, media players, or other line-level sources using RCA cables to the LEFT and RIGHT LINE inputs.

Bild: Eine Nahaufnahme view of the mixer's input section, demonstrating the connection of both a 1/4-inch TRS cable and an XLR cable into the MIC/LINE combo jacks.
5.2.2 Ausgangsanschlüsse
- Hauptausgang: Connect the L/R MAIN RCA outputs to your power ampVerstärker, Aktivlautsprecher oder Aufnahmegerät.
- Kopfhörer: Connect your headphones to the PHONES 1/4" TRS output for monitoring.
6. Bedienungsanleitung
6.1 Grundlegendes Mischen
- Kontrolle erlangen: Adjust the input sensitivity for each MIC/LINE channel. Set it so the PEAK LED flashes only occasionally during the loudest parts of the signal.
- HOCH-/TIEF-EQ: Use these knobs to adjust the treble (HIGH) and bass (LOW) frequencies for each channel.
- EFX Send: Controls the amount of signal sent from each channel to the built-in effects processor.
- MAIN Output: Adjusts the overall volume of the main mix.
- TELEFON-Ausgang: Regelt die Lautstärke für den Kopfhörerausgang.
- +48V Phantomspeisung: Activate this switch for condenser microphones that require phantom power. Ensure microphones are connected before activating.
6.2 Bluetooth-Betrieb
So verbinden Sie ein Bluetooth-Gerät:
- Press the MODE/BT button on the USB/Bluetooth section until the display shows "BT".
- On your smartphone or Bluetooth device, search for available devices and select "XTUGA A4" (or similar name).
- Once paired, audio from your device will play through channels 3/4. Adjust the volume using the 3-4/USB knob.
6.3 USB Playback (U-Disk)
Audio abspielen files from a USB flash drive:
- Insert a USB flash drive (U-Disk) containing MP3/WAV/WMA/FLAC files in den USB-Port.
- The mixer will automatically detect and begin playing files. Use the playback controls (play/pause, next/previous) on the mixer.
- Adjust the volume using the 3-4/USB knob.

Image: The XTUGA A4 mixer with a USB flash drive inserted into its USB port, highlighting its U-Disk functionality for playing MP3/WAV/WMA/FLAC files und Audioaufnahmen.
6.4 USB Recording to Computer
The mixer can send its main stereo mix to a computer for recording.
- Connect the mixer to your computer via the USB cable.
- Your computer should recognize the mixer as an audio input device. Select it in your recording software (e.g., Audacity, GarageBand, OBS).
- Adjust input levels on the mixer and in your software. The mixer will send a stereo mix of all active channels to the computer.

Image: A diagram illustrating the connection for recording. A computer sends background music to the audio mixer, and the audio mixer's output is recorded by a computer program.
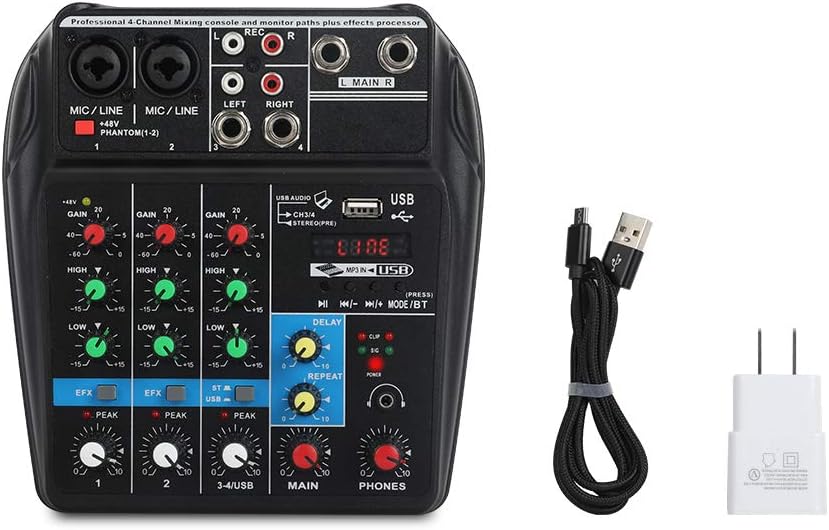
Image: A visual guide detailing the process of recording audio to a computer. Steps include connecting the USB cable, setting the mixer to 'Record' status, pressing record in a computer program (like GoldWave), and then playing back the recorded audio.
6.5 Effects (DELAY & REPEAT)
The mixer includes built-in delay and repeat effects:
- VERZÖGERUNG: Passt die Verzögerungszeit des Effekts an.
- WIEDERHOLEN: Controls the number of repetitions for the delay effect.
- Use the EFX send knobs on individual channels to control how much of that channel's signal is sent to the effects processor.
6.6 Produktvideo-Demonstration
Watch this video for a visual demonstration of the XTUGA A4 Audio Mixer's features and operation.
Video: A demonstration of the XTUGA A4 4-Channel Audio Mixer, showcasing its various features, connections, and operational aspects. This video provides a visual guide to understanding the product's capabilities.
7. Wartung
- Reinigung: Wischen Sie die Oberfläche des Mischers regelmäßig mit einem weichen, trockenen Tuch ab. Vermeiden Sie die Verwendung von Scheuermitteln oder Lösungsmitteln.
- Lagerung: Wenn der Mixer nicht in Gebrauch ist, bewahren Sie ihn an einem sauberen, trockenen Ort fern von direkter Sonneneinstrahlung und extremen Temperaturen auf.
- Kabelpflege: Handle cables carefully. Avoid sharp bends or excessive pulling, which can damage connectors or internal wiring.
8. Fehlerbehebung
| Problem | Mögliche Ursache | Lösung |
|---|---|---|
| Kein Strom | Incorrect or insufficient USB power supply. | Ensure the USB power adapter is properly connected to a wall outlet. If using a computer USB, try a different port or a dedicated USB power adapter (recommended). Verify the power source provides at least 5V and 1.5A. |
| Kein Ton oder geringe Lautstärke | Incorrect connections, low gain/volume settings, phantom power off for condenser mics. | Check all input and output cable connections. Increase GAIN for input channels, MAIN volume, and PHONES volume. Ensure +48V phantom power is engaged for condenser microphones. |
| Brummen oder statisches Rauschen | Ground loop, insufficient power, poor quality cables, interference. | Use the provided USB power adapter plugged into a wall outlet instead of a computer USB port. Ensure all cables are good quality and properly shielded. Try isolating the mixer from other electronic devices. |
| USB recording/playback issues (disconnects, not recognized) | Faulty USB cable, computer port issues, driver conflicts. | Try a different USB cable and a different USB port on your computer. Restart your computer. Ensure your operating system has the latest audio drivers. |
| Cannot record multiple microphones to separate tracks | The mixer outputs a stereo mix, not individual tracks. | This mixer is designed to output a combined stereo mix to your computer. It does not support multi-track recording of individual inputs. For multi-track recording, a dedicated multi-channel audio interface is required. |
9. Spezifikationen
- Artikelmodellnummer: A4
- Artikelgewicht: 1.5 Pfund
- Produktabmessungen: 3.15 x 9.45 x 9.45 Zoll
- Anzahl der Kanäle: 4
- Hardware-Schnittstelle: Bluetooth, USB
- Konnektivitätstechnologie: Bluetooth
- Energiequelle: Kabelgebundener Strom (USB)
- Bandtage: 48 Volt (für Phantomspeisung)
- Ausgangssteckertyp: XLR (implied for mic inputs), RCA (Main Out), TRS (Phones Out)
10. Garantie und Support
Informationen zu Garantie, technischem Support oder Serviceanfragen erhalten Sie direkt vom Verkäufer oder Hersteller über die Plattform, auf der Sie das Produkt erworben haben. Bewahren Sie Ihren Kaufbeleg als Kaufnachweis auf.