
1. Einleitung
This manual provides essential information for the safe and effective operation of your Skyking MECO-G R-2025THz Digital Auto-Ranging Clamp Meter. This True RMS meter is designed for measuring AC current up to 1000A, voltage, resistance, frequency, and temperature. Please read this manual thoroughly before use and retain it for future reference.
2. Sicherheitshinweise
To ensure safe operation and avoid damage to the meter, observe the following safety precautions:
- Always adhere to safety regulations as per GB4793-1 and IEC 61010-1. This meter is rated for CAT III 600V and CAT II 1000V.
- Die für jede Funktion angegebenen maximalen Eingabewerte dürfen nicht überschritten werden.
- Ensure test leads are properly connected to the correct input terminals before making any measurements.
- Inspect the meter, test leads, and accessories for any damage before each use. Do not use if damaged.
- Never attempt to measure current on circuits with voltage exceeding the meter's rating.
- Bei Arbeiten an unter Spannung stehenden Stromkreisen ist äußerste Vorsicht geboten.
3. Produktüberschreitungview
The Skyking MECO-G R-2025THz is a compact and versatile digital clamp Zähler. Zu den wichtigsten Komponenten gehören:
- Aktueller Klamp Kiefer: For non-contact AC current measurement. Features a 45mm jaw opening.
- Drehfunktionswahlrad: Selects measurement functions (OFF, 1000A~, 600A~, 60A~, V, mV, Ω, Hz/Duty, Temp).
- LCD Anzeige: 3 digits, 6000 counts, True RMS readings. Includes backlight for low-light conditions.
- Funktionstasten: Includes buttons for Hz/Duty, Range, and Select.
- Eingangsklemmen: Dedicated ports for 'V', 'COM', and 'Hz/°C°F Ω' test lead connections.
- Auslösen: Located on the side for opening the clamp Kiefer.
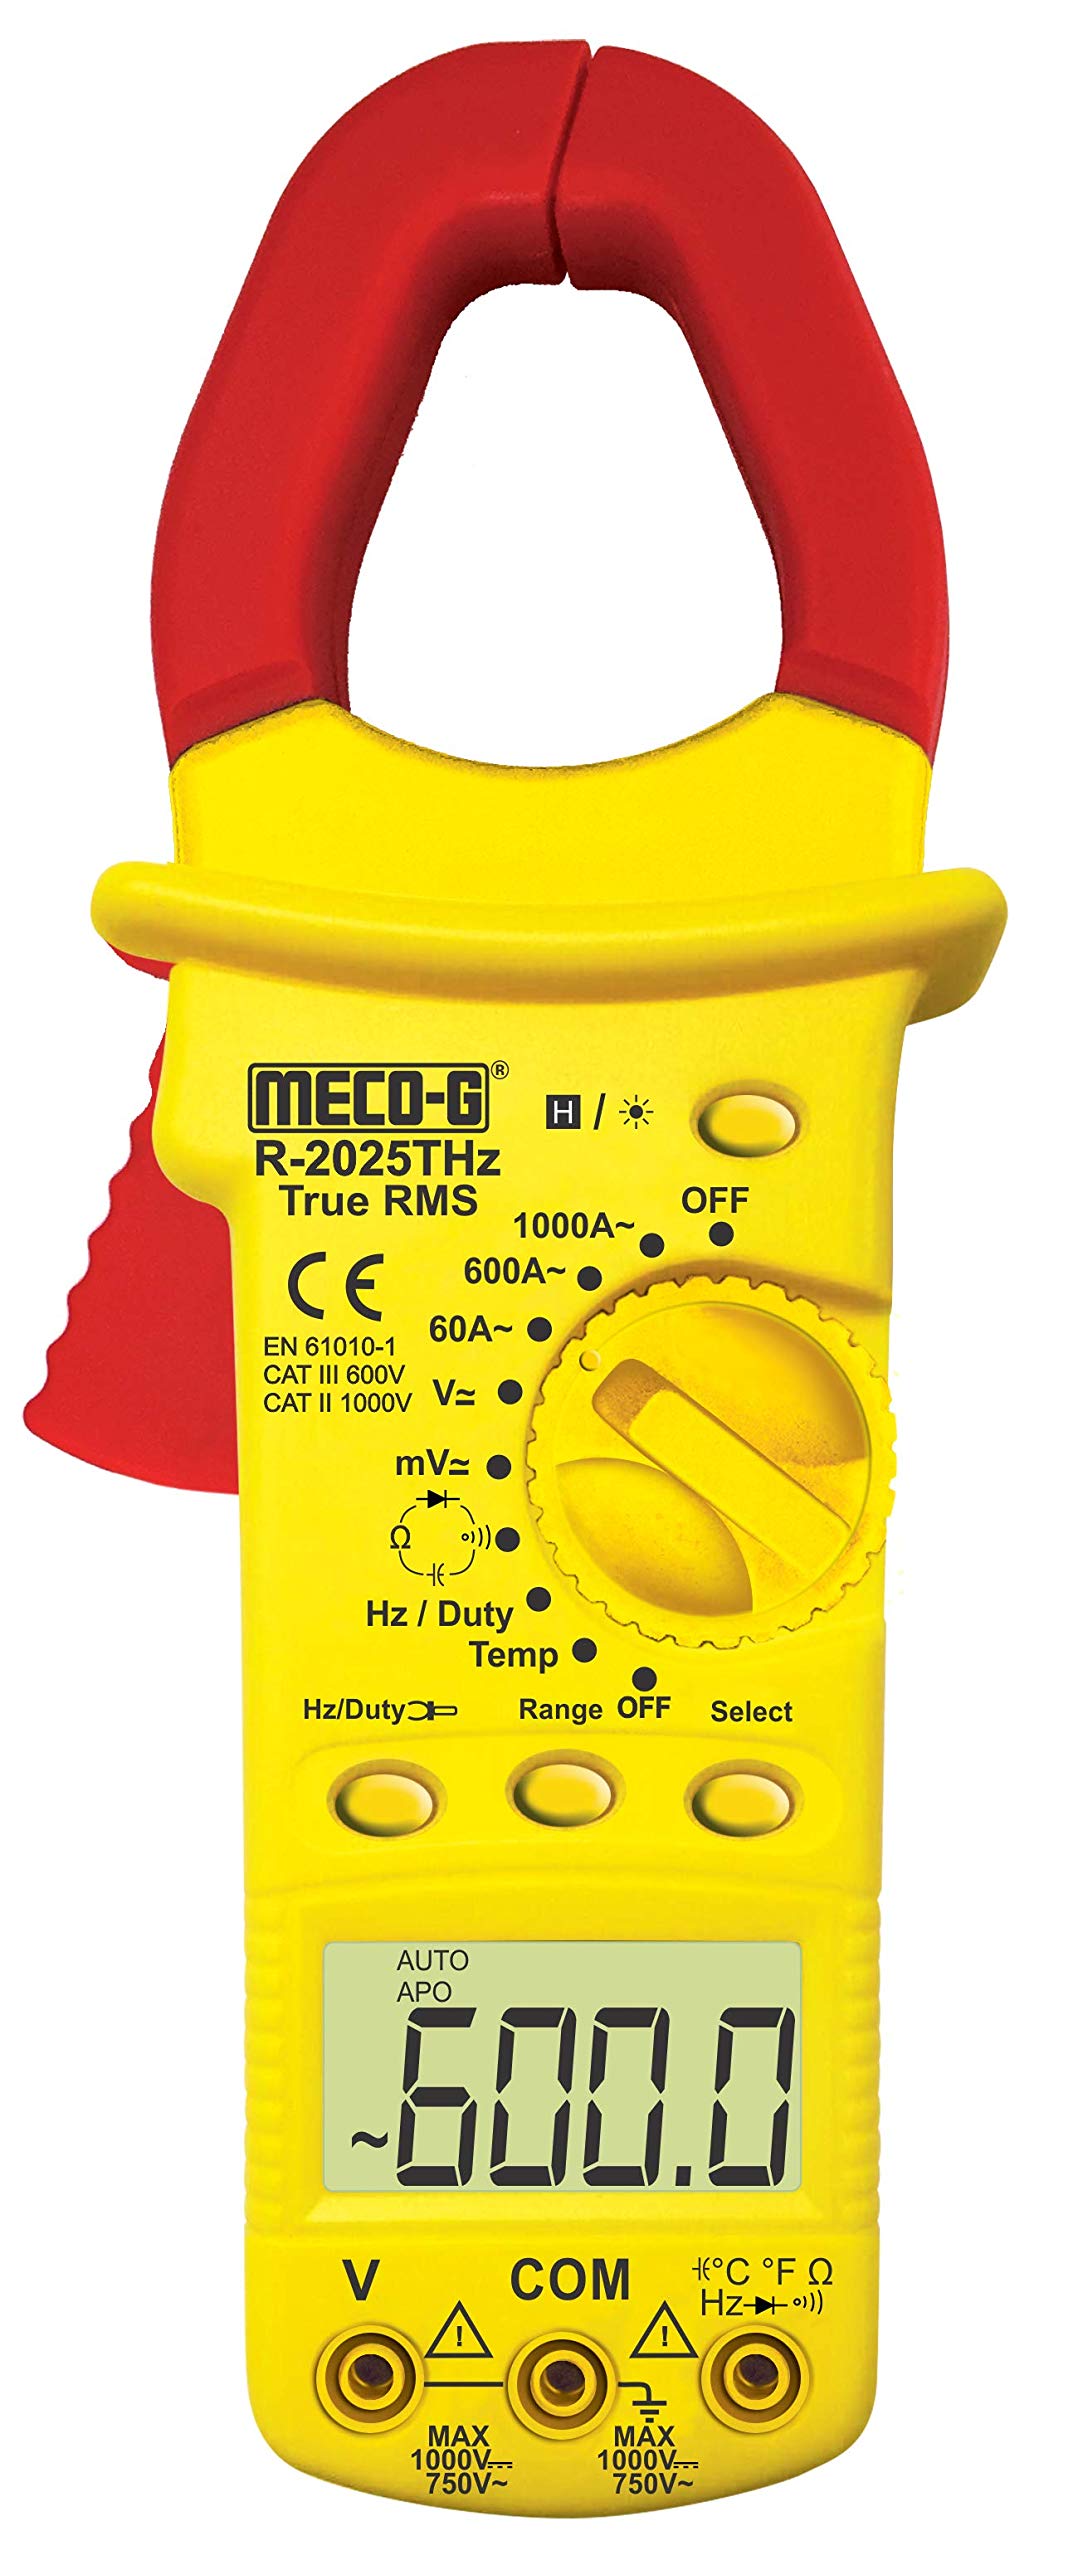
This image displays the main components of the clamp meter, including the current clamp, function selector dial, LCD display, and input jacks for test leads.
4. Einrichtung
Vor der Verwendung des clamp meter, perform the following setup steps:
4.1. Einlegen der Batterie
- Stellen Sie sicher, dass der Zähler ausgeschaltet ist.
- Suchen Sie den Batteriefachdeckel auf der Rückseite des Messgeräts.
- Die Befestigungsschraube(n) lösen und die Abdeckung abnehmen.
- Insert the required batteries (not included) according to the polarity indicators inside the compartment.
- Bringen Sie die Batterieabdeckung wieder an und befestigen Sie sie mit der/den Schraube(n).
4.2. Messleitungen anschließen
Für voltage, resistance, frequency, and temperature measurements, connect the test leads as follows:
- Insert the red test lead into the 'V' or 'Hz/°C°F Ω' input terminal.
- Insert the black test lead into the 'COM' (common) input terminal.
5. Bedienungsanleitung
Follow these steps for various measurement functions:
5.1. Ein-/Ausschalten
Rotate the function dial from the 'OFF' position to the desired measurement function to turn the meter ON. Rotate back to 'OFF' to power down. The meter features an Auto Power-Off function after 15 minutes of inactivity.
5.2. AC Current Measurement (1000A, 600A, 60A)
- Rotate the function dial to the '1000A~', '600A~', or '60A~' position.
- Drücken Sie den Auslöser, um die Cl zu öffnenamp Kiefer.
- Umschließen Sie nur einen Leiter des Stromkreises mit dem Klemmenkabel.amp Kiefer. Stellen Sie sicher, dass der Kiefer vollständig geschlossen ist.
- Lesen Sie den Wechselstromwert auf dem LCD-Display ab.
5.3. Volumentage Messung (V, mV)
- Schließen Sie die Messleitungen wie in Abschnitt 4.2 beschrieben an.
- Rotate the function dial to the 'V' or 'mV' position.
- Berühren Sie mit den Testspitzen die gewünschten Testpunkte im Schaltkreis.
- Lesen Sie den Bandtage value on the LCD display. Use the 'Select' button to switch between AC and DC voltage ggf.
5.4. Widerstandsmessung (Ω)
- Schließen Sie die Messleitungen wie in Abschnitt 4.2 beschrieben an.
- Drehen Sie den Funktionswähler auf die Position 'Ω'.
- Stellen Sie sicher, dass der zu prüfende Stromkreis oder das zu prüfende Bauteil spannungsfrei ist.
- Um den Widerstand zu messen, berühren Sie mit den Messspitzen das Bauteil oder den Stromkreis.
- Lesen Sie den Widerstandswert auf dem LCD-Display ab.
5.5. Frequency / Duty Cycle Measurement (Hz/Duty)
- Schließen Sie die Messleitungen wie in Abschnitt 4.2 beschrieben an.
- Rotate the function dial to the 'Hz/Duty' position.
- Touch the test probes to the desired test points.
- Press the 'Hz/Duty' button to toggle between frequency and duty cycle measurements.
- Lesen Sie den Wert auf dem LCD-Display ab.
5.6. Temperature Measurement (Temp)
- Connect the K-Type Thermocouple leads (included) to the 'V' and 'COM' input terminals, observing polarity.
- Rotate the function dial to the 'Temp' position.
- Platzieren Sie die Thermoelementsonde an der Stelle, an der die Temperatur gemessen werden soll.
- Read the temperature value on the LCD display. Use the 'Select' button to switch between Celsius (°C) and Fahrenheit (°F).
5.7. Datenhaltefunktion
Press the 'Hold' button (if available, or 'Select' button may serve this function) to freeze the current reading on the display. Press it again to release the hold function.
5.8. Hintergrundbeleuchtungsfunktion
Press the 'Back Light' button (if available, or 'Select' button may serve this function) to illuminate the LCD display for better visibility in dark environments. Press it again to turn off the backlight.
6. Wartung
Durch sachgemäße Wartung werden die Langlebigkeit und Genauigkeit Ihres Geräts gewährleistet.amp Meter:
- Reinigung: Wischen Sie den Zähler ab.asing mit Adamp Tuch. Keine Scheuer- oder Lösungsmittel verwenden.
- Batteriewechsel: When the low battery indicator appears on the display, replace the batteries promptly to ensure accurate readings. Refer to Section 4.1 for battery installation.
- Lagerung: If the meter is not used for an extended period, remove the batteries to prevent leakage. Store the meter in a dry environment, within the specified storage temperature range of -10°C to 50°C (14°F to 122°F).
7. Fehlerbehebung
Sollten Sie Probleme mit Ihrem CL habenamp Zähler, siehe die folgenden häufigen Probleme und Lösungen:
- Kein Bildschirm: Check if the meter is turned ON. Verify battery installation and ensure batteries are not depleted. Replace batteries if necessary.
- Falsche Messwerte: Ensure test leads are correctly connected. Verify that the correct measurement function and range are selected. Check for any damage to the test leads or meter.
- Meter Turns Off Automatically: This is a normal function (Auto Power-Off) designed to conserve battery life. The meter will turn off after 15 minutes of inactivity. Rotate the function dial to turn it back on.
8. Spezifikationen
| Besonderheit | Spezifikation |
|---|---|
| Anzeige | 3 Digits, 6000 Counts Trms |
| Automatisches Ausschalten | 15 Minuten Leerlauf |
| Betriebstemperatur und Luftfeuchtigkeit | 0°C ~ 40°C (32°F ~ 104°F) & ≤ 80% RH |
| Lagertemperatur und Luftfeuchtigkeit | -10 ° C ~ 50 ° C (14 ° F ~ 122 ° F) |
| Sicherheitsbestimmungen | GB4793-1, IEC 61010-1, CAT II 600V, CAT III 1000V |
| Anzeige für niedrigen Batteriestand | Batteriesymbol wird angezeigt |
| Kieferöffnung | 45 mm |
| Abmessungen (L x B x H) | 140 x 70 x 35mm (Approx.) |
| Gewicht | 180gms. Approx (With Battery) |
| Material | Metall |
| Stromquelle | Batteriebetrieben (Batterien nicht im Lieferumfang enthalten) |
| Modellnummer | R-2025THz |
9. Garantie und Support
Informationen zur Garantie und zum technischen Support finden Sie in der Ihnen beim Kauf ausgehändigten Dokumentation oder wenden Sie sich an Ihren Händler. Bewahren Sie Ihren Kaufbeleg als Kaufnachweis auf.