
1. Einleitung
This manual provides detailed instructions for the installation, operation, and maintenance of your ASRock B365 PRO4 ATX Motherboard. Please read this manual thoroughly before proceeding with installation to ensure correct setup and to prevent damage to the components.
The ASRock B365 PRO4 motherboard supports 9th and 8th Generation Intel Core Processors, offering a robust platform for personal computing. It features a Digi Power Design with an 8 Power Phase Design, ensuring stable power delivery to the CPU.
2. Sicherheitshinweise
- Vor dem Ein- oder Ausbau von Bauteilen muss immer die Stromversorgung getrennt werden.
- Tragen Sie ein antistatisches Armband, um Schäden an empfindlichen Bauteilen durch elektrostatische Entladung (ESD) zu verhindern.
- Fassen Sie das Motherboard an den Kanten an, um eine Berührung empfindlicher Bauteile zu vermeiden.
- Sorgen Sie für ausreichende Belüftung im PC-Gehäuse, um eine Überhitzung zu vermeiden.
- Das Motherboard sollte vor Feuchtigkeit und extremen Temperaturen geschützt werden.
3. Einrichtung und Installation
3.1 Packungsinhalt
Überprüfen Sie, ob alle Artikel im Paket vorhanden sind:
- ASRock B365 PRO4 Motherboard
- Kurzanleitung zur Installation
- Support-CD
- E / A-Schild
- 2 x SATA-Datenkabel
- 3 x Schrauben für M.2-Gewindebuchsen
- 1 x Standoff for M.2 Socket

Image: ASRock B365 PRO4 Motherboard and its included accessories, including the quick installation guide, support CD, I/O shield, SATA cables, and M.2 screws/standoff.
3.2 Motherboard-Layout
Machen Sie sich mit den wichtigsten Komponenten und Anschlüssen auf dem Motherboard vertraut.

Bild: Draufsicht view of the ASRock B365 PRO4 Motherboard, highlighting the CPU socket, RAM slots, PCIe slots, and M.2 slots.

Bild: Abgewinkelt view of the ASRock B365 PRO4 Motherboard, showing the heatsinks and various connectors.
3.3 CPU-Installation (LGA1151)
- Öffnen Sie den Hebel des CPU-Sockels und heben Sie die Ladeplatte an.
- Richten Sie die CPU sorgfältig am Sockel aus und achten Sie darauf, dass das goldene Dreieck auf der CPU mit dem Dreieck auf dem Sockel übereinstimmt.
- Setzen Sie die CPU vorsichtig in den Sockel ein, ohne sie mit Gewalt einzusetzen.
- Die Ladeplatte schließen und mit dem Hebel sichern.
3.4 Installation des Arbeitsspeichers (RAM)
The motherboard features 4 DDR4 DIMM slots, supporting dual-channel memory up to 64GB.
- Öffnen Sie die Klemmen an beiden Enden des DIMM-Steckplatzes.
- Richten Sie die Kerbe am RAM-Modul an der Nut im DIMM-Steckplatz aus.
- Insert the RAM module firmly until the clips snap into place.
3.5 Installation des Speichergeräts
The motherboard supports 6 SATA3 ports and 2 Ultra M.2 ports.
- SATA-Laufwerke: Connect SATA data cables to the SATA ports on the motherboard and to your storage devices (HDDs/SSDs). Connect power cables from your power supply to the devices.
- M.2 SSDs: Locate the M.2 slots. Insert the M.2 SSD into the slot at an angle, then gently push it down and secure it with the provided screw and standoff.
3.6 Installation der Erweiterungskarte (PCIe)
The motherboard has 2 PCI-Express 3.0 x16 slots and 2 PCI-Express 3.0 x1 slots.
- Select an appropriate PCIe slot for your expansion card (e.g., graphics card).
- Entfernen Sie die entsprechende Metallhalterung von Ihrem PC-Gehäuse.
- Align the card with the slot and press firmly until it is seated correctly.
- Befestigen Sie die Karte mit einer Schraube am PC-Gehäuse.
3.7 Connecting Peripherals to the I/O Panel
Das rückseitige I/O-Panel bietet verschiedene Anschlüsse zum Verbinden externer Geräte.
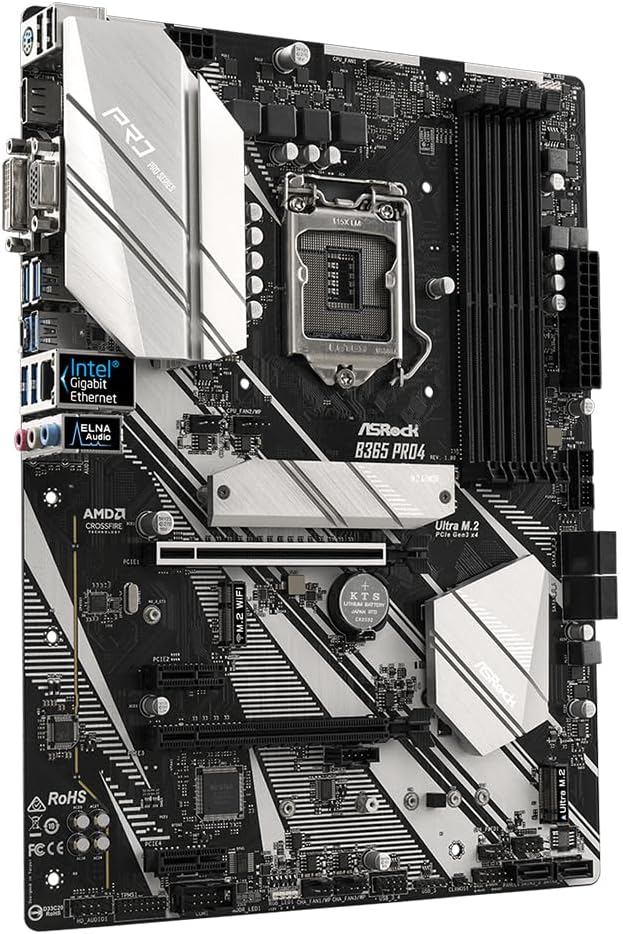
Bild: Nahaufnahme view of the ASRock B365 PRO4 Motherboard's rear I/O panel, showing ports for PS/2, USB 2.0, USB 3.1 Gen 1, VGA, DVI-D, HDMI, LAN, and audio jacks.
- USB-Anschlüsse: Connect USB devices (keyboard, mouse, external drives) to the available USB 2.0 (5 ports) and USB 3.1 Gen 1 (8 ports, including 1 Type-C rear) ports.
- Videoausgänge: Connect your monitor to the VGA, DVI-D, or HDMI port.
- LAN-Anschluss: Schließen Sie ein Ethernet-Kabel für den Netzwerkzugriff an.
- Audiobuchsen: Schließen Sie Lautsprecher, Kopfhörer oder Mikrofone an die Audiobuchsen an.
- PS/2-Anschluss: Connect a PS/2 keyboard or mouse.
4. Bedienungsanleitung
4.1 Erster Start und BIOS-Einrichtung
- After assembling all components, connect the power supply and monitor.
- Power on your system. Press Del or F2 during startup to enter the BIOS/UEFI setup utility.
- Konfigurieren Sie die Startreihenfolge, die Systemzeit und weitere erforderliche Einstellungen. Speichern Sie die Änderungen und beenden Sie das Programm.
- Installieren Sie Ihr Betriebssystem von einem bootfähigen USB-Laufwerk oder optischen Medium.
4.2 Treiberinstallation
After installing the operating system, install the necessary drivers from the provided Support CD or download the latest versions from the ASRock webWebsite. Zu den wichtigsten Einflussfaktoren gehören:
- Chipsatztreiber
- Audiotreiber (Realtek ALC892)
- LAN Drivers (Intel I219V Gigabit Ethernet)
- Grafiktreiber (für integrierte Grafik oder dedizierte GPU)
5. Wartung
- Staubentfernung: Regularly clean dust from the motherboard and case fans using compressed air. Ensure the system is powered off and unplugged before cleaning.
- BIOS-Updates: Check the ASRock website periodically for BIOS updates. Updates can improve system stability and compatibility. Follow the instructions carefully when updating the BIOS.
- Kabelmanagement: Sorgen Sie für eine ordentliche Kabelführung, um die Luftzirkulation zu verbessern und Störungen zu vermeiden.
6. Fehlerbehebung
- Kein Strom:
- Check all power connections, including the 24-pin ATX and 8-pin 12V CPU power connectors.
- Stellen Sie sicher, dass sich der Netzschalter in der Position EIN befindet.
- Kein Bildschirm:
- Verify that the monitor is connected to the correct video output (either integrated graphics or discrete GPU).
- Setzen Sie die Grafikkarte und die RAM-Module neu ein.
- Systeminstabilität/Abstürze:
- Prüfen Sie, ob die RAM-Module korrekt eingesetzt sind.
- Stellen Sie sicher, dass der CPU-Kühler ordnungsgemäß installiert ist und einen guten Kontakt herstellt.
- Aktualisieren Sie Treiber und BIOS auf die neuesten Versionen.
- M.2 SSD nicht erkannt:
- Ensure the M.2 SSD is correctly seated and secured.
- Check BIOS settings to ensure M.2 slots are enabled and configured correctly (SATA vs. PCIe mode).
7. Spezifikationen
| Besonderheit | Detail |
|---|---|
| CPU-Sockel | LGA 1151 |
| Kompatible Prozessoren | 9th/8th Generation Intel Core Processors (up to 95W) |
| Chipsatz | Intel B365 |
| Erinnerung | 4 x DDR4 DIMM slots, Dual Channel, Non-ECC, Buffered, Max 64GB (2666/2400/2133 MHz) |
| Erweiterungssteckplätze | 2 x PCIe 3.0 x16, 2 x PCIe 3.0 x1 |
| Unterstützung für mehrere Grafiken | AMD Quad CrossFireX and CrossFire Technology |
| Lagerung | 6 x SATA3 ports (RAID 0, 1, 5, 10), 2 x Ultra M.2 ports (PCIe Gen3 x4 & SATA3) |
| Audio | Realtek ALC892 7.1-Kanal HD Audio |
| LAN | Intel I219V Gigabit Ethernet |
| USB-Anschlüsse | 8 x USB 3.1 Gen1 (1 Type-C rear, 5 rear, 2 via header), 5 x USB 2.0 (2 rear, 3 via header) |
| Videoausgänge | 1 x VGA, 1 x DVI-D, 1 x HDMI |
| Formfaktor | ATX (12.0 x 9.0 inch / 30.5 x 22.9 cm) |
8. Garantie und Support
8.1 Garantieinformationen
The ASRock B365 PRO4 Motherboard comes with a 1 Jahr eingeschränkte Garantie. This warranty covers defects in materials and workmanship under normal use. For specific terms and conditions, please refer to the warranty card included with your product or visit the official ASRock webWebsite.
Note: Damage caused by improper installation, misuse, unauthorized modifications, or natural disasters is not covered under warranty.
8.2 Technischer Support
For technical assistance, driver downloads, BIOS updates, or further troubleshooting, please visit the official ASRock support webWebsite:
You may also contact ASRock customer service directly through their webWebsite für personalisierte Unterstützung.