
1. Einleitung
This manual provides detailed instructions for the safe and effective operation of the BSIDE ADMS7 Digital Multimeter. The ADMS7 is a high-precision, automatic induction smart multimeter designed for measuring DC/AC voltage, resistance, frequency, and other electrical parameters. It features an intelligent identification function and True RMS measurement capabilities, making it suitable for various electrical testing applications.
2. Sicherheitshinweise
WARNUNG: Um Stromschläge oder Verletzungen zu vermeiden, lesen und verstehen Sie alle Sicherheitshinweise, bevor Sie dieses Produkt verwenden.
- Vergewissern Sie sich stets, dass sich das Multimeter im richtigen Messmodus befindet, bevor Sie die Messleitungen an einen Stromkreis anschließen.
- Nicht anwenden voltage or current that exceeds the maximum specified limits for the multimeter. Maximum voltage allowed at the measuring end: 600V DC, 600V AC.
- Bei Arbeiten an stromführenden Leitungen ist äußerste Vorsicht geboten. Vermeiden Sie den Kontakt mit blanken Drähten oder Klemmen.
- Prüfen Sie die Messleitungen vor jedem Gebrauch auf Beschädigungen. Nicht verwenden, wenn die Isolierung beschädigt ist.
- Tauschen Sie die Batterien sofort aus, sobald die Anzeige für niedrigen Batteriestand erscheint, um genaue Messwerte zu gewährleisten.
- Das Multimeter darf nicht bedient werden, wenn es beschädigt erscheint oder nicht ordnungsgemäß funktioniert.
- This device is designed for use at working heights up to 2000m.
3. Produktüberschreitungview
The BSIDE ADMS7 Digital Multimeter is a compact and intelligent testing device. Familiarize yourself with its components:

Figure 3.1: BSIDE ADMS7 Multimeter, including the main unit, red and black test leads, a wrist strap, and the product packaging.
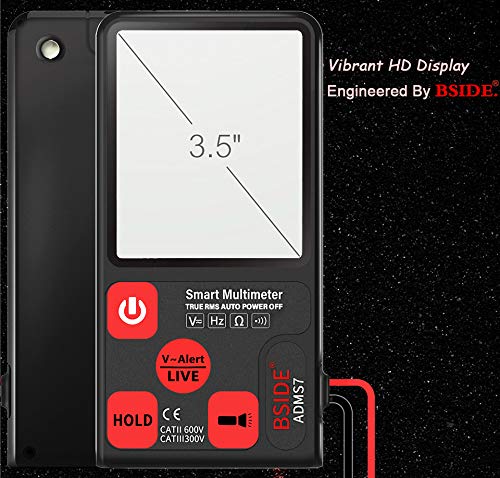
Abbildung 3.2: Vorderseite view of the ADMS7 Multimeter, highlighting its 3.5-inch vibrant HD display and button layout.
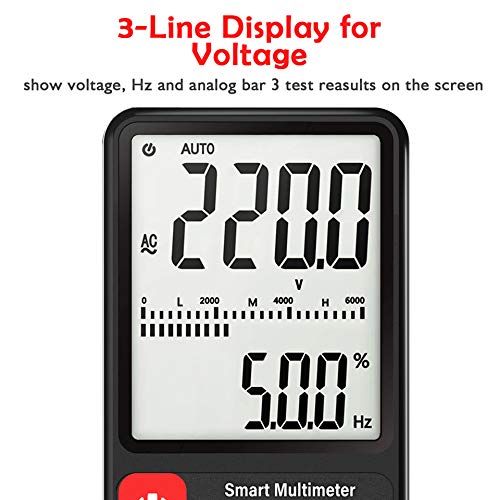
Abbildung 3.3: Ausführlich view of the multimeter's LCD, illustrating the 3-line display for voltage, frequency (Hz), and analog bar graph results.
Schlüsselkomponenten:
- LCD Anzeige: Large screen for clear readings, including main value, secondary value, and analog bar graph. Maximum display value: 6000 digits.
- Netzschalter: Zum Ein- und Ausschalten des Geräts.
- V-Alert/LIVE Button: Aktiviert berührungsloses Volumentage detection and live wire detection.
- Halte den Knopf: Friert den aktuellen Messwert auf dem Display ein.
- Eingangsbuchsen: For connecting test leads (COM and VΩHz).
- Messleitungen: Red (positive) and Black (common) leads for measurements.
4. Einrichtung
4.1 Einlegen der Batterie
- Stellen Sie sicher, dass das Multimeter ausgeschaltet ist.
- Suchen Sie die Abdeckung des Batteriefachs auf der Rückseite des Geräts.
- Verwenden Sie einen Schraubendreher, um das Batteriefach zu öffnen.
- Insert two AAA 1.5V batteries, observing the correct polarity (+/-). Batteries are not included.
- Bringen Sie die Batteriefachabdeckung wieder an und sichern Sie sie mit der Schraube.
4.2 Anschließen der Testleitungen
- Stecken Sie die schwarze Messleitung in die "COM" (Common) Eingangsbuchse.
- Stecken Sie die rote Messleitung in die Eingangsbuchse „VΩHz“ für die Lautstärke.tage, Widerstands- und Frequenzmessungen.
5. Bedienungsanleitung
5.1 Ein-/Ausschalten
Drücken Sie die Netzschalter (red circle with line) to turn the multimeter on. The device will automatically enter intelligent identification mode. To turn off, press and hold the Power Button. The device also features an automatic shutdown time of 15 minutes to conserve battery life.
5.2 Automatischer Identifikationsmodus
Upon power-on, the ADMS7 automatically detects the type of measurement (AC/DC voltage, resistance, continuity) and selects the appropriate range. This simplifies operation by eliminating manual range selection.
5.3 Vol. messentage (Wechselstrom/Gleichstrom)
- Ensure the multimeter is powered on and in automatic identification mode.
- Connect the black test lead to the common point of the circuit and the red test lead to the point where voltage soll gemessen werden.
- Das Display zeigt die Lautstärke antage reading (DC or AC) and frequency (Hz) if applicable.
5.4 V-Alarm (kontaktloser Vol)tage Detection) and LIVE Function
The V-Alert function allows for non-contact detection of AC voltage, indicating the presence of live electrical fields without direct contact. The LIVE function helps identify live wires.

Figure 5.1: The V-Alert function in use, showing the multimeter detecting voltage near various electrical outlets. The display indicates the presence of voltage, and an audible alarm sounds.
- Drücken Sie die V-Alert/LIVE Button. The display will show "V-Alert" or "LIVE".
- For V-Alert, bring the top of the multimeter near the conductor or outlet. The device will beep and the bar graph on the LCD will indicate the strength of the detected voltage-Feld.
- For LIVE, insert the red test lead into the suspected live wire and the black test lead into the neutral or ground. The display will indicate "LIVE" and provide a voltage reading if a live wire is detected.
5.5 HOLD-Funktion
Drücken Sie die Halte den Knopf to freeze the current reading on the display. This is useful for recording measurements in difficult-to-read situations. Press the button again to release the hold function.
6. Wartung
6.1 Reinigung
Wischen Sie das Multimeter ab.asing mit Adamp Mit einem Tuch und mildem Reinigungsmittel reinigen. Keine Scheuermittel oder Lösungsmittel verwenden. Das Gerät vor Gebrauch vollständig trocknen.
6.2 Batteriewechsel
Wenn die Batterie unter Voltage indication (battery icon) appears on the LCD, replace the batteries as described in Section 4.1. Prompt battery replacement ensures continued accuracy and proper operation.
7. Fehlerbehebung
- Kein Bildschirm: Überprüfen Sie den Einbau der Batterien und stellen Sie sicher, dass die Batterien nicht entladen sind.
- Ungenaue Messwerte: Ensure test leads are properly connected. Check battery level. Verify the multimeter is in the correct mode (though automatic, ensure it's not stuck in a specific function).
- „OL“ oder Überlastungsanzeige: The measured value exceeds the multimeter's range. Disconnect immediately to prevent damage.
- No V-Alert Detection: Ensure the V-Alert function is activated. The multimeter needs to be close enough to the AC voltagDie Quelle.
8. Spezifikationen
| Parameter | Wert |
|---|---|
| Maximaler Anzeigewert | 6000 Ziffern |
| Polaritätsanzeige | Automatic indication |
| Geräteanzeige | Function, power unit display |
| Automatische Abschaltzeit | 15 Мinuten |
| Funktionierendes Netzteil | 2 x AAA 1.5V battery (not included) |
| Akku-Untervolumentage Anzeige | LCD Anzeige |
| Temperaturkoeffizient | Less than 0.1 x accuracy / °C |
| Arbeitstemperatur | 0 - 40 °C |
| Lagertemperatur und Luftfeuchtigkeit | 10 - 60 °C |
| Maximale Lautstärketage Allowed | 600 VDC, 600 VAC |
| Arbeitshöhe | Bis zu 2000 m |
| Überlastschutz | Volles Sortiment |
| Gefährliche Voltage-Alarm | Two grades |
9. Garantie und Support
Informationen zu Garantie und technischem Support finden Sie in der mitgelieferten Dokumentation oder wenden Sie sich direkt an den Hersteller. Bewahren Sie Ihren Kaufbeleg als Kaufnachweis auf.