
1. Einleitung
This manual provides comprehensive instructions for the setup, operation, and maintenance of your Drawmer CMC2 Compact Monitor Controller. Please read this manual thoroughly before using the device to ensure proper functionality and to maximize its performance.
2. Sicherheitshinweise
- Stromversorgung: Use only the factory-supplied 15V DC power supply. Using an incorrect power supply may damage the unit and void the warranty.
- Belüftung: Sorgen Sie für ausreichende Belüftung rund um das Gerät. Blockieren Sie keine Belüftungsöffnungen.
- Feuchtigkeit: Das Gerät darf weder Regen, Feuchtigkeit noch übermäßiger Luftfeuchtigkeit ausgesetzt werden.
- Reinigung: Vor der Reinigung die Stromzufuhr unterbrechen. Ein trockenes, weiches Tuch verwenden. Keine flüssigen Reiniger oder Sprays verwenden.
- Wartung: Überlassen Sie alle Wartungsarbeiten qualifiziertem Fachpersonal. Versuchen Sie nicht, das Gerät selbst zu öffnen oder zu reparieren.
3. Packungsinhalt
Überprüfen Sie, ob Ihr Paket die folgenden Artikel enthält:
- Drawmer CMC2 Compact Monitor Controller
- 15V DC Power Supply Unit
- Benutzerhandbuch (dieses Dokument)
4. Produktüberschreitungview
4.1 Bedienelemente auf der Vorderseite
The front panel provides all primary controls for audio monitoring and source selection.

Abbildung 4.1: Vorderseite view of the Drawmer CMC2 Compact Monitor Controller, showing all knobs and buttons for input selection, speaker selection, master volume, headphone control, and mix check functions.
- AUX INPUT Knob: Adjusts the level of the auxiliary input.
- SOURCE SELECT Buttons (I/P1, I/P2, AUX): Selects the active audio input source.
- SPEAKER SELECT Buttons (A, B, SUB): Activates the selected speaker outputs.
- MASTER-LAUTSTÄRKE-Regler: Controls the overall output level to the selected speakers.
- MUTE-Taste: Mutes all speaker outputs.
- HEADPHONE Knob: Regelt die Lautstärke für den Kopfhörerausgang.
- MIX CHECK Buttons (ØREV, MONO, DIM): Provides phase reverse, mono sum, and dim functions for mix analysis.
- AUX INPUT (3.5mm Jack): Front panel auxiliary input for portable devices.
- HEADPHONE Output (6.35mm Jack): Front panel headphone output.
4.2 Anschlüsse auf der Rückseite
The rear panel houses all audio input and output connectors, along with the power input.

Abbildung 4.2: Rückseite view of the Drawmer CMC2 Compact Monitor Controller, displaying the DC power input, speaker outputs (Mono/Sub, R-B-L, R-A-L), and inputs (R-2-L, R-1-L).
- DC=15V Input: Schließen Sie hier das mitgelieferte 15V-Gleichstromnetzteil an.
- Stromschalter: Toggles the unit's power on/off.
- SPEAKER OUTPUTS (MONO/SUB, R-B-L, R-A-L): Balanced XLR outputs for connecting up to two pairs of stereo monitors (A and B) and a mono subwoofer.
- INPUTS (R-2-L, R-1-L): Balanced XLR inputs for two stereo audio sources.
5. Einrichtung
Follow these steps to set up your CMC2 controller:
- Stromanschluss: Connect the supplied 15V DC power adapter to the 'DC=15V' input on the rear panel. Plug the adapter into a suitable power outlet. Do not power on the unit yet.
- Eingangsanschlüsse:
- Connect your primary audio source (e.g., audio interface, mixer) to the 'INPUTS R-1-L' using balanced XLR cables.
- Connect a secondary audio source to the 'INPUTS R-2-L' using balanced XLR cables.
- For portable devices, connect to the front panel 'AUX INPUT' (3.5mm jack) or the rear panel RCA auxiliary inputs (if available on your model, refer to specific product documentation).
- Lautsprecheranschlüsse:
- Connect your main studio monitors to the 'SPEAKER OUTPUTS R-A-L' using balanced XLR cables.
- If using a second pair of monitors, connect them to 'SPEAKER OUTPUTS R-B-L'.
- If using a subwoofer, connect it to the 'SPEAKER OUTPUTS MONO/SUB'.
- Kopfhöreranschluss: If desired, connect your headphones to the front panel 'HEADPHONE' 6.35mm jack.
- Einschalten: Once all connections are secure, press the power switch on the rear panel to turn on the CMC2.
6. Bedienungsanleitung
This section details the functions of the CMC2's controls.
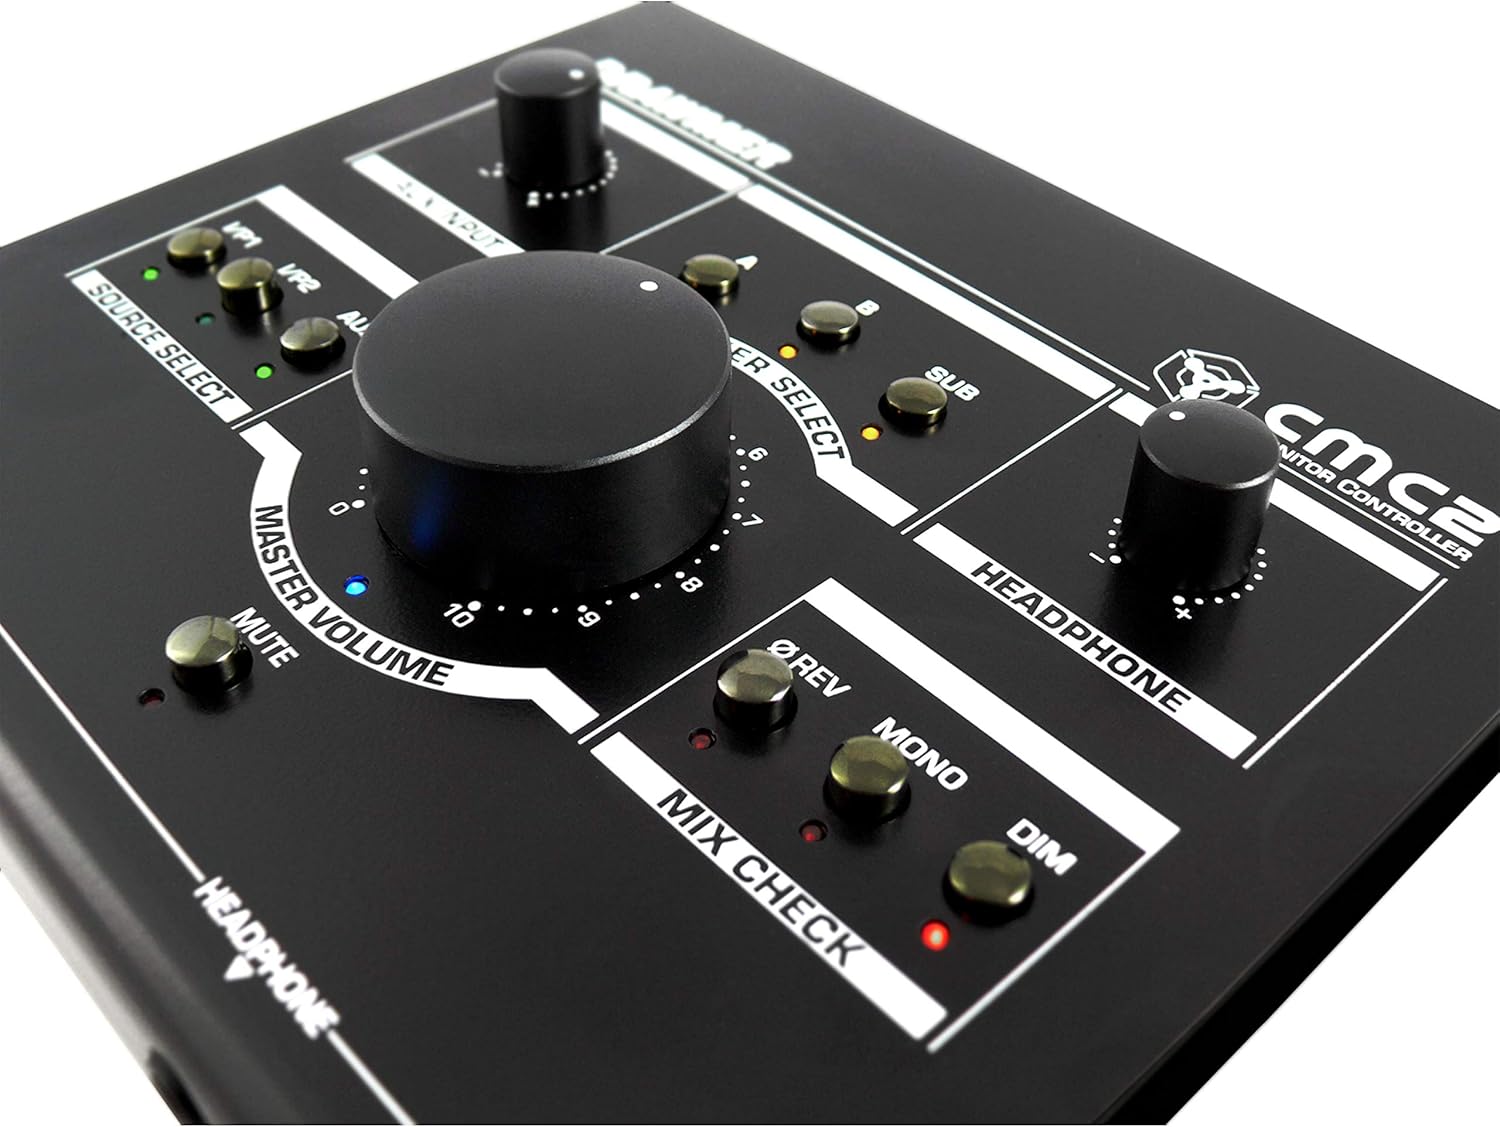
Abbildung 6.1: Nahaufnahme view of the Drawmer CMC2 front panel, highlighting the master volume, source select, speaker select, headphone, and mix check controls.
6.1 Quellenauswahl
- Drücken Sie die Ich/P1 button to select the audio source connected to Input 1.
- Drücken Sie die Ich/P2 button to select the audio source connected to Input 2.
- Drücken Sie die AUX button to select the auxiliary input (front panel 3.5mm jack).
- Only one source can be active at a time. The LED next to the selected button will illuminate.
6.2 Sprecherauswahl
- Drücken Sie die A button to route the selected source to Speaker Output A.
- Drücken Sie die B button to route the selected source to Speaker Output B.
- Drücken Sie die Untertitel button to route the selected source to the Subwoofer Output.
- Multiple speaker outputs can be active simultaneously (e.g., A and SUB). The LEDs indicate active outputs.
6.3 Lautstärkeregelung
- Drehen Sie das große MASTERLAUTSTÄRKE knob clockwise to increase the output level to the selected speakers, and counter-clockwise to decrease it.
- Drehen Sie den KOPFHÖRER knob to adjust the listening level for connected headphones.
- Drehen Sie den AUX-EINGANG knob to adjust the input level of the auxiliary source.
6.4 Mix Check Functions
- Drücken Sie die ØREV button to reverse the phase of the right channel, useful for checking phase compatibility.
- Drücken Sie die MONO button to sum the stereo signal to mono, allowing you to check for mono compatibility issues in your mix.
- Drücken Sie die DIM button to temporarily reduce the output volume by a fixed amount, useful for quick listening level changes without losing your main volume setting.
6.5 Mute-Funktion
- Drücken Sie die MUTE button to instantly silence all active speaker outputs. The LED will illuminate when mute is active. Press again to unmute.
7. Wartung
The Drawmer CMC2 is designed for reliable operation with minimal maintenance.
- Reinigung: Keep the unit clean by wiping it with a dry, soft, lint-free cloth. Avoid abrasive cleaners or solvents.
- Umfeld: Operate the unit in a clean, dry environment, away from direct sunlight, heat sources, and excessive dust.
- Belüftung: Um eine Überhitzung zu vermeiden, ist darauf zu achten, dass die Lüftungsschlitze nicht verstopft sind.
8. Fehlerbehebung
If you encounter issues with your CMC2, refer to the following common problems and solutions:
- Kein Strom:
- Ensure the 15V DC power adapter is securely connected to the unit and a working power outlet.
- Check that the rear panel power switch is in the 'ON' position.
- Keine Audioausgabe:
- Verify that the correct input source (I/P1, I/P2, or AUX) is selected and its LED is illuminated.
- Ensure that at least one speaker output (A, B, or SUB) is selected and its LED is illuminated.
- Check that the MASTER VOLUME knob is turned up and the MUTE button is not active (LED off).
- Confirm all audio cables are securely connected to both the CMC2 and your speakers/audio sources.
- Testen Sie mit verschiedenen Kabeln oder Audioquellen, um das Problem einzugrenzen.
- Verzerrter Ton:
- Verringern Sie den Eingangspegel Ihrer Audioquelle.
- Lower the MASTER VOLUME on the CMC2.
- Prüfen Sie, ob die Audiokabel beschädigt sind.
- Headphone Output Not Working:
- Ensure headphones are fully plugged into the front panel jack.
- Adjust the HEADPHONE volume knob.
- Test with a different pair of headphones.
If the problem persists, contact Drawmer customer support or your authorized dealer for assistance.
9. Spezifikationen
| Modellname | CMC2 |
| Marke | Zeichner |
| Empfohlene Verwendung | Audioüberwachung |
| Konnektivitätstechnologie | XLR, RCA (Auxiliary) |
| Audioausgabemodus | Stereo |
| Lautsprechertyp | Monitor |
| Technische Daten | 13 x 9 x 3 Zoll (33 x 22.86 x 7.62 cm) |
| Artikelgewicht | 3 Pfund (1.36 kg) |
| Hersteller | Zeichner |
10. Garantie und Support
The Drawmer CMC2 Compact Monitor Controller is covered by a manufacturer's warranty. Please refer to the warranty card included with your product or visit the official Drawmer webAuf der Webseite finden Sie die detaillierten Garantiebedingungen.
For technical support, service, or further inquiries, please contact your authorized Drawmer dealer or the Drawmer customer support team through their official channels.