
Einführung
This manual provides detailed instructions for the setup, operation, and maintenance of your Homtime C1 Mini Snooze Alarm Clock. Please read this manual thoroughly before using the product to ensure proper function and longevity.

Image: The Homtime C1 Mini Alarm Clock, light blue in color, is shown on a decorative tray next to a small potted plant. The digital display shows the time 20:08.
Produkt überview
The Homtime C1 Mini is a compact digital alarm clock designed for convenience and functionality. It features a clear LCD display, dual USB charging ports for mobile devices, and a snooze function. Its design is suitable for various environments including bedrooms, offices, and for travel.
Hauptmerkmale:
- Digitale Zeitanzeige
- Schlummerfunktion
- Zwei USB-Ladeanschlüsse
- Dimmable LCD Screen
- Kompaktes und tragbares Design
Packungsinhalt:
- Homtime C1 Mini Alarm Clock
- Netzteil
- Benutzerhandbuch (dieses Dokument)
Aufstellen
- Stromanschluss: Connect the provided power adapter to the DC input port on the back of the alarm clock. Plug the adapter into a standard wall outlet. The display will illuminate.
- Battery Installation (Optional for backup): Sicherung der Zeit- und Alarmeinstellungen bei Stromausfalltages, install 3 AAA batteries (not included) into the battery compartment located on the bottom of the unit. Ensure correct polarity.
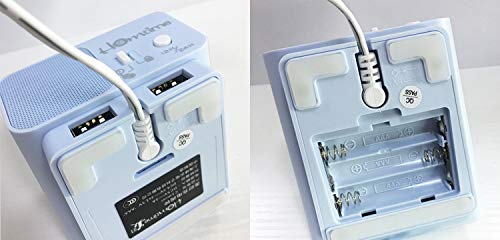
Image: A split image showing the bottom of the Homtime C1 Mini. The left side displays the rear with two USB charging ports and a power input. The right side shows the open battery compartment, designed for AAA batteries.
Bedienungsanleitung
1. Uhrzeit einstellen
- Halten Sie die "Time Set" Drücken Sie den Knopf (normalerweise oben oder hinten), bis die Stundenziffern zu blinken beginnen.
- Verwenden Sie die "+" or "-" buttons to adjust the hour. Pay attention to AM/PM indicators if present.
- Drücken Sie die "Time Set" Drücken Sie erneut die Taste, um die Stunde zu bestätigen und zur Minuteneinstellung zu wechseln.
- Verwenden Sie die "+" or "-" Tasten zum Einstellen der Minuten.
- Drücken Sie die "Time Set" Drücken Sie die Taste ein letztes Mal, um die Zeiteinstellung zu speichern.
2. Einstellen des Alarms
- Halten Sie die "Alarm Set" Drücken Sie die Taste, bis die Ziffern der Alarmstunde zu blinken beginnen.
- Verwenden Sie die "+" or "-" Tasten, um die Weckstunde einzustellen.
- Drücken Sie die "Alarm Set" button again to confirm the alarm hour and move to alarm minute adjustment.
- Verwenden Sie die "+" or "-" Tasten zum Einstellen der Alarmminuten.
- Drücken Sie die "Alarm Set" button one last time to save the alarm setting.
- Zum Aktivieren/Deaktivieren des Alarms drücken Sie die Taste "Alarm On/Off" button (or a dedicated alarm icon button). An alarm icon will appear on the display when active.
3. Schlummerfunktion
When the alarm sounds, press the large button on the top of the clock (often labeled "Schlummern" or simply the main control button). The alarm will pause for approximately 9 minutes and then sound again. To turn off the alarm completely, press any other button or let it sound for its full duration.
4. Helligkeit des Displays
The LCD screen has multiple brightness levels. Press the "Dimmer" button (or a dedicated light icon button) repeatedly to cycle through the available brightness settings (e.g., High, Medium, Low, Off).
5. USB-Ladeanschlüsse
The Homtime C1 Mini features dual USB charging ports on the back of the unit. These ports are designed to charge compatible mobile devices such as smartphones and tablets. Simply connect your device's USB charging cable to one of the ports. Charging will begin automatically.
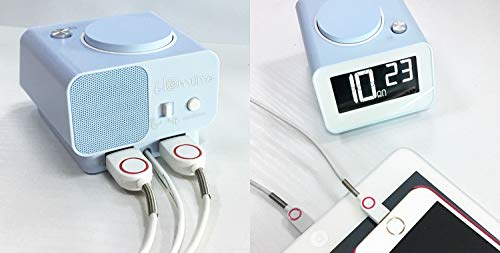
Abbildung: Die Rückseite view of the Homtime C1 Mini alarm clock, showing two white USB charging cables plugged into its dual USB ports. This illustrates the charging functionality.
Wartung
- Reinigung: Wischen Sie das Gerät mit einem weichen, trockenen Tuch ab. Verwenden Sie keine Scheuermittel oder Lösungsmittel, da diese die Oberfläche beschädigen können.
- Leistung: Ensure the power adapter is securely connected. Disconnect from power during extended periods of non-use.
- Umfeld: Avoid placing the clock in direct sunlight, near heat sources, or in excessively humid environments.
Fehlerbehebung
| Problem | Mögliche Ursache | Lösung |
|---|---|---|
| Die Uhranzeige ist leer. | Kein Strom oder Stromausfalltage. | Check power adapter connection. If using battery backup, ensure batteries are installed correctly and are not depleted. |
| Der Alarm ertönt nicht. | Alarm nicht aktiviert oder falsch eingestellt. | Ensure the alarm is turned ON (alarm icon visible). Verify the alarm time is set correctly. |
| USB-Ladefunktion funktioniert nicht. | Kabelproblem oder Geräteinkompatibilität. | Try a different USB cable. Ensure the device is compatible with USB charging. Check if the clock is powered on. |
| Das Display ist zu hell/zu dunkel. | Die Helligkeitseinstellung muss angepasst werden. | Press the "Dimmer" button to cycle through brightness levels. |
Technische Daten
- Marke: Heimzeit
- Modell: C1 Mini
- Anzeigetyp: Digital LCD
- Energiequelle: Electrical (AC Adapter)
- Batterie-Backup: 3 x AAA-Batterien (nicht im Lieferumfang enthalten)
- Besondere Merkmale: Alarm, Dual USB Charging Ports, Dimmable Screen
- Rahmenmaterial: Acrylnitril-Butadien-Styrol, Kunststoff
- Montageart: Tischplatte
- Ursprungsland: China
Garantie und Support
For warranty information and customer support, please refer to the warranty card included with your product or visit the official Homtime webWebsite. Bewahren Sie Ihren Kaufbeleg für Garantieansprüche auf.
For further assistance, you may contact Homtime customer service through their official channels. Please have your model number (C1 Mini) and purchase details ready.