
Homtime C1
Homtime C1 Digital Alarm Clock User Manual
Modell: C1
1. Einleitung
Vielen Dank für Ihren Einkauf.asing the Homtime C1 Digital Alarm Clock. This device combines a digital alarm clock with dual USB charging ports, offering convenience and functionality for your bedside or office. Its user-friendly design, featuring a rotary button and dimmable LCD screen, ensures ease of use for all ages. Please read this manual thoroughly before operation to ensure proper use and maintenance.

Image: The Homtime C1 Digital Alarm Clock, turquoise in color, displayed on a wooden surface with a succulent plant in the background. The clock shows the time 20:08 and an alarm set for 15:00.
2. Sicherheitshinweise
Um einen sicheren Betrieb zu gewährleisten und Schäden zu vermeiden, beachten Sie bitte folgende Vorsichtsmaßnahmen:
- Das Gerät darf weder Wasser noch übermäßiger Feuchtigkeit ausgesetzt werden.
- Vermeiden Sie es, das Gerät in der Nähe von Wärmequellen wie Heizkörpern, Heizlüftern, Öfen oder anderen Geräten (einschließlich) aufzustellen. ampKonverter (Lüfter), die Wärme erzeugen.
- Use only the power adapter and charging cable provided or recommended by Homtime.
- Versuchen Sie nicht, das Gerät selbst zu zerlegen, zu reparieren oder zu modifizieren. Überlassen Sie alle Wartungsarbeiten qualifiziertem Fachpersonal.
- Halten Sie das Gerät von starken Magnetfeldern fern.
- Nur mit trockenem Tuch reinigen.
3. Packungsinhalt
Bitte prüfen Sie das Paket auf folgende Artikel:
- Homtime C1 Digital Alarm Clock
- Netzteil
- Charging Cable (Multi-connector for various mobile phones)
- Bedienungsanleitung

Image: A gold-colored multi-connector charging cable with USB-A, Micro USB, Lightning, and USB-C connectors, indicating its versatility for various mobile devices.
4. Produktüberschreitungview
Familiarize yourself with the different parts of your Homtime C1 alarm clock:
- Front: Large LCD display for time and alarm.
- Spitze: Rotary button for setting time/alarm, snooze/dimmer button, alarm ON/OFF button.
- Zurück: Stromeingangsanschluss.
- Seite (rechts): Zwei USB-Ladeanschlüsse.

Image: A composite image showing various angles of the Homtime C1 Digital Alarm Clock, including front, top, side, and bottom views, highlighting its compact design and port locations.
5. Einrichtung
- Strom anschließen: Plug the provided power adapter into the DC input port on the back of the alarm clock, then plug the adapter into a standard wall outlet. The display will light up.
- Erste Zeiteinstellung: The clock will typically display a default time. To set the correct time, proceed to the 'Setting Time' section under Operating Instructions.
6. Bedienungsanleitung
6.1 Zeiteinstellung
- Press and hold the rotary button on top of the clock until the hour digits start blinking.
- Rotate the button clockwise or counter-clockwise to adjust the hour.
- Press the rotary button once to switch to minute adjustment.
- Rotate the button to adjust the minutes.
- Press the rotary button again to confirm the time and exit time setting mode.
6.2 Alarm einstellen
- Press and hold the alarm setting button (bell icon) on top of the clock until the alarm hour digits start blinking.
- Rotate the rotary button to adjust the alarm hour.
- Press the alarm setting button once to switch to alarm minute adjustment.
- Rotate the rotary button to adjust the alarm minutes.
- Press the alarm setting button again to confirm the alarm time.
- To activate or deactivate the alarm, press the alarm ON/OFF button (next to the rotary button). An alarm icon will appear on the display when activated.

Image: A person's hand with green nail polish is shown pressing the large circular button on top of a white Homtime C1 alarm clock, demonstrating the interaction for setting time or alarm.
6.3 Schlummerfunktion
When the alarm sounds, press the large rotary button on top of the clock to activate the snooze function. The alarm will pause for a few minutes (default snooze time is typically 9 minutes) and then sound again. To turn off the alarm completely, press the alarm ON/OFF button.
6.4 Display Brightness (Dimmable)
The Homtime C1 features an auto-dimmable display. The brightness adjusts automatically based on ambient light conditions. You can also manually adjust the brightness by briefly pressing the snooze/dimmer button (usually the large rotary button or a dedicated button next to it) to cycle through different brightness levels.
6.5 USB-Ladeanschlüsse
The Homtime C1 is equipped with dual USB charging ports (5V/2.1A) on its side, allowing you to charge your mobile devices directly from the clock. Simply connect your device's USB charging cable to one of the ports. These ports are compatible with most smartphones and tablets, including iPhone and Android devices.
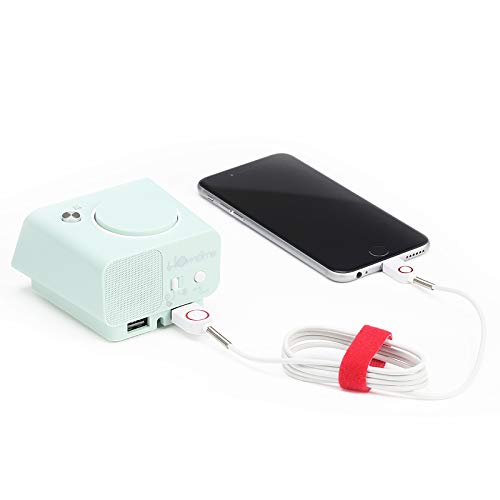
Image: The Homtime C1 alarm clock, turquoise in color, with a white charging cable connected to its side USB port, actively charging a black smartphone. This illustrates the dual USB charging capability.
7. Wartung
- Reinigung: Use a soft, dry cloth to clean the surface of the clock. Do not use liquid cleaners or aerosol sprays.
- Lagerung: Wenn Sie das Gerät über einen längeren Zeitraum lagern, ziehen Sie den Netzstecker und bewahren Sie es an einem kühlen, trockenen Ort auf.
- Auswirkungen vermeiden: Do not drop or subject the clock to strong impacts, as this may damage internal components.
8. Fehlerbehebung
| Problem | Mögliche Ursache | Lösung |
|---|---|---|
| Die Uhranzeige ist aus. | Kein Stromanschluss. | Stellen Sie sicher, dass der Netzadapter fest mit der Uhr und der Steckdose verbunden ist. |
| Der Alarm ertönt nicht. | Der Alarm ist nicht aktiviert oder falsch eingestellt. | Prüfen Sie, ob das Alarmsymbol angezeigt wird. Stellen Sie die Alarmzeit neu ein. |
| USB-Ladefunktion funktioniert nicht. | Kabelproblem oder Geräteinkompatibilität. | Try a different USB cable. Ensure your device is compatible with 5V/2.1A charging. |
| Display zu dunkel/hell. | Auto-dimming or manual setting. | Briefly press the snooze/dimmer button to cycle through brightness levels. |
9. Spezifikationen
- Marke: Heimzeit
- Modell: C1
- Farbe: Turquoise (Green)
- Anzeigetyp: Digital LCD
- Besondere Merkmale: Alarm, Auto Dimmable, Snooze, Dual USB Charging Ports
- Energiequelle: Kabelgebundene Elektrik
- Material: Acrylnitril-Butadien-Styrol, Kunststoff
- Montageart: Tischplatte
- USB-Ausgang: 5V/2.1A (Total for both ports)
- Abmessungen: (Genaue Abmessungen entnehmen Sie bitte der Produktverpackung.)
- Ursprungsland: China
10. Garantie und Support
Homtime products are designed and manufactured to the highest quality standards. For information regarding warranty coverage, please refer to the warranty card included with your product or visit the official Homtime website. For technical support or service inquiries, please contact Homtime customer service through the contact information provided on the product packaging or webWebsite.
Bitte bewahren Sie Ihren Kaufbeleg als Kaufnachweis für Garantiezwecke auf.
Ask a question about this manual
Ask about setup, troubleshooting, compatibility, parts, safety, or missing instructions. Manuals+ will review the question and use this page’s manual context to help answer it.