
1. Einleitung
Vielen Dank für Ihren Einkauf.asing the UHAPPY U18 Portable Mini HD LED Projector. This manual provides essential information for the safe and efficient operation of your device. Please read it thoroughly before use and retain it for future reference.
Sicherheitsvorkehrungen
- Schauen Sie nicht direkt in die Projektorlinse, wenn der lamp ist eingeschaltet.
- Sorgen Sie für eine ausreichende Belüftung rund um den Projektor, um eine Überhitzung zu vermeiden.
- Setzen Sie den Projektor weder Regen noch Feuchtigkeit aus.
- Verwenden Sie ausschließlich das mit dem Projektor gelieferte Netzteil.
- Versuchen Sie nicht, den Projektor selbst zu öffnen oder zu reparieren. Überlassen Sie alle Wartungsarbeiten qualifiziertem Fachpersonal.
2. Produktüberschreitungview
Familiarize yourself with the components and ports of your UHAPPY U18 projector.
Packungsinhalt
The following items are included in your projector package:

Image: Contents of the UHAPPY U18 projector package, including the projector, power adapter, AV cable, remote control, and user manual.
- UHAPPY U18 Mini LED Projector
- Netzteil
- AV-Kabel
- Fernbedienung
- Benutzerhandbuch (dieses Dokument)
Projector Components and Ports

Image: Angled top-down view of the UHAPPY U18 projector, highlighting the lens, focus adjustment, and control panel.

Bild: Oben view of the UHAPPY U18 projector, showing the integrated control buttons.

Bild: Vorderseite view of the UHAPPY U18 projector, focusing on the projection lens.
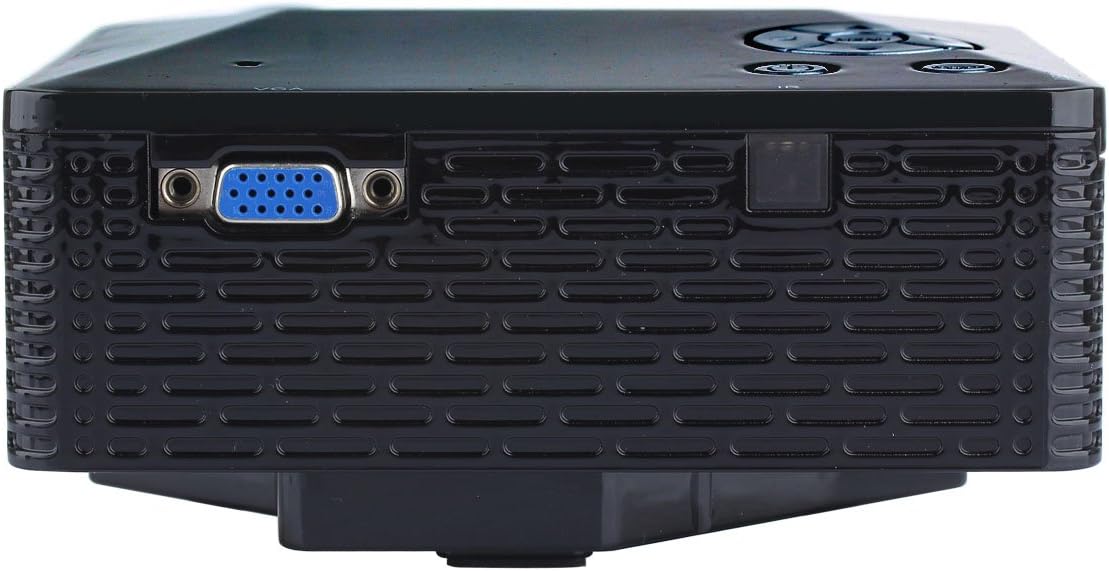
Abbildung: Seite view of the UHAPPY U18 projector, illustrating the VGA input port.
The projector features various input ports for connectivity:
- HDMI-Eingang: For connecting devices like laptops, gaming consoles, or media players.
- USB-Anschluss: Zum direkten Anschluss von USB-Speichergeräten zur Medienwiedergabe.
- SD-Kartensteckplatz: For inserting SD memory cards to play media directly.
- AV-Eingang: Zum Anschluss älterer Geräte mit dem mitgelieferten AV-Kabel.
- VGA-Eingang: For connecting computers or laptops with a VGA output.
- DC-IN: Stromeingangsanschluss.
- Kopfhörerausgang: Zum Anschluss externer Audiogeräte oder Kopfhörer.
- Fokusknopf: Befindet sich in der Nähe des Objektivs zur Einstellung der Bildschärfe.
3. Einrichtung
3.1 Platzierung
Place the projector on a stable, flat surface. Ensure there is adequate space around the projector for ventilation. The ideal projection distance is between 1 to 4 meters, yielding an image size of 20 to 80 inches.
3.2 Stromanschluss
- Schließen Sie das Netzteil an den DC-IN-Anschluss des Projektors an.
- Stecken Sie das Netzteil in eine geeignete Steckdose.
3.3 Anschließen von Eingabegeräten
Choose the appropriate cable and port based on your source device:
- HDMI: Connect an HDMI cable from your device (e.g., laptop, DVD player) to the projector's HDMI port.
- VGA: Verbinden Sie Ihren Computer mit einem VGA-Kabel mit dem VGA-Anschluss des Projektors.
- EIN V: Use the provided AV cable to connect devices with AV output (e.g., older DVD players, set-top boxes) to the projector's AV port.
- USB/SD-Karte: Stecken Sie einen USB-Stick in den USB-Anschluss oder eine SD-Karte in den SD-Kartensteckplatz.
4. Bedienungsanleitung
4.1 Ein-/Ausschalten
- So schalten Sie das Gerät ein: Drücken Sie den Ein-/Ausschalter am Projektor oder an der Fernbedienung. Die LED-Anzeige leuchtet auf.
- So schalten Sie das Gerät aus: Press the power button again. It is recommended to allow the projector to cool down for a few minutes before unplugging it.
4.2 Quellenauswahl
Nach dem Einschalten müssen Sie möglicherweise die Eingangsquelle auswählen:
- Press the 'Source' button on the projector or the remote control.
- Use the navigation buttons to select the desired input (HDMI, VGA, AV, USB, SD) and press 'OK' or 'Enter'.
4.3 Fokuseinstellung
If the projected image appears blurry:
- Rotate the focus knob located near the projector lens until the image becomes clear and sharp.
4.4 Menünavigation
Use the 'Menu' button on the projector or remote to access settings. Use the navigation arrows to move through options and 'OK' or 'Enter' to confirm selections. The projector supports multiple languages including English, Czech, Slovak, Danish, German, Spanish, French, Croatian, Italian, Hungarian, Dutch, Norwegian, Polish, Portuguese, Romanian, Slovene, Serbian, Finnish, Swedish, Bulgarian, Greek, Russian, and Chinese.
4.5 Unterstützte Medienformate
When playing media directly from USB or SD card, the projector supports the following formats:
- Bild: BMP, JPEG, PNG
- Video: MPEG1, MPEG2, MPEG4, RM, RMVB, AVI, FLV, WMV
5. Wartung
5.1 Reinigung der Linse
Verwenden Sie ein weiches, fusselfreies Tuch, das speziell für optische Linsen entwickelt wurde, um die Projektorlinse vorsichtig abzuwischen. Vermeiden Sie die Verwendung von scheuernden Materialien oder aggressiven Chemikalien.
5.2 Allgemeine Reinigung
Wipe the projector's exterior with a soft, dry cloth. Do not use liquid cleaners directly on the device. Ensure ventilation openings are free from dust and obstructions.
5.3 Speicherung
When not in use, store the projector in a cool, dry place, away from direct sunlight and extreme temperatures. It is advisable to cover the lens to protect it from dust.
6. Fehlerbehebung
Sollten Sie Probleme mit Ihrem Projektor haben, beachten Sie bitte die folgenden häufig auftretenden Probleme und Lösungen:
| Problem | Mögliche Ursache | Lösung |
|---|---|---|
| Kein Bild auf dem Bildschirm | Falsche Eingangsquelle ausgewählt Lose Kabelverbindung Quellgerät nicht eingeschaltet | Wählen Sie die richtige Eingangsquelle. Überprüfen Sie alle Kabelverbindungen. Stellen Sie sicher, dass das Quellgerät eingeschaltet ist und ein Signal ausgibt. |
| Bild ist verschwommen | Fokus nicht eingestellt | Rotate the focus knob until the image is clear. |
| Kein Ton | Lautstärke zu niedrig External audio device not connected Audioeinstellungen des Quellgeräts | Increase projector volume. Connect external speakers/headphones to the audio output. Überprüfen Sie die Audioeinstellungen Ihres Quellgeräts. |
| Der Projektor überhitzt und schaltet sich ab. | Blockierte Belüftung Längerer Einsatz in heißer Umgebung | Stellen Sie sicher, dass die Belüftungsöffnungen frei sind. Allow the projector to cool down. Operate in a well-ventilated area. |
7. Spezifikationen
Technical specifications for the UHAPPY U18 Portable Mini HD LED Projector:
- Bildsystem: LCD
- Native Auflösung: 320 x 240
- Lamp: LED
- LED-Lebensdauer: 20,000 Stunden
- Helligkeit: 60 lm
- Kontrast: 300:1
- Linse: F=125
- Bildgröße: 20-80 Zoll
- Projektionsabstand: 1-4 Meter
- Projektionsmodus: Frontprojektion
- Betriebsmodus: Manuell/Fernbedienung
- Eingangsklemmen: AV, VGA, USB, SD, HDMI
- Ausgabe: Kopfhörer
- Leistung: 24 W
- Farbe: 16.77 Millionen Farben
- Lautsprecher: 1.0 W * 2
- Arbeitstemperatur: 10-35°C
- Abmessungen: 135 x 132 x 52 mm
- Gewicht: 0.44 kg
8. Garantie und Support
This product is manufactured by Generic. For warranty information and technical support, please refer to the documentation provided at the time of purchase or contact your retailer. Keep your purchase receipt as proof of purchase.