
1. Einleitung
This manual provides essential information for the safe and efficient operation of your RAGGIE RGS 1500W 12V Solar Power Inverter. This device is designed to convert 12V DC electricity from batteries or solar panels into 220V AC electricity, allowing you to power standard household appliances from a DC power source. Please read this manual thoroughly before installation and use.
2. Sicherheitshinweise
WARNUNG: Die Nichtbeachtung dieser Sicherheitshinweise kann zu Stromschlag, Brand, schweren Verletzungen oder Tod führen.
- Ensure the inverter is installed in a well-ventilated, dry, and cool environment, away from direct sunlight, heat sources, and flammable materials.
- Do not expose the inverter to rain, moisture, or liquids.
- Schließen Sie den Wechselrichter nur an eine 12-V-Gleichstromquelle an. Der Anschluss an eine andere Spannung ist nicht zulässig.tagDies könnte zu einer Beschädigung des Geräts führen.
- Always connect the battery terminals with correct polarity: positive (+) to positive, and negative (-) to negative. Reverse polarity will damage the unit.
- Um Überhitzung und Lichtbogenbildung zu vermeiden, ist darauf zu achten, dass alle Verbindungen fest und sicher sind.
- Öffnen Sie den Wechselrichter nicht.asing. Im Inneren befinden sich keine vom Benutzer wartbaren Teile. Alle Wartungsarbeiten dürfen nur von qualifiziertem Fachpersonal durchgeführt werden.
- Halten Sie Kinder vom Wechselrichter und seinen Anschlüssen fern.
- Always disconnect the DC power source before performing any maintenance or troubleshooting.
- Stellen Sie sicher, dass der Wechselrichter ordnungsgemäß geerdet ist.
3. Produktüberschreitungview
The RAGGIE RGS 1500W inverter features robust construction and essential ports for reliable power conversion.
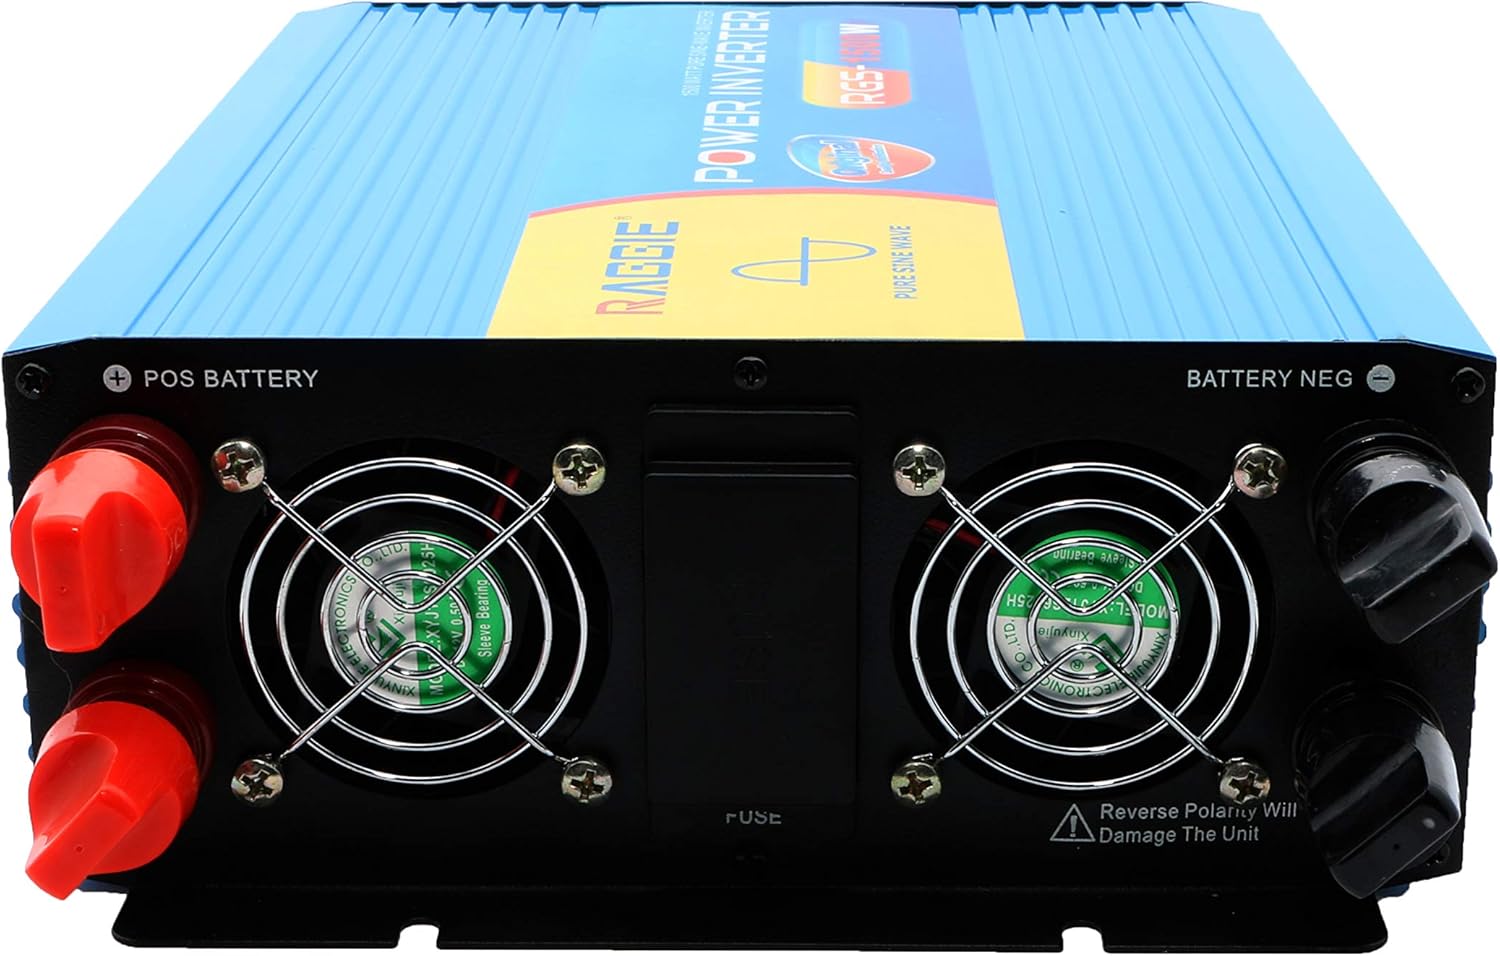
3.1 Komponenten auf der Rückseite
The rear panel includes the DC input terminals for connecting to your 12V battery or solar array, along with cooling fans and a fuse compartment.
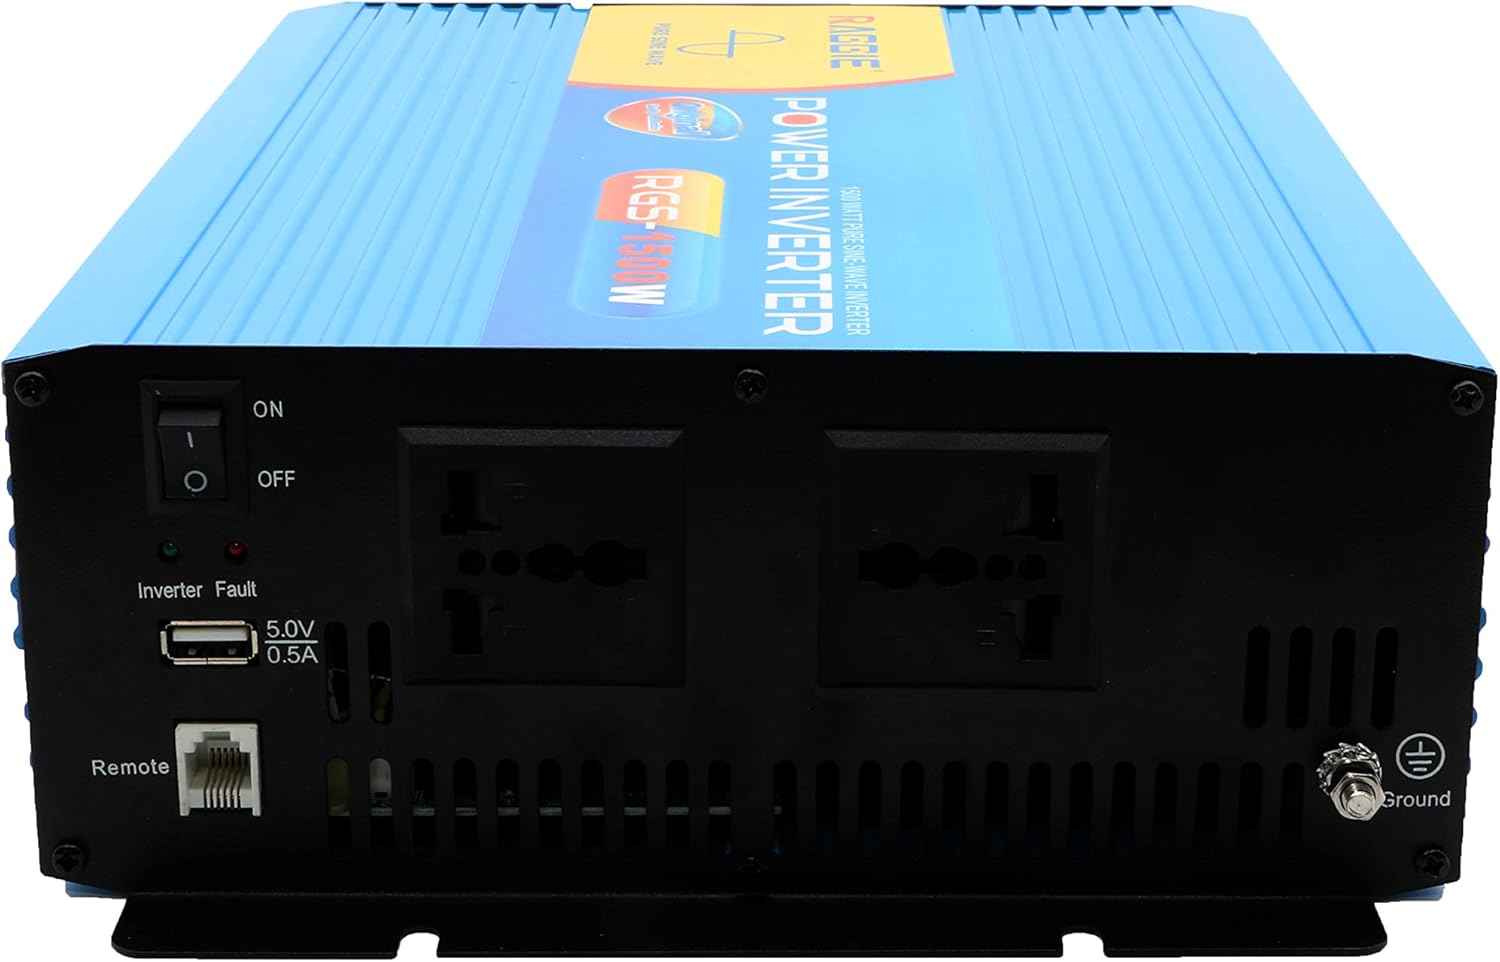
3.2 Komponenten der Vorderseite
The front panel provides the AC output sockets for connecting your appliances, the main power switch, a USB charging port, and a remote control port.
4. Einrichtung und Installation
Befolgen Sie diese Schritte für die ordnungsgemäße Installation Ihres Wechselrichters.
4.1 Auspacken und Prüfen
- Nehmen Sie den Wechselrichter vorsichtig aus der Verpackung.
- Inspect the unit for any signs of damage during transit. If damage is found, do not proceed with installation and contact your supplier.
- Stellen Sie sicher, dass sämtliches Zubehör vorhanden ist.
4.2 Platzierung
- Wählen Sie einen trockenen, kühlen und gut belüfteten Ort.
- Avoid areas with direct sunlight, high temperatures, or excessive dust.
- Montieren Sie den Wechselrichter sicher auf einer stabilen Oberfläche.
- Ensure there is adequate clearance around the cooling fans for proper airflow.
4.3 DC Input Connection (Battery/Solar)
IMPORTANT: Ensure the inverter's power switch is in the OFF position before making any connections.
- Use appropriate gauge cables for your 12V DC input. Refer to the specifications for recommended cable sizes.
- Verbinden Sie ROT (+) cable to the positive terminal of your 12V battery/solar array.
- Verbinden Sie das andere Ende des ROT (+) cable to the positive terminal (POS BATTERY) on the inverter's rear panel.
- Verbinden Sie SCHWARZ (-) cable to the negative terminal of your 12V battery/solar array.
- Verbinden Sie das andere Ende des SCHWARZ (-) cable to the negative terminal (BATTERY NEG) on the inverter's rear panel.
- Stellen Sie sicher, dass alle Verbindungen fest und sicher sind.
4.4 Erdung
Aus Sicherheitsgründen muss der Wechselrichter ordnungsgemäß geerdet sein.
- Connect a grounding wire from the ground terminal on the inverter's front panel to a suitable earth ground point (e.g., vehicle chassis, ground rod).
4.5 AC Output Connection (Appliances)
- Plug your AC appliances directly into the AC output sockets on the inverter's front panel.
- Stellen Sie sicher, dass das Gesamtwasser vorhanden isttage of all connected appliances does not exceed the inverter's continuous output power (1500W).
5. Bedienungsanleitung
5.1 Einschalten des Wechselrichters
- Ensure all DC and AC connections are correctly made and secure.
- Switch the main power switch on the inverter's front panel to the ON Position.
- The inverter will typically emit a short beep and an indicator light will illuminate, indicating it is operational.
5.2 Turning Off the Inverter
- Disconnect all AC appliances from the inverter.
- Switch the main power switch on the inverter's front panel to the AUS Position.
5.3 USB-Ladeanschluss
- The inverter includes a 5.0V 0.5A USB port for charging small electronic devices.
- Plug your USB device into this port for charging.
6. Wartung
Regelmäßige Wartung gewährleistet optimale Leistung und Langlebigkeit Ihres Wechselrichters.
- Reinigung: Reinigen Sie die Außenseite des Wechselrichters regelmäßig mit einem trockenen, weichen Tuch. Achten Sie darauf, dass die Lüftungsschlitze frei von Staub und Schmutz sind. Verwenden Sie keine flüssigen Reinigungsmittel.
- Verbindungsprüfung: Regularly inspect all DC and AC connections to ensure they remain tight and free from corrosion. Loose connections can cause overheating and power loss.
- Sicherungswechsel: The inverter is equipped with internal fuses. If the inverter stops working and troubleshooting does not resolve the issue, the fuse may need replacement. This should only be performed by qualified personnel.
7. Fehlerbehebung
In diesem Abschnitt werden häufig auftretende Probleme behandelt, die bei Ihrem Wechselrichter auftreten können.
| Problem | Mögliche Ursache | Lösung |
|---|---|---|
| Keine Stromausgabe / Wechselrichter schaltet sich nicht ein | Lose Gleichstromverbindungen Niedrige Batterieladungtage Durchgebrannte Sicherung Wechselrichterschalter AUS | Gleichstromkabel prüfen und festziehen Akku aufladen oder ersetzen Check and replace fuse (by qualified personnel) Wechselrichter einschalten |
| Überlastwarnung / Wechselrichter schaltet sich ab | Die angeschlossene Last übersteigt 1500 W. Surge power too high | Reduzieren Sie den Gesamtwasserverbrauchtage angeschlossener Geräte Ensure appliance starting current is within inverter's peak capacity |
| Overheating warning / Inverter shuts down | Schlechte Belüftung Übermäßige Umgebungstemperatur Blockierte Lüfter | Ensure adequate airflow around the inverter Move inverter to a cooler location Clean cooling fans and vents |
| Niedrige BatterieladungtagE-Warnung | Akkuladung ist niedrig | Laden Sie den Akku auf |
8. Spezifikationen
| Besonderheit | Spezifikation |
|---|---|
| Marke | RAGGIE |
| Modellnummer | RGS 1500W |
| Kontinuierliche Ausgangsleistung | 1500 Watt |
| Eingangslautstärketage | 12 Volt Gleichstrom |
| Ausgangsvolumentage | AC (Standard for region, typically 220V) |
| Stromquelle | External (Battery/Solar) |
| Empfohlene Verwendung | Provide AC power from a DC source, operate AC devices using DC power. |
| Spitzenleistung | 18000 Watts (Momentary Surge) |
| Zertifizierungen | UL, ETL, CE |
| Datum der ersten Verfügbarkeit | 9. Juli 2019 |
9. Garantie und Support
Informationen zur Garantie und technische Unterstützung finden Sie in der mitgelieferten Dokumentation oder wenden Sie sich direkt an den Hersteller. Bewahren Sie Ihren Kaufbeleg als Kaufnachweis auf.