
NVX XC4N1
NVX XC4N1 Universal 4-in-1 Rearview Bedienungsanleitung der Rückfahrkamera
Model: XC4N1
Einführung
This manual provides detailed instructions for the installation, operation, and maintenance of your NVX XC4N1 Universal 4-in-1 Rearview Backup Camera. Please read this manual thoroughly before installation and use to ensure proper function and safety.

Image: The NVX XC4N1 camera shown with its various mounting configurations, highlighting its versatility.
Sicherheitshinweise
- Vor der Durchführung jeglicher elektrischer Arbeiten muss immer die Fahrzeugbatterie abgeklemmt werden.
- Stellen Sie sicher, dass alle Kabel ordnungsgemäß isoliert und befestigt sind, um Kurzschlüsse oder Beschädigungen zu vermeiden.
- Den Fahrer nicht behindern. view oder die Fahrzeugsteuerung während der Installation beeinträchtigen.
- This camera is an aid for reversing and parking; it does not replace the driver's responsibility to check surroundings.
- Wenn Sie sich bei einzelnen Installationsschritten unsicher sind, wenden Sie sich an einen Fachmann.
Packungsinhalt
Vergewissern Sie sich vor Beginn der Installation, dass alle Komponenten vorhanden sind:
- NVX XC4N1 Backup Camera Unit
- Quadratische Halterung
- Abgewinkelte Halterung
- Unterputz
- Gummihalterung
- License Plate Bar Mount
- Stromkabel
- Cinch-Videokabel
- Mounting Hardware (screws, adhesive pad)
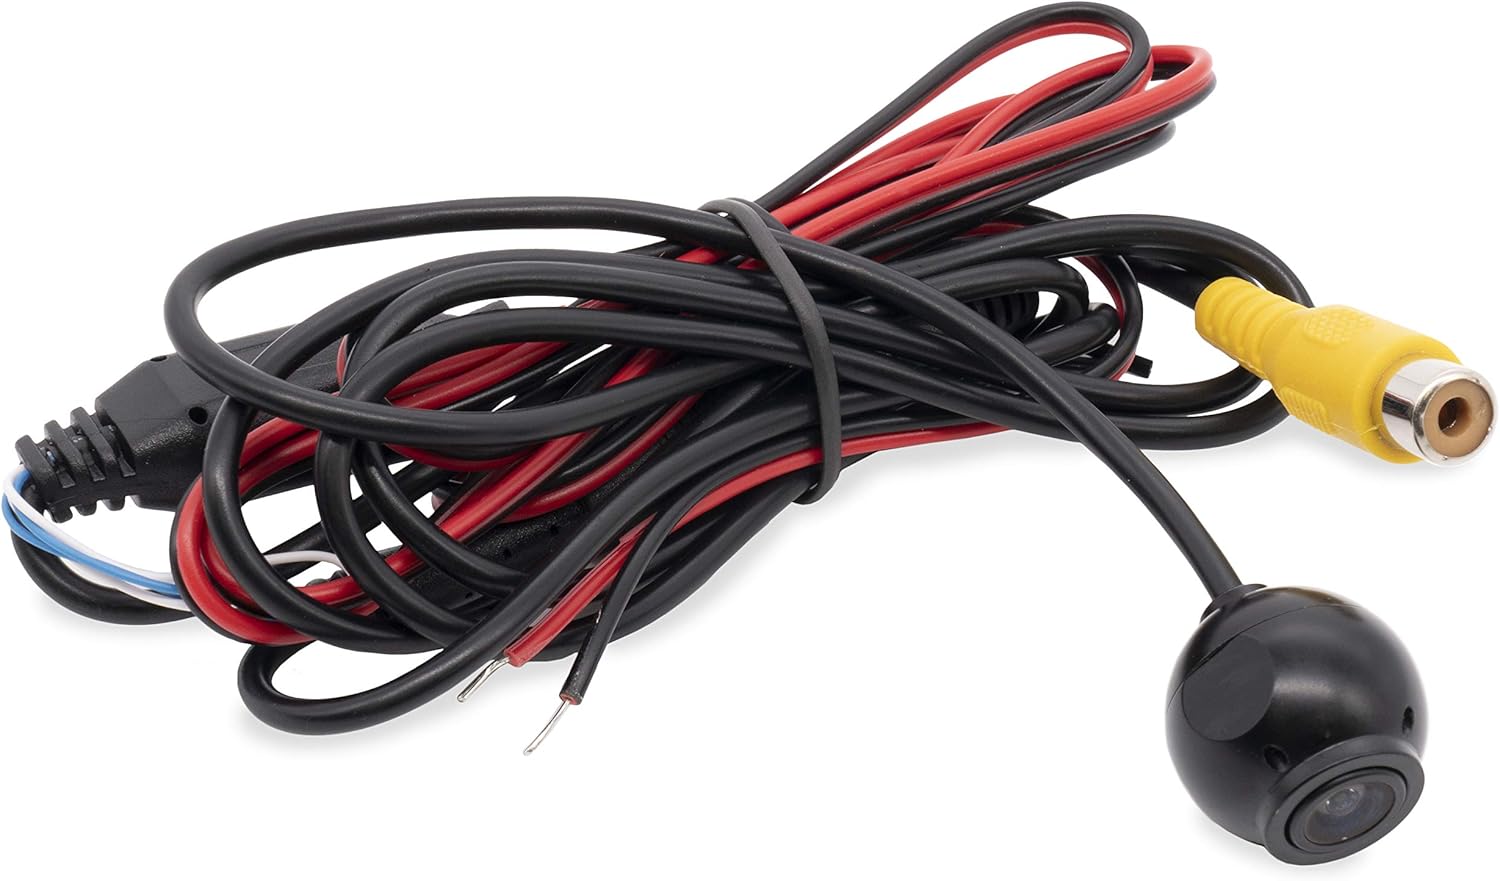
Image: The main camera unit with its attached power and RCA video cables.

Image: A collection of mounting brackets and screws included with the camera for different installation types.

Image: Supplementary mounting accessories, including a flush mount housing and adhesive pad.
Setup und Installation
The NVX XC4N1 offers four primary mounting options to suit various vehicle types and preferences.

Image: Visual representation of the four mounting styles: Flush, Square, Rubber (angled), and Bar (angled for license plate).
Montagemöglichkeiten:
- Unterputzmontage: For a discreet, integrated look. Requires drilling a hole for the camera body.
- Quadratische Halterung: A surface-mount option, typically used on flat areas.
- Rubber Mount (Angled): Provides an angled view, often used for specific bumper or panel contours.
- License Plate Bar Mount (Angled): Designed to attach to the vehicle's license plate frame for easy installation.
Allgemeine Installationsschritte:
- Montageort wählen: Select the optimal mounting location based on visibility and vehicle aesthetics.
- Kamerahalterung installieren: Secure the chosen mount using the provided screws or adhesive. Ensure the camera is oriented correctly.
- Kabel verlegen: Carefully route the power and video cables from the camera to the vehicle's interior, avoiding moving parts, sharp edges, and heat sources.
- Strom anschließen:
- Connect the red wire of the power cable to a 12V reverse light power source (positive). This ensures the camera activates when the vehicle is in reverse.
- Connect the black wire of the power cable to a vehicle ground (negative).
- Videoverbindung:
- Verbinden Sie das gelbe RCA-Videokabel der Kamera mit dem Videoeingang Ihres Monitors oder Autoradios.
- If your monitor requires a trigger wire for reverse activation, connect the small red wire integrated into the RCA cable to the reverse trigger input of your monitor.
- Testsystem: Reconnect the vehicle battery. Engage reverse gear (with the parking brake on and foot on the brake pedal) to verify the camera image appears on your display.
- Installation abschließen: Secure all cables and components, ensuring no loose wires or potential hazards.
Bedienungsanleitung
The NVX XC4N1 camera automatically activates when the vehicle is shifted into reverse, displaying the rear view auf Ihrem angeschlossenen Monitor.
Hauptmerkmale:
- Ultra-Wide 170-Degree View: Bietet ein weites Feld von view hinter Ihrem Fahrzeug, wodurch tote Winkel minimiert werden.

Image: A visual representation of the camera's 170-degree wide viewing angle, showing an extended area behind a vehicle.
- Parklinien: Integrated color parking lines assist in judging distance and alignment. These lines are fixed and cannot be adjusted.

Image: A screenshot of the camera's output, showing green, yellow, and red parking guide lines overlaid on the rear view.
- Ultra-Low Lux Night Vision: The camera operates effectively in low-light conditions with a minimum illumination of 0.08 Lux, enhancing visibility at night.

Image: A split image comparing the night vision performance of a competitor's camera (left, darker) versus the NVX XC4N1 (right, brighter) in low light conditions.
- Penetrating Fog Function: Designed to improve visibility in foggy conditions.
Wartung
The NVX XC4N1 camera is designed for durability and minimal maintenance.
- Wasserdichte Konstruktion: The camera is IP68 certified, meaning it is fully dustproof and can withstand submersion in water. This protects it from rain, car washes, and other environmental elements.

Image: The camera lens partially submerged in water, illustrating its IP68 waterproof capability.
- Reinigung: Reinigen Sie das Kameraobjektiv regelmäßig mit einem weichen Tuch.amp Für ein klares Bild verwenden Sie ein Tuch. Vermeiden Sie scheuernde Reinigungsmittel oder Materialien, die die Linse zerkratzen könnten.
- Kabelinspektion: Occasionally check the cables for any signs of wear, damage, or loose connections.
Fehlerbehebung
If you encounter issues with your NVX XC4N1 camera, refer to the following common problems and solutions:
| Problem | Mögliche Ursache | Lösung |
|---|---|---|
| No image on display when in reverse. |
|
|
| Das Bild ist unscharf oder verzerrt. |
|
|
| Parking lines are not visible. |
|
|
Technische Daten
| Besonderheit | Detail |
|---|---|
| Modell | XC4N1 |
| Marke | NVX |
| Auflösung | 720 x 480 Pixel |
| Viewing-Winkel | 170 Degrees (Real Angle of View) |
| Optische Sensorik | CMOS |
| Größe des optischen Sensors | 1/3 Zoll |
| Mindestbeleuchtung | 0.08 Lux |
| Wasserdichtigkeit | IP68 |
| Bandtage | 12 Volt |
| Steckertyp | Cinch |
| Installationstyp | Bracket Mount (4-in-1 Universal) |
| Artikelgewicht | 1.5 Pfund |
Garantie und Support
For warranty information or technical support, please refer to the documentation included with your purchase or visit the official NVX website. Contacting customer support with your product model (XC4N1) and purchase details will help expedite assistance.
Visit the NVX Store on Amazon Für weitere Informationen und Produkte.
Ask a question about this manual
Ask about setup, troubleshooting, compatibility, parts, safety, or missing instructions. Manuals+ will review the question and use this page’s manual context to help answer it.