1. Einleitung
The Protmex PT625A is a handheld digital anemometer designed for measuring air velocity and airflow. This device is suitable for various applications, including environmental monitoring, HVAC system analysis, outdoor sports, and industrial use. It provides accurate and fast readings with multiple measurement units and data handling capabilities.
2. Produktüberschreitungview
2.1 Komponenten
- Air Velocity Flow Sensor: The fan blade assembly at the top of the device.
- Anzeige: LCD screen for showing measurement readings and indicators.
- Bedientasten: Power, Function, Unit, Max/Min/Avg, Data Hold, Record.
- Batteriefach: Befindet sich auf der Rückseite zur Installation der Batterie.
- Micro-USB-Anschluss: For data connection (on some models, not explicitly stated for PT625A but mentioned in video).
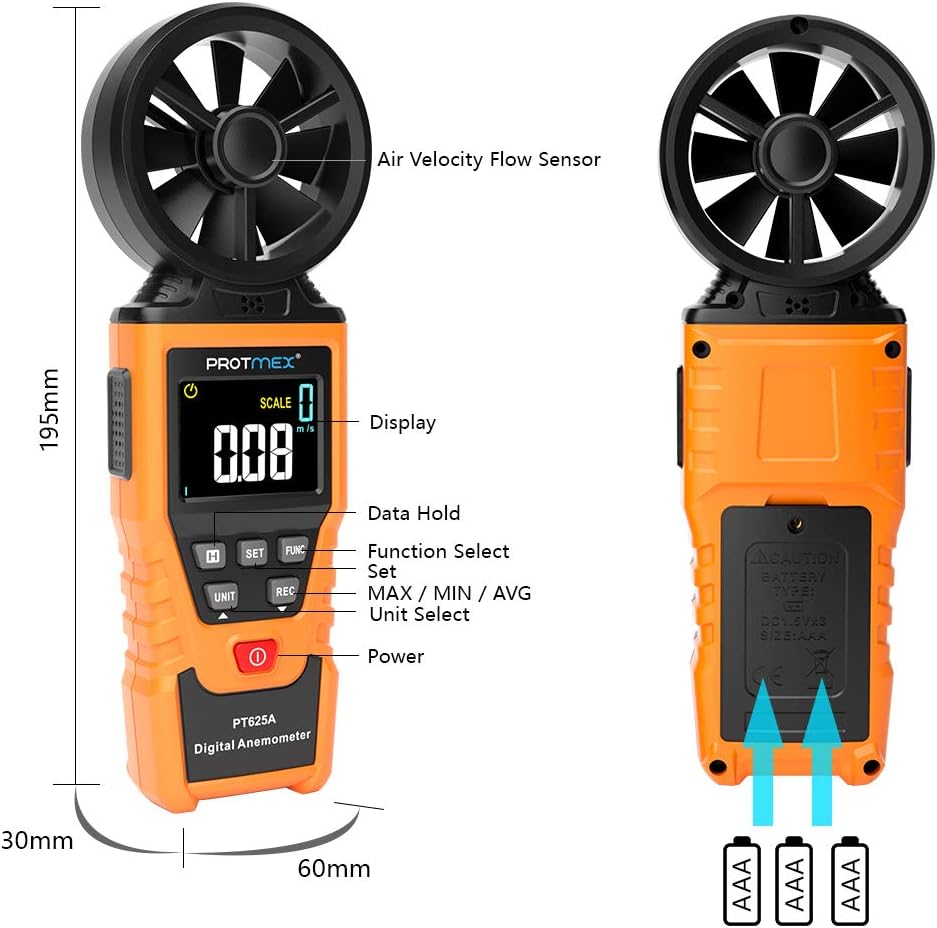
Abbildung 1: Vorderseite view of the Protmex PT625A Anemometer with key components labeled, including the air velocity flow sensor, display, and control buttons.
2.2 Funktionen
- High accuracy for wind speed measurement (0.4~40 m/s).
- Multiple units for wind speed: m/s, km/h, ft/s, knots, mil/h, fp/m.
- Air volume measurement in CFM, CMM, CMS.
- 8-blade aviation wing fan for sensitive and accurate readings.
- MAX/MIN/AVG data display.
- Datenhaltefunktion.
- Automatische Abschaltung.
- Anzeige für niedrigen Batteriestand.
- Air duct area setting for airflow calculation.
3. Einrichtung
3.1 Einlegen der Batterie
- Suchen Sie das Batteriefach auf der Rückseite des Geräts.
- Verwenden Sie einen Schraubendreher, um die Abdeckung des Batteriefachs zu öffnen.
- Legen Sie die mitgelieferte 9V-Batterie ein und achten Sie dabei auf die richtige Polarität (+/-).
- Bringen Sie die Batteriefachabdeckung wieder an und sichern Sie sie mit der Schraube.

Abbildung 2: Zurück view of the anemometer, indicating the battery compartment where a 9V battery is inserted. A screwdriver is required to open the compartment.
4. Bedienungsanleitung
4.1 Ein-/Ausschalten
Drücken Sie die Leistung Taste ( ) to turn the device on or off. The device features an auto power-off function to conserve battery life.
4.2 Measuring Air Velocity
- Turn on the anemometer.
- Point the air velocity flow sensor (fan) directly into the airflow you wish to measure. Ensure the airflow passes through the fan blades.
- The current air velocity reading will be displayed on the LCD screen.
- Drücken Sie die EINHEIT button to cycle through different measurement units (m/s, km/h, ft/s, knots, mil/h, fp/m).

Figure 3: The anemometer being used to measure wind speed in an outdoor environment, demonstrating how to position the sensor into the airflow.
4.3 Airflow Measurement (CFM/CMM/CMS)
- Turn on the anemometer.
- Drücken Sie die FUNK button to enter airflow measurement mode.
- Verwenden Sie die SATZ button to input the cross-sectional area of the air duct or channel. This is crucial for accurate airflow calculation.
- Once the area is set, point the sensor into the airflow. The device will display the airflow volume in CFM, CMM, or CMS.
- Drücken Sie die EINHEIT button to select the desired airflow unit.

Figure 4: Illustration of the anemometer displaying airflow measurement after setting the air duct area. The screen shows both area input and calculated flow.
4.4 Data Hold, Max/Min/Avg, and Record Functions
- Datenaufnahme: Drücken Sie die HALTEN Drücken Sie diese Taste, um den aktuellen Messwert auf dem Display einzufrieren. Zum Entsperren erneut drücken.
- MAX/MIN/AVG: Drücken Sie die MAX / MIN / AVG button to cycle through maximum, minimum, and average readings during a measurement session.
- Aufzeichnen: Drücken Sie die AUFNAHME button to initiate data recording. (Note: Specific details on data storage and retrieval may be in the full manual or software).

Figure 5: The anemometer's display showing maximum, minimum, and average wind velocity readings, accessible via the dedicated buttons.
5. Wartung
- Halten Sie das Gerät sauber und trocken. Wischen Sie es mit einem weichen, trockenen Tuch ab.amp Tuch. Keine Scheuer- oder Lösungsmittel verwenden.
- Ensure the fan blades are free from dust and debris to maintain measurement accuracy.
- Bei längerer Nichtbenutzung sollte die Batterie entfernt werden, um ein Auslaufen zu verhindern.
- Store the anemometer in its protective case in a cool, dry place.
6. Fehlerbehebung
- Kein Display/Gerät schaltet sich nicht ein:
- Prüfen Sie, ob die Batterie korrekt mit der richtigen Polarität eingesetzt ist.
- Tauschen Sie die Batterie aus, wenn sie schwach oder leer ist.
- Ungenaue Messwerte:
- Ensure the fan blades are clean and spinning freely.
- Verify that the sensor is pointed directly into the airflow.
- Check if the correct measurement unit is selected.
- For airflow measurements, confirm the air duct area setting is accurate.
- Schaltflächen reagieren nicht:
- Turn the device off and then on again.
- Ersetzen Sie die Batterie.
7. Spezifikationen
| Parameter | Wert |
|---|---|
| Windgeschwindigkeitsbereich | 0.4 bis 40 m/s |
| Windgeschwindigkeitseinheiten | m/s, km/h, ft/s, knots, mil/h, fp/m |
| Air Volume Units | CFM, CMM, CMS |
| Sampling Zeit | Approx. 0.5s/time |
| Maximaler Anzeigewert | 9999 |
| Stromversorgung | 9-V-Batterie |
| Abmessungen (L x B x H) | 8.85 x 4.52 x 1.77 Zoll |
| Artikelgewicht | 10 Unzen |
| Material | Gummi |

Figure 6: A detailed screen introduction showing various symbols and their descriptions, including MAX, MIN, AVG, VEL, FLOW, AREA, and different units of measurement.
8. Garantie und Support
Protmex products are designed for quality and reliability. For any issues or support, please refer to the contact information provided with your purchase or visit the official Protmex website. The product is CE (LVE, EMC), RoHS approved.
Protmex offers 24/7 online friendly support. Your satisfaction is our priority.