
1. Einleitung
The BSIDE 600A Digital Clamp Multimeter is a versatile and reliable instrument designed for measuring AC current, AC/DC voltage, resistance, continuity, capacitance, and frequency. It features True RMS measurement, auto-ranging, non-contact voltage (NCV) detection, inrush current measurement, data hold, peak hold, a flashlight, and backlight for enhanced usability. This manual provides essential information for safe and effective operation of the device.
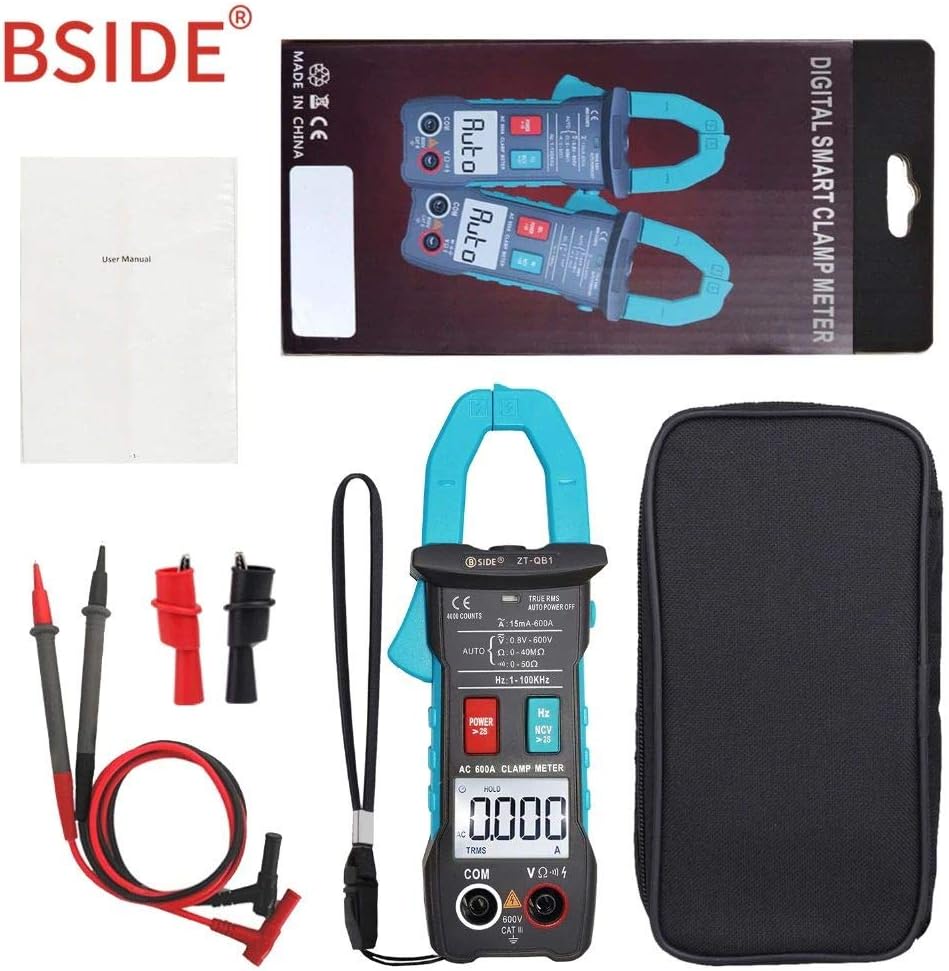
Image 1: The BSIDE 600A Digital Clamp Multimeter shown with its included test leads, carrying case, and user manual.
2. Sicherheitshinweise
Please read and understand all safety information before operating this multimeter. Failure to follow these instructions may result in electric shock, fire, or damage to the meter or the equipment under test.
- Vor jeder Messung ist sicherzustellen, dass die Messleitungen in gutem Zustand und ordnungsgemäß angeschlossen sind.
- Nicht anwenden voltage or current that exceeds the maximum rated values for the meter.
- Exercise extreme caution when working with live circuits. Voltages above 30V AC RMS, 42V peak, or 60V DC pose a shock hazard.
- Vor der Strommessung mit dem Clamp, ensure the circuit is de-energized and the clamp Die Backen sind um einen einzelnen Leiter vollständig geschlossen.
- Tauschen Sie die Batterien sofort aus, sobald die Anzeige für niedrigen Batteriestand erscheint, um genaue Messwerte zu gewährleisten.
- Das Messgerät darf nicht in Betrieb genommen werden, wenn es beschädigt erscheint oder das Gehäuse geöffnet ist.
- This device features double insulation protection, enhancing user safety by providing an additional layer of insulation beyond basic insulation.

Image 2: The BSIDE 600A Digital Clamp Multimeter-Showasing its double insulation protection feature, which enhances user safety.
3. Produktüberschreitungview
The BSIDE 600A Digital Clamp Multimeter is designed for ease of use and accuracy. Key components include the clamp jaws for current measurement, the display screen, function buttons, and input terminals for test leads.

Abbildung 3: Eine detaillierte Vorderansicht view of the BSIDE 600A Digital Clamp Multimeter, showing the clamp jaws, display, function buttons, and input terminals, along with the red and black test leads.
3.1 Hauptmerkmale
- 600A Wechselstrommessung: Measures AC current without breaking the circuit.
- Automatische Identifizierung: Automatically detects measurement parameters and selects the appropriate range.
- Inrush Current Test: Accurately captures inrush current.
- Peak-Hold-Funktion: Holds the peak value of a measurement.
- Echter RMS: Liefert genaue Messwerte für nicht-sinusförmige Wellenformen.
- NCV (Kontaktlose Voltage) Erkennung: Erkennt AC-Voltage ohne Körperkontakt.
- Taschenlampe & Hintergrundbeleuchtung: Illuminates the measurement area and display in low-light conditions.
- Automatisches Ausschalten: Verlängert die Batterielebensdauer.

Image 4: The BSIDE 600A Digital Clamp Multimeter's display, illustrating various function icons such as AC/DC Voltage, AC Current, Resistance, Capacitance, Continuity, Frequency, True RMS, NCV, Data Hold, Inrush Current, Auto Power Off, Flashlight, and Peak Hold.
4. Einrichtung
4.1 Einlegen der Batterie
- Stellen Sie sicher, dass das Multimeter ausgeschaltet ist.
- Suchen Sie die Abdeckung des Batteriefachs auf der Rückseite des Geräts.
- Verwenden Sie einen Schraubendreher, um das Batteriefach zu öffnen.
- Legen Sie zwei 1.5V AAA-Batterien ein und achten Sie dabei auf die richtige Polarität (+/-).
- Bringen Sie die Batteriefachabdeckung wieder an und sichern Sie sie mit der Schraube.

Image 5: The open battery compartment of the BSIDE 600A Digital Clamp Multimeter, showing the slots for two AAA batteries and a warning label regarding battery replacement.
4.2 Anschließen der Testleitungen
Für voltage, resistance, continuity, and capacitance measurements, connect the test leads:
- Stecken Sie die schwarze Messleitung in die 'COM' (gemeinsame) Eingangsbuchse.
- Stecken Sie die rote Messleitung in die Eingangsbuchse „VΩHz“.
5. Bedienungsanleitung
The BSIDE 600A Digital Clamp Multimeter features automatic identification for most measurement types, simplifying operation. Press the 'POWER' button for more than 2 seconds to turn the device on or off.
5.1 Wechselstrommessung (Clamp)
- Ensure the meter is in AC current mode (indicated by 'AC' on the display).
- Öffne dieamp Die Kiefer werden durch Drücken des Auslösers geöffnet.
- Schließen Sie nur einen Leiter des Stromkreises in die Klemme ein.amp Kiefer. Stellen Sie sicher, dass die Kiefer vollständig geschlossen sind.
- Lesen Sie den Wechselstromwert auf dem Display ab.

Image 6: The BSIDE 600A Digital Clamp Multimeter actively measuring AC current by clamping its jaws around a single electrical conductor, displaying the reading on its screen.
5.2 Voltage Messung (AC/DC)
- Schließen Sie die Messleitungen wie in Abschnitt 4.2 beschrieben an.
- Das Messgerät erkennt automatisch Wechsel- oder Gleichspannung.tage.
- Schließen Sie die Messspitzen parallel an den Stromkreis oder das Bauteil an, das Sie messen möchten.
- Lesen Sie den Bandtage-Wert auf dem Display.
5.3 Resistance, Continuity, and Capacitance Measurement
- Schließen Sie die Messleitungen wie in Abschnitt 4.2 beschrieben an.
- Ensure the circuit or component under test is de-energized before connecting the probes.
- Connect the test probes across the component. The meter will automatically identify the measurement type.
- For continuity, if resistance is less than 30Ω, the buzzer will sound.
5.4 Frequenzmessung
- Schließen Sie die Messleitungen wie in Abschnitt 4.2 beschrieben an.
- Schließen Sie die Messspitzen an den Stromkreis an, in dem die Frequenz gemessen werden soll.
- Read the frequency value in Hertz (Hz) or Kilohertz (kHz) on the display.
5.5 NCV (Nicht-Kontakt-Volumen)tage) Erkennung
- Press the 'Hz NCV' button for more than 2 seconds to activate NCV mode.
- Bringen Sie die Spitze des Clamp Messgerät in der Nähe des Leiters oder der Steckdose.
- Das Messgerät zeigt das Vorhandensein von Wechselspannung an.tage through an audible beep and visual indicator.
5.6 Inrush Current Test
- Ensure the meter is in AC current mode.
- Press the 'POWER' button briefly to activate the Inrush function.
- Clamp the jaws around the single conductor of the device you want to test as it starts up.
- The meter will capture and display the peak inrush current.
5.7 Data Hold and Peak Hold
- Datenaufnahme: Drücken Sie kurz die Taste „HOLD“, um den aktuellen Messwert auf dem Display einzufrieren. Drücken Sie erneut, um die Taste zu lösen.
- Peak-Hold: In certain modes, pressing and holding the 'HOLD' button may activate Peak Hold, capturing the maximum value.

Abbildung 7: Seite A view of the BSIDE 600A Digital Clamp Multimeter, clearly showing the 'HOLD' button, which is used to freeze the current measurement on the display.
5.8 Taschenlampe und Hintergrundbeleuchtung
- Press the 'HOLD' button for more than 2 seconds to turn the flashlight and backlight on or off. This feature is useful in dimly lit environments.

Image 8: A hand holding the BSIDE 600A Digital Clamp Multimeter, demonstrating its ergonomic design and the integrated flashlight illuminating the area in front of the clamp Kiefer.
6. Wartung
6.1 Reinigung
Wischen Sie das Gehäuse des Zählers mit einem Desinfektionsmittel ab.amp Mit einem Tuch und mildem Reinigungsmittel reinigen. Keine Scheuermittel oder Lösungsmittel verwenden. Die Eingangsanschlüsse sauber und trocken halten.
6.2 Batteriewechsel
Wenn die Anzeige für niedrigen Batteriestand erscheint, tauschen Sie die Batterien wie in Abschnitt 4.1 beschrieben aus. Verwenden Sie immer zwei neue 1.5-V-AAA-Batterien.
6.3 Speicherung
If the meter is not used for an extended period, remove the batteries to prevent leakage. Store the device in a cool, dry place, away from direct sunlight and extreme temperatures.
7. Fehlerbehebung
- Kein Bildschirm: Überprüfen Sie den Batterieeinbau und stellen Sie sicher, dass die Batterien nicht entladen sind. Tauschen Sie sie gegebenenfalls aus.
- Falsche Messwerte: Verify correct function selection and proper test lead connection. Ensure the circuit is de-energized for resistance/continuity/capacitance. For current, ensure only one conductor is within the clamp Kiefer.
- Zähler reagiert nicht: Schalten Sie das Messgerät aus und wieder ein. Sollte das Problem weiterhin bestehen, tauschen Sie die Batterien aus.
8. Spezifikationen
| Parameter | Spezifikation |
|---|---|
| Anzeige | 4000 Zählwerte |
| Wechselstrom | 4.000A (5%+5counts), 40.00A/400.0A/600A (2.5%+8counts) |
| DC-Voltage | 4.000V/40.00V/400.0V/600V (0.5%+3counts) |
| AC-Lautstärketage | 4.000V/40.00V/400.0V/600V (1.0%+3counts) |
| Widerstand | 4.000kΩ (1.5%+3counts), 40.00kΩ/400.0kΩ/4.000MΩ (1.0%+3counts), 40.00MΩ (1.5%+3counts) |
| Frequenz | 4.000Hz/40.00Hz/400.0Hz/4.000kHz/40.00kHz (0.1%+2counts) |
| Durchgangssummer | Sounds if resistance is less than 30Ω |
| Backenkapazität | 25 mm |
| Leistung | 1.5 V (AAA) x 2 (nicht im Lieferumfang enthalten) |
| Größe | 172 mm x 64 mm x 32 mm |
| Gewicht | 172g |
| Messtyp | Multimeter |
| Stromquelle | Batteriebetrieben, elektrisch |
| Stil | Digitales |
| Artikelmodellnummer | BSIDE 600A Digital Clamp Multimeter |
| ASIN | B07WWWHNN2 |
| Datum der ersten Verfügbarkeit | 21. August 2019 |