
1. Einleitung
This manual provides instructions for the safe and effective use of the BSIDE Dual Mode AC Voltage Detector (AVD06) and Socket Wall Power Outlet Tester (AST01ER) kit. This kit is designed for electrical testing, offering non-contact AC voltage detection and socket wiring verification. Please read this manual thoroughly before operation and retain it for future reference.
2. Sicherheitshinweise
WARNING: Electrical testing can be hazardous. Always exercise extreme caution when working with electrical circuits. Failure to follow safety instructions may result in electric shock, injury, or death.
- Gehen Sie immer davon aus, dass Stromkreise unter Spannung stehen, bis das Gegenteil bewiesen ist.
- Verwenden Sie die Geräte nicht, wenn sie beschädigt erscheinen oder nicht ordnungsgemäß funktionieren.
- Ensure hands are dry and insulated before handling electrical components.
- The AVD06 is designed for non-contact detection; direct contact with live wires is not required and should be avoided.
- The AST01ER is designed for 220-250V AC outlets; do not use it on circuits outside this range.
- Beachten Sie alle lokalen und nationalen Sicherheitsvorschriften.
- This device is designed to international safety standard CE CAT.II 1000V.
3. Produktüberschreitungview
3.1 AVD06 Non-Contact AC Voltage Detektor
The AVD06 is a pen-style device used to detect the presence of AC voltage without direct contact. It features dual mode operation (manual/auto sensitivity), LED indicators for voltage strength, and a built-in spotlight.
3.2 AST01ER Socket Tester
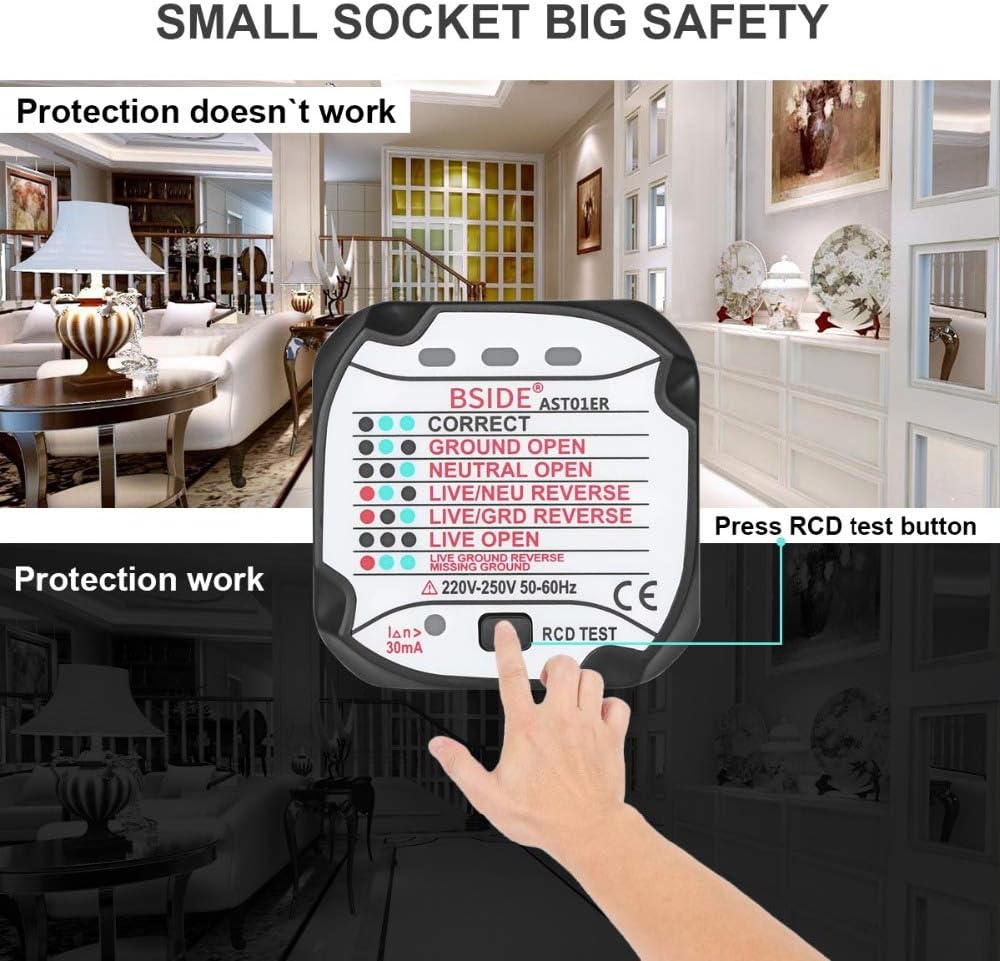
The AST01ER is a plug-in device that quickly checks the wiring status of standard wall power outlets. It uses a series of LED indicators to show common wiring faults and includes an RCD (Residual Current Device) test button.


4. Einrichtung
4.1 AVD06 Battery Installation
- Locate the battery compartment cover on the back of the AVD06.
- Schieben Sie die Abdeckung auf.
- Insert one 9V 6F22 battery, observing the correct polarity (+/-).
- Schließen Sie den Batteriefachdeckel fest.
The AVD06 will indicate a low battery condition when the battery voltage drops below a certain level, prompting replacement.

5. Bedienungsanleitung
5.1 AVD06 Non-Contact AC Voltage Detector Operation
- Einschalten: Press the power button to turn on the device. The device will typically start in Auto Mode.
- Mode Selection (Auto/Manual): The AVD06 offers two detection modes:
- Auto Mode (48V-1000V): The device automatically adjusts sensitivity. This is suitable for general voltage Erkennung.
- Manual Mode (12V-1000V): Allows for fine-tuning sensitivity using the adjustment knob. This mode is useful for detecting lower voltages or pinpointing live wires in crowded conduits.
- Sensitivity Adjustment (Manual Mode): In Manual Mode, rotate the sensitivity adjustment knob to increase or decrease the detection sensitivity.
- Bandtage-Erkennung: Place the tip of the AVD06 near the wire, outlet, or circuit to be tested. If AC voltage is detected, the device will emit an audible beep and the LED indicators will light up.
- Grüne LED: Geringe Lautstärketage erkannt.
- Gelbe LED: Moderate voltage erkannt.
- Rote LED: Hohe Lautstärketage erkannt.
- Kennzeichnung von stromführendem und neutralem Leiter: In Manual Mode, by adjusting the sensitivity, the AVD06 can help distinguish between live and neutral wires. A stronger indication (more LEDs, faster beeping) typically signifies the live wire.
- Spotlight-Funktion: Press the spotlight button to illuminate the testing area, useful in dark environments.
- Automatisches Ausschalten: Das Gerät schaltet sich nach 5 Minuten Inaktivität automatisch aus, um die Batterie zu schonen.

5.2 AST01ER Socket Tester Operation
- Mit der Steckdose verbinden: Plug the AST01ER directly into a standard 220-250V AC wall power outlet.
- Interpret LED Indicators: Observe the LED lights on the front of the tester. The combination of lit LEDs indicates the wiring status of the outlet. Refer to the diagram below for interpretation.
- RCD Test (Residual Current Device): If the outlet is protected by an RCD, press the RCD test button on the AST01ER. A functional RCD should trip, cutting power to the outlet. If the RCD does not trip, it may be faulty and should be inspected by a qualified electrician.

6. Wartung
- Reinigung: Reinigen Sie die Geräte mit einem trockenen, weichen Tuch. Verwenden Sie keine Scheuermittel oder Lösungsmittel.
- Lagerung: Store the devices in a cool, dry place, away from direct sunlight and extreme temperatures. If storing for extended periods, remove the battery from the AVD06 to prevent leakage.
- Batteriewechsel: Replace the 9V battery in the AVD06 when the low battery indicator appears.
7. Fehlerbehebung
- AVD06 does not power on: Prüfen Sie, ob die 9-V-Batterie richtig eingesetzt ist und ausreichend geladen ist. Tauschen Sie die Batterie gegebenenfalls aus.
- AVD06 does not detect voltage: Ensure the device is powered on. If in Manual Mode, adjust the sensitivity knob. Ensure the voltage is within the specified range (12V-1000V in Manual, 48V-1000V in Auto).
- AST01ER shows incorrect wiring: Double-check the LED indicator guide. If the wiring is consistently incorrect, consult a qualified electrician. Do not attempt to fix wiring issues yourself unless qualified.
- AST01ER RCD test does not trip: This indicates a potential fault with the RCD or the wiring. Immediately consult a qualified electrician to inspect the RCD and circuit.
8. Spezifikationen
8.1 AVD06 Non-Contact AC Voltage Detektor
- AC-Lautstärketage Reichweite: 12V ~ 1000V (Manual Mode); 48V ~ 1000V (Auto Mode)
- Frequenz: 50 Hz/60 Hz
- Leistung: 1 x 9V 6F22 Battery (Not Included)
- Größe: 174 mm x 47 mm x 35 mm
- Gewicht: 68g
- Sicherheitsstandard: CE KAT.II 1000V
8.2 AST01ER Socket Tester
- Nennvolumentage (un): 220–250 V (Wechselstrom), 50–60 Hz
- Bemessungs-Restbetriebsstrom: 30 mA
- Earth Resistance: Meets standard
- Größe: 52.8 mm x 53 mm x 62 mm
- Gewicht: 51g
9. Garantie und Support
Informationen zur Garantie und zum technischen Support finden Sie in der mitgelieferten Dokumentation oder wenden Sie sich an Ihren Händler. Bewahren Sie Ihren Kaufbeleg als Kaufnachweis auf.