
1. Einleitung
This manual provides essential information for the safe installation, operation, and maintenance of your Nutone 30" 210 Max CFM White Range Hood, Model NU230WW. Please read this manual thoroughly before installation and use, and retain it for future reference.
The Nutone range hood is designed to effectively remove smoke, steam, grease, and cooking odors from your kitchen, ensuring a cleaner and more comfortable cooking environment. It features a 2-speed rocker switch, an aluminum grease filter, and is compatible with both ducted and non-ducted installations (with an optional charcoal filter).
2. Sicherheitshinweise
WARNUNG: Um das Risiko von Bränden, Stromschlägen oder Verletzungen von Personen zu verringern, beachten Sie Folgendes:
- Die Installationsarbeiten und die elektrische Verkabelung müssen von qualifizierten Fachkräften gemäß allen geltenden Vorschriften und Normen, einschließlich feuerfester Konstruktion, durchgeführt werden.
- Für eine ordnungsgemäße Verbrennung und den Abtransport der Abgase durch den Schornstein von Heizgeräten ist ausreichend Luftzufuhr erforderlich, um einen Rückstrom zu verhindern. Beachten Sie die Richtlinien des Heizgeräteherstellers sowie die Sicherheitsstandards, wie sie beispielsweise von der National Fire Protection Association (NFPA), der American Society for Heating, Refrigeration and Air Conditioning Engineers (ASHRAE) und den örtlichen Baubehörden veröffentlicht werden.
- Achten Sie beim Schneiden oder Bohren in Wänden oder Decken darauf, elektrische Leitungen und andere versteckte Versorgungseinrichtungen nicht zu beschädigen.
- Die Entlüftung von Kanalventilatoren muss immer nach außen erfolgen.
- Verwenden Sie dieses Gerät nicht mit einem elektronischen Geschwindigkeitsregler.
- Dieses Gerät ist ausschließlich für allgemeine Belüftungszwecke bestimmt. Es darf nicht zum Abführen von gefährlichen oder explosiven Stoffen und Dämpfen verwendet werden.
- To reduce the risk of fire and to properly exhaust air, be sure to duct air outside – Do not vent exhaust air into spaces within walls or ceilings, attics, crawl spaces, or garages.
- Vor Wartungs- oder Reinigungsarbeiten muss die Stromzufuhr zum Gerät unterbrochen werden.
VORSICHT:
- Nur für den Innenbereich.
- Um die Brandgefahr zu verringern, verwenden Sie nur Rohrleitungen aus Metall.
- So verringern Sie das Risiko eines Fettbrands auf dem Herd:
- Lassen Sie Küchengeräte bei hohen Temperaturen niemals unbeaufsichtigt. Überkochendes Kochen führt zu Rauchbildung und Fettspritzern, die sich entzünden können. Erhitzen Sie Öle langsam bei niedriger oder mittlerer Temperatur.
- Schalten Sie die Haube immer ein, wenn Sie bei hoher Hitze kochen oder Speisen flambieren.
- Reinigen Sie die Ventilatoren regelmäßig. Es darf sich kein Fett auf dem Ventilator oder Filter ansammeln.
- Verwenden Sie Pfannen der richtigen Größe. Verwenden Sie immer Kochgeschirr, das für die Größe des Kochfelds geeignet ist.
3. Einrichtung und Installation
The Nutone Range Hood Model NU230WW is designed for wall-mount installation. Ensure you have all necessary components and tools before beginning installation.
3.1 Benötigte Komponenten (nicht im Lieferumfang enthalten)
- 1-level 75-watt bulb (for lighting)
- Charcoal filter 41F (required for non-ducted installations)
- Appropriate electrical wiring and connectors
- Ductwork (for ducted installations)
3.2 Elektrische Anforderungen
The unit requires an AC input of 120V, 60Hz, 2.5A. Ensure the electrical supply meets these specifications and is installed by a qualified electrician.
3.3 Abmessungen und Platzierung
The range hood measures approximately 30" W x 17.5" D. Proper clearance above your cooking surface is crucial for optimal performance and safety. Refer to local building codes and the cooking appliance manufacturer's recommendations for minimum clearance.
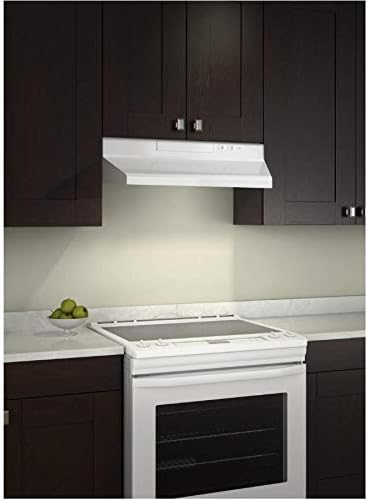
Figure 3.1: Nutone Range Hood Model NU230WW installed in a kitchen setting. This image illustrates the typical appearance of the range hood when mounted above a cooking range.
3.4 Installationsschritte (Allgemein)view)
- Bereiten Sie den Installationsbereich vor: Ensure the wall surface is clean, dry, and structurally sound to support the weight of the range hood. Mark the mounting points according to the installation template (if provided with the product packaging).
- Elektroverkabelung: Route the electrical wiring to the installation point. Connect the wiring to the range hood's terminal block as per the wiring diagram provided in the full installation guide (not included in this general manual).
- Montieren Sie die Motorhaube: Secure the range hood to the wall using appropriate fasteners. Ensure it is level and firmly attached.
- Lüftungskanäle (falls zutreffend): Connect the ductwork from the range hood to the exterior vent. Ensure all connections are sealed to prevent air leaks.
- Install Filters and Bulb: Insert the aluminum grease filter. If using a non-ducted setup, install the charcoal filter 41F. Install the 75-watt light bulb.
- Testbetrieb: Restore power and test the fan speeds and lighting to ensure proper functionality.
For detailed, step-by-step installation instructions, please refer to the complete installation guide included with your product packaging.
4. Bedienungsanleitung
Your Nutone Range Hood is designed for simple and efficient operation.
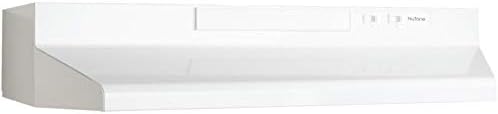
Abbildung 4.1: Vorderseite view of the Nutone Range Hood, highlighting the control panel area.
4.1 Lüfterbetrieb
- The range hood is equipped with a 2-speed rocker switch located on the front control panel.
- Den Ventilator einschalten ON to the low speed setting, press the rocker switch to the first position.
- To increase the fan speed to high, press the rocker switch to the second position. At high speed, the fan provides up to 160 CFM (Cubic Feet Per Minute) of airflow, with a maximum CFM of 210.
- Den Ventilator einschalten AUS, return the rocker switch to the neutral (center) position.
4.2 Beleuchtungsbetrieb
- The range hood features a light socket for a 75-watt bulb (not included).
- The light is controlled by a separate push button switch on the control panel.
- Press the button once to turn the light ON.
- Press the button again to turn the light AUS.
For best results, turn on the range hood a few minutes before cooking to establish an airflow pattern, and leave it on for a few minutes after cooking to clear any remaining smoke or odors.
5. Wartung
Regular maintenance ensures the longevity and optimal performance of your Nutone Range Hood. Always disconnect power to the unit before performing any maintenance.
5.1 Außenreinigung
- The exterior of the range hood is finished in white and is designed to be easy to clean.
- Wipe surfaces regularly with a soft cloth dampmit mildem Reinigungsmittel und warmem Wasser.
- Do not use abrasive cleaners, steel wool, or scouring pads, as these can scratch the finish.
- Nach der Reinigung gründlich trocknen.
5.2 Reinigung des Aluminium-Fettfilters
The aluminum grease filter should be cleaned regularly, depending on cooking frequency and type. A dirty filter can reduce airflow and increase fire risk.
- Entfernen Sie den Filter: Locate the aluminum grease filter beneath the hood. It typically has a small latch or spring mechanism. Gently push or pull the latch to release the filter and slide it out.
- Reinigen Sie den Filter: The filter can be washed by hand in hot water with a mild dish soap, or placed in a dishwasher. For stubborn grease, soak the filter in hot, soapy water before scrubbing with a non-abrasive brush.
- Trocknen und Wiedereinbauen: Ensure the filter is completely dry before reinstalling it. Slide the filter back into its slot until it clicks securely into place.
5.3 Replacing the Charcoal Filter (Non-Ducted Installations Only)
If your range hood is installed in a non-ducted configuration, it uses a charcoal filter (Nutone part 41F) to remove odors. This filter is not washable and must be replaced periodically, typically every 3-6 months depending on usage.
- Alten Filter entfernen: Disconnect power. Locate the charcoal filter, usually positioned above the grease filter or near the fan motor. Follow the instructions in your full installation guide for specific removal steps.
- Neuen Filter installieren: Place the new Nutone charcoal filter 41F into position, ensuring it is securely seated.
- Strom wiederherstellen: Reconnect power and test the unit.
6. Fehlerbehebung
Bevor Sie sich an den Kundendienst wenden, lesen Sie bitte die folgenden häufig auftretenden Probleme und deren Lösungen:
| Problem | Mögliche Ursache | Lösung |
|---|---|---|
| Lüfter läuft nicht. | Keine Stromversorgung. Rocker switch is OFF. Motorstörung. |
Leistungsschalter/Sicherung prüfen. Ensure rocker switch is in ON position. Wenden Sie sich an qualifiziertes Servicepersonal. |
| Licht funktioniert nicht. | Bulb is burnt out or loose. Light switch malfunction. |
Replace bulb (75-watt max). Ensure bulb is screwed in tightly. Wenden Sie sich an qualifiziertes Servicepersonal. |
| Poor airflow or excessive noise. | Verstopfter Fettfilter. Clogged charcoal filter (non-ducted). Verstopfung im Lüftungssystem. Unsachgemäße Installation. |
Clean aluminum grease filter. Replace charcoal filter 41F. Check ductwork for blockages. Review Installationsschritte durchführen oder einen Fachmann konsultieren. |
| Vibration. | Lockere Befestigungsschrauben. Fan blade imbalance. |
Prüfen und ziehen Sie alle Befestigungsschrauben fest. Wenden Sie sich an qualifiziertes Servicepersonal. |
7. Spezifikationen
| Modellnummer | NU230WW |
| Marke | Nutone |
| Farbe | Weiß |
| Produktabmessungen (B x T x H) | 30" x 17.5" x 30" (approximate installed height may vary) |
| Artikelgewicht | 11.99 Pfund |
| Luftstromkapazität | 160 CFM (High Speed), 210 Max CFM |
| Anzahl der Geschwindigkeiten | 2 |
| Steuerelementtyp | Push Button (Light), Rocker Switch (Fan) |
| Bandtage | 120 Volts, 60Hz, 2.5A |
| Montagetyp | Wandhalterung |
| Filtertyp | Aluminum Grease Filter (included), Mesh; Charcoal Filter (optional, part 41F) |
| Besonderheit | Leicht zu reinigen |
| UPC | 026715253869 |
8. Garantie und Support
Nutone products are manufactured to high-quality standards. For specific warranty details, including coverage period and terms, please refer to the warranty card included with your product packaging or visit the official Nutone webWebsite.
For technical support, replacement parts, or service inquiries, please contact Nutone Customer Service. Have your model number (NU230WW) and purchase date ready when contacting support.
Contact information for Nutone can typically be found on their official webauf der Website oder auf der Produktverpackung.