
1. Einleitung
The XTUGA X-CM01 is a professional UHF wireless lavalier microphone system designed for high-quality audio recording. It is suitable for various applications including photography, video recording, news interviews, and classroom lectures. This system provides stable signal transmission with 16 selectable channels to minimize interference, offering a wireless range of up to 50 meters (164 feet). It is compatible with DSLR cameras, camcorders, smartphones, laptops, and PCs.
2. Packungsinhalt
Bitte überprüfen Sie den Packungsinhalt, um sicherzustellen, dass alle Artikel vorhanden sind:
- 1 x XTUGA X-CM01 UHF Receiver
- 1 x XTUGA X-CM01 UHF Transmitter
- 1 x Lavalier-Mikrofon
- 1 x 3.5mm TRS to TRS Cable (for cameras/camcorders)
- 1 x 3.5mm TRS to TRRS Cable (for smartphones/laptops)
- 1 x Kameraschuhhalterung
- 1 x Belt Clip (pre-attached to units)
- Benutzerhandbuch (dieses Dokument)
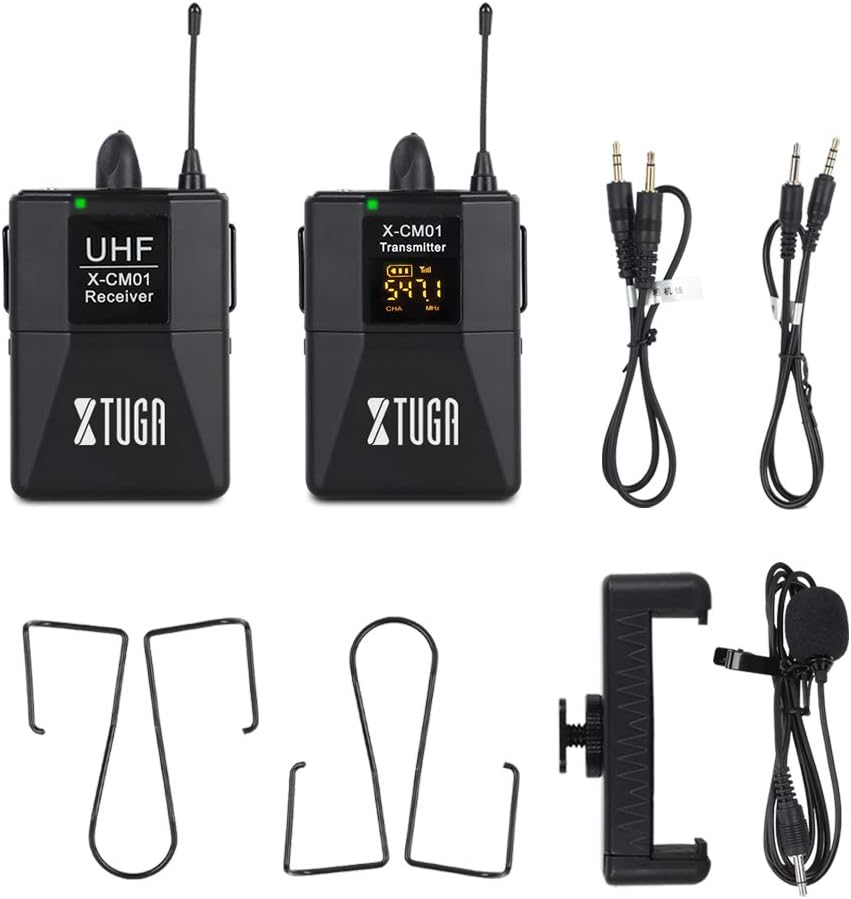
Abbildung 2.1: All components included in the XTUGA X-CM01 package. This includes the receiver, transmitter, lavalier microphone, two 3.5mm cables, and a camera shoe mount.
3. Einrichtung
3.1. Einlegen der Batterie
Both the receiver and transmitter require two AA, 1.5V batteries each. Batteries are not included in the package.
- Locate the battery compartment cover on the back of both the receiver and transmitter units.
- Schieben Sie die Abdeckung auf.
- Legen Sie zwei AA-Batterien ein und achten Sie dabei auf die richtige Polarität (+/-).
- Schließen Sie den Batteriefachdeckel fest.

Abbildung 3.1: Open battery compartment showing insertion of AA batteries. The system requires two AA batteries for each unit (transmitter and receiver).
3.2. Anschließen des Lavalier-Mikrofons
Connect the lavalier microphone to the transmitter unit.
- Locate the 3.5mm microphone input jack on the top of the transmitter.
- Insert the 3.5mm plug of the lavalier microphone firmly into this jack.
- Attach the lavalier microphone to your clothing, approximately 6-8 inches from your mouth, using the lapel clip.
3.3. Connecting the Receiver to a Recording Device
The receiver can be connected to various recording devices using the appropriate 3.5mm cable.
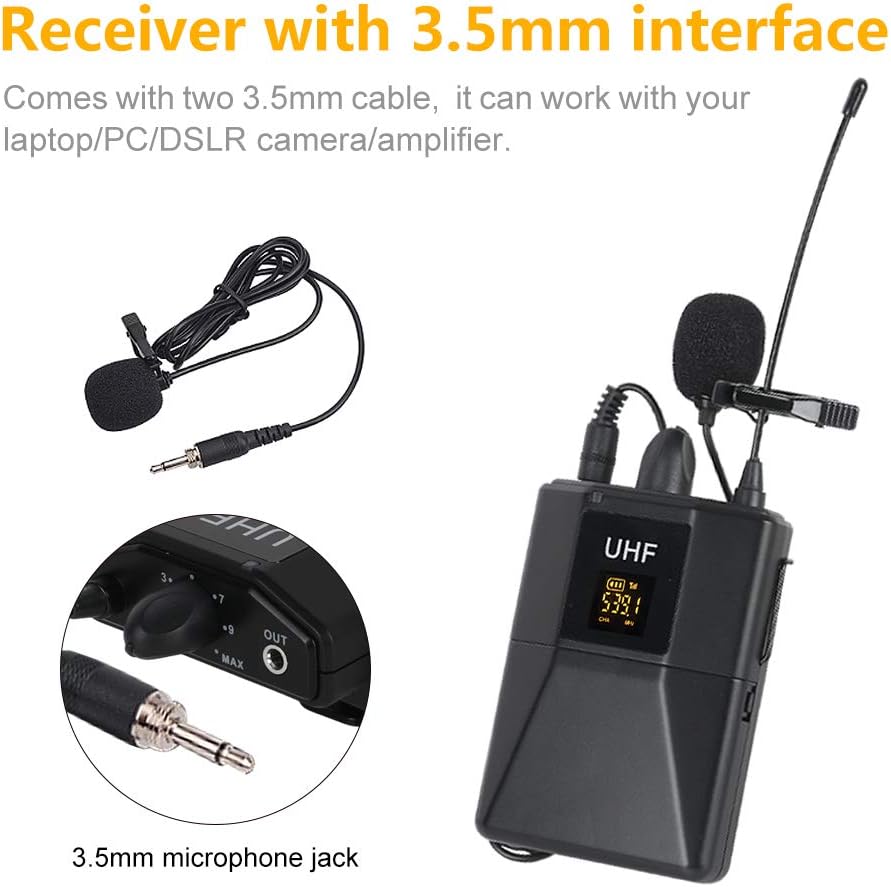
Abbildung 3.2: The receiver unit showing its 3.5mm output jack and the two types of 3.5mm cables provided for connecting to different devices.
- For DSLR Cameras/Camcorders/Audio Recorders:
Verwenden Sie die 3.5-mm-TRS-zu-TRS-Kabel (two black rings on the plug). Connect one end to the "OUT" jack on the receiver and the other end to the microphone input jack on your camera or recording device.

Abbildung 3.3: Receiver connected to a DSLR camera via the camera shoe mount and 3.5mm TRS cable.
- For Smartphones/Laptops/PCs:
Verwenden Sie die 3.5-mm-TRS-zu-TRRS-Kabel (three black rings on the plug). Connect one end to the "OUT" jack on the receiver and the other end to the headphone/microphone combo jack on your smartphone or laptop. For PCs with separate microphone and headphone jacks, you may need an additional adapter (not included).

Abbildung 3.4: Receiver connected to a smartphone using the appropriate 3.5mm TRRS cable.
3.4. Montage des Empfängers
The receiver unit can be mounted on a camera using the included shoe mount or attached to clothing using the belt clip.
- Camera Shoe Mount: Slide the camera shoe mount onto the receiver's belt clip, then slide the entire assembly onto your camera's hot shoe or cold shoe mount.
- Gürtelschnalle: Use the integrated belt clip to attach the receiver to your belt, pocket, or other clothing.
4. Bedienungsanleitung
4.1. Ein-/Ausschalten
Press and hold the power button on both the receiver and transmitter units for a few seconds to turn them on or off. The LCD display will illuminate when powered on.
4.2. Kanalauswahl
The X-CM01 system offers 16 selectable UHF channels to help avoid interference. Both the transmitter and receiver must be set to the same channel for proper operation.
- With the transmitter and receiver powered on, observe the channel number displayed on their LCD screens.
- On the transmitter, press the "FM keys" button (or channel selection button) to cycle through the available channels.
- Ensure the receiver automatically syncs to the same channel as the transmitter. If not, manually adjust the receiver's channel to match the transmitter's.
- Select a channel that provides clear audio without interference.

Abbildung 4.1: Transmitter unit displaying the channel selection button ("FM keys") and the LCD screen showing the current channel and frequency.
4.3. Lautstärkeregelung
Both the transmitter and receiver units have individual volume controls. Adjust these to achieve optimal audio levels without distortion.
- Transmitter Volume: Adjust the input gain on the transmitter to prevent clipping (distortion) from the lavalier microphone.
- Empfängerlautstärke: Adjust the output level on the receiver to match the input sensitivity of your recording device (camera, smartphone, etc.). Start with a moderate level and adjust as needed.
Tipp: It is often best to set the transmitter volume to a level where the audio is strong but not peaking, and then fine-tune the overall recording level using the receiver's volume control and your recording device's input settings.
4.4. Arbeitsbereich
The system has a wireless range of up to 50 meters (164 feet) in an open environment. Obstacles such as walls, metal structures, and other wireless devices can reduce this range. Maintain a clear line of sight between the transmitter and receiver for best performance.

Abbildung 4.2: Visual representation of the 50-meter (164 feet) transmission distance in an open environment.
5. Wartung
- Reinigung: Reinigen Sie die Geräte mit einem weichen, trockenen Tuch. Verwenden Sie keine flüssigen Reiniger oder Lösungsmittel.
- Lagerung: When not in use for extended periods, remove the batteries from both units to prevent leakage. Store the system in a cool, dry place.
- Batteriewechsel: Replace batteries when the low battery indicator appears on the LCD display. Always use fresh AA 1.5V batteries.
6. Fehlerbehebung
| Problem | Mögliche Ursache | Lösung |
|---|---|---|
| Kein Geräusch oder sehr geringer Geräuschpegel. |
|
|
| Störungen oder statische Aufladung. |
|
|
| Der Ton setzt zeitweise aus. |
|
|
| Verzerrter Ton. |
|
|
7. Spezifikationen
| Marke | XTUGA |
| Modellname | X-CM01 |
| Kabelloser Typ | UHF |
| Frequenzbereich | 519-551MHz (16 selectable channels) |
| Drahtlose Reichweite | Up to 50 meters (164 feet) in open environment |
| Steckertyp | 3.5 mm Klinke |
| Kompatible Geräte | Camcorder, Camera, Smartphone, Laptop, PC, Audio Recorder |
| Audio Empfindlichkeit | 98 Dezibel |
| Signal-Rausch-Verhältnis | 98 dB |
| Stromquelle | Battery Powered (2 x AA 1.5V batteries per unit) |
| Geschätzte Batterielebensdauer | 4-5 hours (with fresh AA batteries) |
| Artikelgewicht | 350 Gramm (Gesamtgewicht der Verpackung) |
8. Garantie und Support
For warranty information or technical support, please refer to the retailer's return policy or contact XTUGA customer service through their official website or the platform where the product was purchased. Please have your model number (X-CM01) and purchase details ready when contacting support.