
1. Einleitung
Thank you for choosing the Arcam SA10 Class A/B Integrated Amplifier. This manual provides essential information for setting up, operating, and maintaining your amplifier to ensure years of high-quality audio enjoyment. The SA10 is designed to deliver class-leading sound quality, bringing your music to life with its powerful 50W per channel output, high-performance ESS9016K2M Sabre DAC, and low noise floor. It offers a listening experience as close to the artist's original performance as possible.
2. Sicherheitshinweise
Bitte lesen Sie vor der Inbetriebnahme des Geräts alle Sicherheitshinweise sorgfältig durch. Bewahren Sie diese Bedienungsanleitung zum späteren Nachschlagen auf.
- Setzen Sie dieses Gerät nicht Regen oder Feuchtigkeit aus.
- Die Lüftungsöffnungen dürfen nicht blockiert werden. Die Installation muss gemäß den Anweisungen des Herstellers erfolgen.
- Installieren Sie das Gerät nicht in der Nähe von Wärmequellen wie Heizkörpern, Heizregistern, Öfen oder anderen Geräten (einschließlich ampKonverter (Lüfter), die Wärme erzeugen.
- Schützen Sie das Netzkabel vor Beschädigungen oder Beschädigungen durch Fußgänger, insbesondere an den Steckern, Steckdosen und an der Stelle, an der es aus dem Gerät austritt.
- Verwenden Sie nur vom Hersteller angegebene Zusatzgeräte/Zubehör.
- Trennen Sie das Gerät bei Gewitter oder längerer Nichtbenutzung vom Stromnetz.
- Überlassen Sie alle Wartungsarbeiten qualifiziertem Servicepersonal. Eine Wartung ist erforderlich, wenn das Gerät in irgendeiner Weise beschädigt wurde.
- Dieses Produkt enthält Chemikalien, von denen der Staat Kalifornien weiß, dass sie Krebs und Geburtsfehler oder andere Fortpflanzungsschäden verursachen.
3. Packungsinhalt
Bitte vergewissern Sie sich nach dem Öffnen des Kartons, dass alle folgenden Artikel vorhanden sind:
- Arcam SA10 Integrated Ampschwerer
- Netzkabel
- Fernbedienung (inkl. 2 AAA-Batterien)
- Benutzerhandbuch (dieses Dokument)
4. Produktüberschreitungview
Familiarize yourself with the front and rear panels of your Arcam SA10 ampschwerer.
4.1 Frontplatte
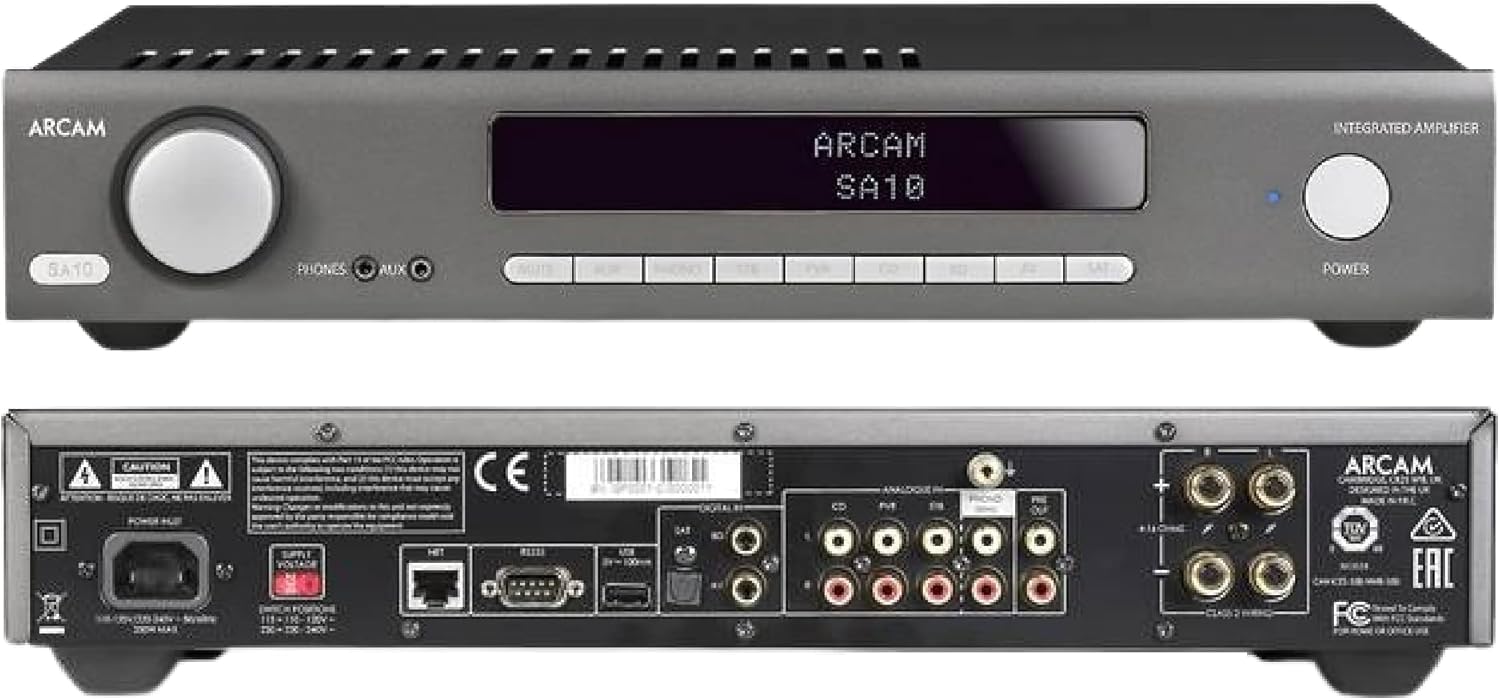
Figure 4.1: Front and Rear Panels of the Arcam SA10. The front panel features a large volume knob on the left, a display screen in the center, input selection buttons below the display, and a power button on the right. Headphone and auxiliary inputs are also present.
- Lautstärkeregler: Passt die Gesamtausgabelautstärke an.
- Bildschirm: Zeigt den aktuellen Eingangspegel, die Lautstärke und weitere Statusinformationen an.
- Eingabeauswahltasten: Allows selection between various audio sources (CD, Tuner, AV, SAT, etc.).
- Netzschalter: Schaltet die um ampVerstärker zwischen Standby- und Betriebsmodus.
- Kopfhörerausgang: 3.5-mm-Klinke zum Anschluss von Kopfhörern.
- Hilfseingang: 3.5mm jack for connecting portable audio devices.
4.2 Rückseite
The rear panel provides all the necessary connections for your audio system.
Figure 4.2: Detailed Rear Panel Connections. This view highlights the speaker terminals, analog RCA inputs (including Phono), digital optical and coaxial inputs, and the power inlet.
- Lautsprecheranschlüsse: Connect your passive speakers (left and right channels).
- Analog Inputs (RCA): Multiple stereo RCA inputs for connecting analog audio sources like CD players, tuners, or other line-level devices.
- Phono-Eingang (RCA): Dedicated input for turntables with moving magnet (MM) cartridges.
- Digitale Eingänge:
- Optisch (Toslink): For digital audio sources like TVs or game consoles.
- Koaxial: For digital audio sources like CD players or network streamers.
- Vorverstärkerausgang: Zum Anschluss an eine externe Stromversorgung ampVerstärker oder aktiver Subwoofer.
- USB-Anschluss: For firmware updates or service.
- Ethernet Anschluss: For network control and future updates.
- Wechselstromeingang: Verbindet die ampNetzteil an das Stromnetz.
5. Einrichtung
5.1 Platzierung
Place the Arcam SA10 on a stable, level surface away from direct sunlight, heat sources, and excessive moisture. Ensure adequate ventilation around the unit to prevent overheating. Do not place other components directly on top of the ampschwerer.
5.2 Anschließen von Lautsprechern
Connect your passive speakers to the speaker terminals on the rear panel. Ensure correct polarity (+ to + and - to -) for both left and right channels. Use high-quality speaker cables for optimal sound performance.
5.3 Anschließen von Audioquellen

Figure 5.3: The Arcam SA10 offers convenient connections including Toslink optical, two digital coaxial inputs, and three stereo analog RCA inputs, plus a dedicated phono input.
- Analoge Quellen: Connect CD players, tuners, or other line-level devices to the RCA analog inputs (CD, Tuner, AV, SAT).
- Drehscheibe: Connect a turntable with a moving magnet (MM) cartridge to the dedicated PHONO input.
- Digitale Quellen: Connect digital audio sources using either the optical (Toslink) or coaxial digital inputs.
- Portable Devices: Use the 3.5mm AUX input on the front panel for quick connection of portable media players.
5.4 Stromanschluss
Once all audio connections are made, connect the supplied AC power cord to the AC power inlet on the rear panel of the ampvom Verstärker zur Steckdose.
6. Bedienungsanleitung
6.1 Ein-/Ausschalten
Drücken Sie die LEISTUNG button on the front panel or the remote control to switch the amplifier on or into standby mode. The blue LED next to the power button indicates operational status.
6.2 Eingangsauswahl
Use the input selection buttons on the front panel or the remote control to choose your desired audio source. The selected input will be displayed on the front panel screen.
6.3 Lautstärkeregelung
Drehen Sie das große VOLUMEN knob on the front panel clockwise to increase volume and counter-clockwise to decrease it. Alternatively, use the volume up/down buttons on the remote control.
6.4 Kopfhörernutzung
Plug your headphones into the 3.5mm TELEFONE jack on the front panel. Connecting headphones will automatically mute the main speaker outputs.
6.5 Fernbedienung & App-Steuerung

Figure 6.5: Control your SA10 with the included remote or via UPnP audio and basic functions using the FREE MusicLife App on your iPad, iPhone, or Android device.
The included remote control provides full functionality for the SA10. Ensure the supplied AAA batteries are correctly inserted. For advanced control and UPnP audio streaming, download the free Arcam MusicLife App from your device's app store (available for iOS and Android).
7. Wartung
To maintain the appearance and performance of your Arcam SA10:
- Wischen Sie die Außenflächen mit einem weichen, trockenen, fusselfreien Tuch ab.
- Verwenden Sie keine Scheuermittel, Wachse oder Lösungsmittel.
- Stellen Sie sicher, dass die Lüftungsgitter frei von Staub und Verunreinigungen sind.
- Disconnect the power cord from the wall outlet before cleaning.
8. Fehlerbehebung
If you experience issues with your Arcam SA10, refer to the following common problems and solutions:
| Problem | Mögliche Ursache | Lösung |
|---|---|---|
| Kein Strom | Netzkabel nicht angeschlossen; Steckdose defekt. | Vergewissern Sie sich, dass das Netzkabel fest angeschlossen ist. Versuchen Sie es mit einer anderen Steckdose. |
| Kein Ton | Falscher Eingang ausgewählt; Lautsprecherkabel lose; Lautstärke zu niedrig; Stummschaltung aktiviert. | Select correct input. Check speaker cable connections. Increase volume. Deactivate mute. |
| Verzerrter Ton | Source signal too high; speaker impedance mismatch; faulty cables. | Reduce source output level. Ensure speakers are compatible (8 ohms recommended). Check/replace cables. |
| Fernbedienung funktioniert nicht | Batterien leer oder falsch eingelegt; Blockade zwischen Fernbedienung und ampschwerer. | Replace batteries. Ensure correct polarity. Remove obstructions. |
If the problem persists, please contact Arcam customer support or your authorized dealer.
9. Spezifikationen
Key technical specifications for the Arcam SA10 Integrated AmpReiniger:

Figure 9.1: The Arcam SA10 delivers 50 watts per channel, features 5 analog inputs (including phono), 3 digital inputs, a 32-bit DAC, and boasts a low total harmonic distortion + noise of 0.003%.
- Leistungsabgabe: 50W per channel (8 ohms, 20-20,000 Hz, at 0.5% THD)
- Amplifizierungstyp: Klasse A/B
- Digital-Analog-Wandler (DAC): 32-bit ESS9016K2M Sabre DAC
- Analoge Eingänge: 5 (including 1 dedicated Phono input for Moving Magnet cartridges)
- Digitale Eingänge: 3 (1 Optical Toslink, 2 Coaxial)
- Gesamte harmonische Verzerrung + Rauschen: 0.003 %
- Abmessungen (B x T x H): 17.05 x 12.72 x 3.43 Zoll (433 x 323 x 87 mm)
- Gewicht: 2.03 Pfund (0.92 kg)
- Kontrolle: Full I/P control, Remote Control, MusicLife App compatibility
- Batterien für die Fernbedienung: 2 AAA (enthalten)
10. Garantie und Support
Arcam products are designed and manufactured to the highest standards. For information regarding warranty coverage, technical support, or service, please refer to the warranty card included with your product or visit the official Arcam webBewahren Sie Ihren Kaufbeleg für Garantieansprüche auf.