1. Einleitung
The TC Electronic Flashback 2 Mini Delay is a compact and powerful delay pedal designed for guitarists. It features next-generation delay algorithms, the innovative MASH footswitch for expressive control, and TonePrint technology for custom sound creation. This manual provides essential information for setting up, operating, and maintaining your Flashback 2 Mini Delay pedal.
2. Wichtige Sicherheitshinweise
- Lesen Sie diese Anweisungen sorgfältig durch, bevor Sie das Gerät in Betrieb nehmen.
- Bewahren Sie diese Anleitung zum späteren Nachschlagen auf.
- Beachten Sie alle Warnungen und befolgen Sie alle Anweisungen.
- Verwenden Sie dieses Gerät nicht in der Nähe von Wasser.
- Nur mit trockenem Tuch reinigen.
- Die Lüftungsöffnungen dürfen nicht blockiert werden. Die Installation muss gemäß den Anweisungen des Herstellers erfolgen.
- Installieren Sie das Gerät nicht in der Nähe von Wärmequellen wie Heizkörpern, Heizregistern, Öfen oder anderen Geräten (einschließlich ampKonverter (Lüfter), die Wärme erzeugen.
- Verwenden Sie nur vom Hersteller angegebene Zusatzgeräte/Zubehör.
- Überlassen Sie alle Wartungsarbeiten qualifiziertem Servicepersonal. Eine Wartung ist erforderlich, wenn das Gerät in irgendeiner Weise beschädigt wurde.
3. Packungsinhalt
Bitte prüfen Sie das Paket auf folgende Artikel:
- TC Electronic Flashback 2 Mini Delay Pedal
- Benutzerhandbuch (dieses Dokument)
- TC Electronic sticker
Note: A 9V DC power supply (not included) is required for operation.
4. Bedienelemente und Anschlüsse

Abbildung 1: Vorderseite view of the Flashback 2 Mini Delay pedal, showing the three control knobs and the MASH footswitch.
4.1 Bedienelemente auf der Oberseite
- Verzögerungsregler: Controls the delay time, from short slap-back echoes to long, ambient repeats.
- F.BACK-Knopf: Adjusts the number of repeats (feedback) for the delay effect. Turn clockwise for more repeats, counter-clockwise for fewer.
- LEVEL-Regler: Sets the mix level of the delayed signal relative to the dry signal.
- MASH Footswitch: This multi-functional footswitch acts as an on/off switch with a single tap. Pressing and holding the footswitch engages the MASH expression control, allowing you to dynamically control various delay parameters depending on the selected TonePrint.
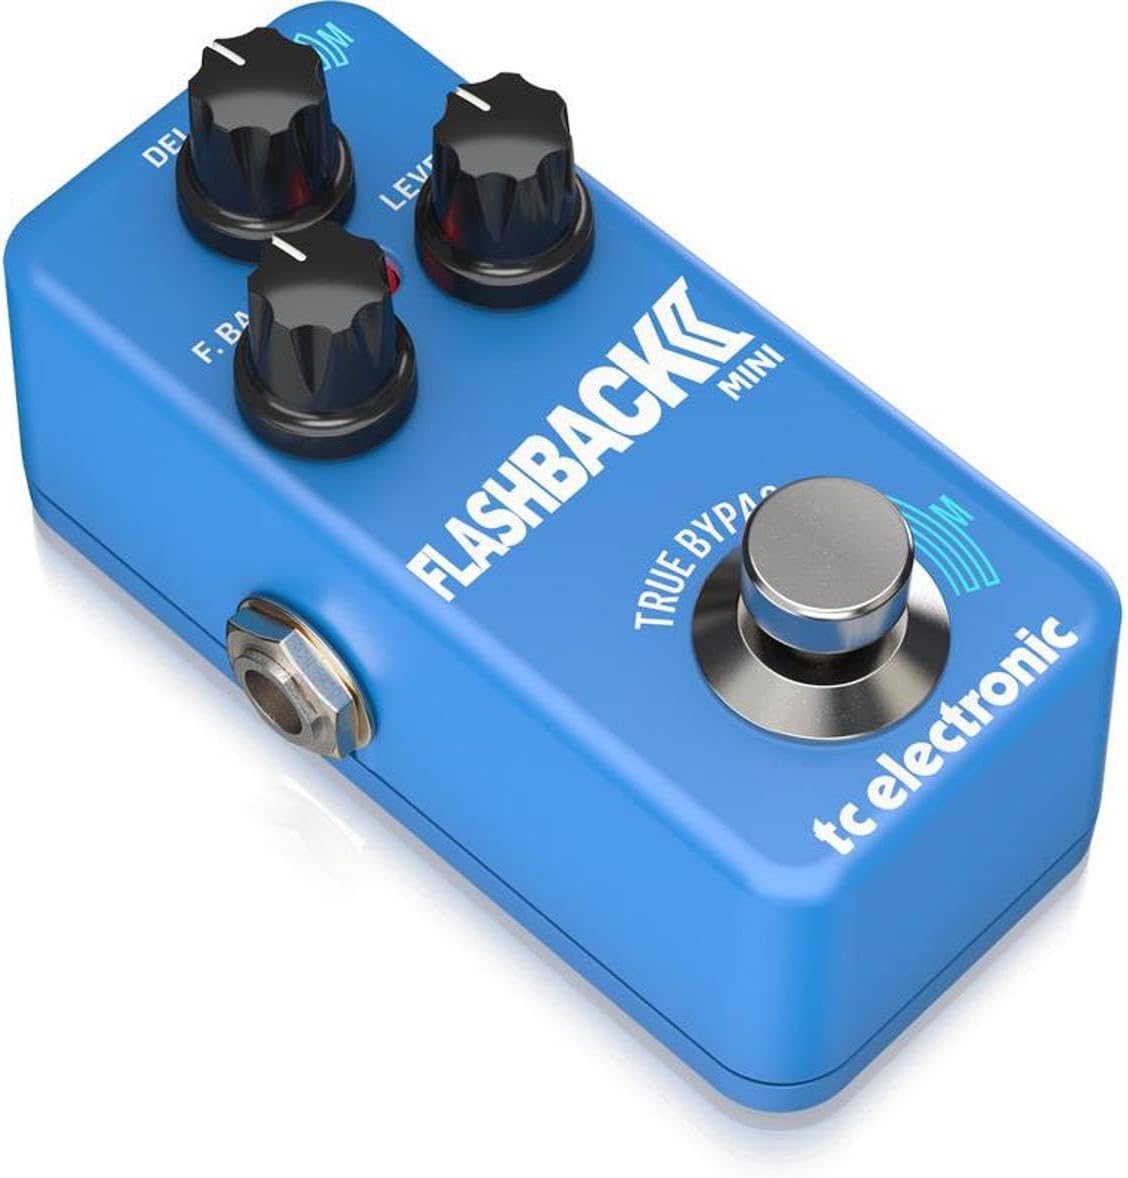
Abbildung 2: Schräg view of the Flashback 2 Mini Delay pedal, highlighting the input, output, and power connections.
4.2 Side Panel Connectors
- Eingangsbuchse: Connect your guitar or the output of another pedal here using a standard 1/4-inch instrument cable.
- OUTPUT-Buchse: Verbinden Sie dies mit Ihrem ampSchließen Sie den Verstärker oder den Eingang des nächsten Effektpedals in Ihrer Signalkette mit einem Standard-Instrumentenkabel (6,35 mm Klinke) an.
- 9-V-Gleichstromeingang: Connect a standard 9V DC, center-negative power supply (not included) here.
- USB-Anschluss: Used for connecting the pedal to a computer for TonePrint editing and firmware updates.
5. Einrichtung
Follow these steps to connect your Flashback 2 Mini Delay pedal:
- Stellen Sie sicher, dass Ihre amplifier is turned off or its volume is set to zero.
- Connect your guitar (or the output of a preceding pedal) to the EINGANG jack of the Flashback 2 Mini using a 1/4-inch instrument cable.
- Verbinden Sie AUSGABE jack of the Flashback 2 Mini to your amplifier (or the input of a subsequent pedal) using another 1/4-inch instrument cable.
- Connect a 9V DC, center-negative power supply (not included) to the 9-V-Gleichstromeingang.
- Sobald alle Verbindungen hergestellt sind, können Sie Ihr Gerät einschalten. amplifier and begin using the pedal.
6. Operating the Flashback 2 Mini
6.1 Grundlegende Bedienung
To activate the delay effect, simply tap the MASH footswitch. The LED indicator will illuminate. Tap it again to bypass the effect. Adjust the DELAY, F.BACK, and LEVEL knobs to shape your desired delay sound.
6.2 MASH Footswitch Functionality
The MASH footswitch offers pressure-sensitive expression control. While the effect is active, press and hold the footswitch with varying pressure to dynamically control a specific parameter of the delay. The parameter controlled by MASH is determined by the selected TonePrint. For example, MASH can control delay time, feedback, modulation, or other effects.
6.3 TonePrint Feature
TonePrint allows you to load custom delay sounds created by TC Electronic and famous artists, or design your own using the free TonePrint Editor software. To load a TonePrint:
- Download the free TC Electronic TonePrint App for your smartphone or the TonePrint Editor for your computer.
- Using the app, select a TonePrint and 'beam' it to your pedal by holding your phone's speaker near your guitar pickup.
- Alternatively, connect the pedal to your computer via the USB port and use the TonePrint Editor software to load or create custom sounds.
6.4 Delay Algorithms
The Flashback 2 Mini features a range of high-quality delay algorithms, including new Tape and Analog algorithms for classic delay tones, and Crystal Delay algorithms based on the Sub'n'Up Octaver for unique, shimmering effects.
6.5 Bypass Modes (True Bypass / Buffered Bypass)
The pedal offers switchable bypass modes: True Bypass and Buffered Bypass. True Bypass ensures that your signal remains completely unaltered when the pedal is off, while Buffered Bypass provides a strong, clean signal over long cable runs. The bypass mode can typically be switched via an internal dip switch or through the TonePrint Editor software. Refer to the TonePrint Editor documentation for specific instructions on changing the bypass mode.
7. Wartung
- Halten Sie das Pedal sauber, indem Sie es mit einem weichen, trockenen Tuch abwischen. Vermeiden Sie die Verwendung von Scheuermitteln oder Lösungsmitteln.
- Lagern Sie das Pedal in einer trockenen Umgebung, fern von extremen Temperaturen und hoher Luftfeuchtigkeit.
- Ensure all cables are securely connected during use and disconnected when not in use to prevent accidental damage.
8. Fehlerbehebung
- Kein Ton: Check all cable connections. Ensure the power supply is correctly connected and functioning. Verify that your ampDer Verstärker ist eingeschaltet und die Lautstärke aufgedreht.
- Schwacher oder verzerrter Ton: Check cable integrity. Ensure the power supply provides the correct voltage (9V DC) and polarity (center-negative). Adjust the LEVEL knob on the pedal.
- Pedal schaltet sich nicht ein: Confirm the power supply is connected and working. Try a different power outlet or power supply.
- MASH Footswitch Not Responding: Ensure the pedal is powered on and the effect is active. If using a custom TonePrint, verify that MASH control is assigned to a parameter within the TonePrint Editor.
- TonePrint Transfer Issues: Ensure your smartphone speaker is placed directly over your guitar pickup for beaming. For USB connection, ensure the correct drivers are installed and the TonePrint Editor software is up to date.
9. Spezifikationen
| Artikelgewicht | 7.1 Unzen (200 Gramm) |
| Technische Daten | 3.66"L x 2.01"B x 1.97"H (9.3 x 5.1 x 5 cm) |
| Stromquelle | Corded Electric (9V DC, center-negative, not included) |
| Bandtage | 9 Volt |
| Hardware-Schnittstelle | USB |
| Signalformat | Analog (Analog-Dry-Through) |
| Bypass-Modus | Switchable True Bypass / Buffered Bypass |
10. Garantie und Support
TC Electronic products are designed for reliability and performance. For detailed warranty information, please refer to the warranty card included with your product or visit the official TC Electronic website. For technical support, firmware updates, or to access the TonePrint Editor, please visit the TC Electronic support page online.
You can find additional resources and contact information at: www.tcelectronic.com