
Einführung
This manual provides instructions for the installation, operation, and maintenance of the Maxxima 8-inch Recessed Commercial LED Downlight. This fixture features selectable color temperature (CCT) and wattage, offering versatility for various lighting needs. It is designed for commercial applications and is 0-10V dimmable, Energy Star certified, and UL listed.
Sicherheitshinweise
WARNUNG: Risk of electric shock. Disconnect power at the fuse or circuit breaker before installation or servicing. This product must be installed in accordance with the applicable installation code by a person familiar with the construction and operation of the product and the hazards involved.
- Lesen Sie vor der Installation alle Anweisungen.
- Do not install in locations where the operating temperature exceeds -20°C to 40°C (-4°F to 104°F).
- Geeignet für damp Standorte.
- IC Rated: Suitable for direct contact with insulation.
- Stellen Sie sicher, dass alle elektrischen Anschlüsse sicher sind und den örtlichen Vorschriften und Verordnungen entsprechen.
Packungsinhalt
Vergewissern Sie sich vor Beginn der Installation, dass alle Komponenten vorhanden sind:
- 1x Maxxima 8-inch Recessed Commercial LED Downlight
- Pre-wired flexible metal conduit (whip)
- Ceiling tension spring clips (pre-attached)
- Drahtmuttern
- Safety cable (pre-attached)
Technische Daten
| Besonderheit | Spezifikation |
|---|---|
| Modellnummer | 755183179899 |
| Eingangslautstärketage | 110-277 VAC, 50 / 60 Hz |
| Wastage | Selectable: 12W / 20W / 30W |
| Helligkeit | Up to 2400 Lumens (depending on wattage Auswahl) |
| Farbtemperatur (CCT) | Selectable: 2700K / 3000K / 3500K / 4000K / 5000K |
| Dimmen | 0-10V Dimming (20% to 100% range) |
| Maße | 10.2" Diameter x 4.6" Depth |
| Peitschenlänge | 18.5 Zoll |
| Sicherheitskabellänge | 19.5 Zoll |
| Betriebstemperatur | -20°C bis 40°C |
| Zertifizierungen | Energy Star, UL, IC Rated |
| Material | Metall |
| Gewicht | 1.83 Pfund |
Setup und Installation
Bevor Sie beginnen: Ensure power is disconnected at the circuit breaker. This fixture is designed for flush mount installation into standard ceilings.
- Deckenöffnung vorbereiten: Create an appropriate size opening in the ceiling for the 8-inch downlight. Refer to local building codes for exact requirements.
- Kabelverbindungen:
- Connect the black wire from the fixture's pre-wired whip to the live (hot) wire from the power supply using a wire nut.
- Connect the white wire from the fixture's pre-wired whip to the neutral wire from the power supply using a wire nut.
- Connect the green (ground) wire from the fixture's pre-wired whip to the ground wire from the power supply using a wire nut.
- For 0-10V dimming, connect the purple wire to the dimmer's positive (+) dimming control wire and the gray wire to the dimmer's negative (-) dimming control wire. If not using dimming, cap these wires individually.
Image: Maxxima 8-inch Recessed Commercial LED Downlight with flexible conduit and wiring.

This image displays the downlight with its pre-wired flexible metal conduit, showing the individual wires for power and dimming connections. The tension spring clips are visible on the sides.
- Sichere Befestigung: Gently push the fixture into the ceiling opening. The pre-attached tension spring clips will automatically engage and secure the downlight firmly against the ceiling surface. Ensure the safety cable is also properly secured to a structural element if required by local codes.
Abbildung: Rückseite view of the Maxxima 8-inch Recessed Commercial LED Downlight showing tension clips.

This image shows the rear of the downlight, highlighting the robust tension spring clips that facilitate secure installation into the ceiling.
Bedienungsanleitung
The Maxxima 8-inch Recessed Commercial LED Downlight features selectable color temperature and wattage settings, allowing customization of light output.
- Farbtemperatur (CCT) auswählen: Before installation, or by carefully removing the fixture, locate the 'KELVIN SETTING' switch on the back of the downlight. Slide the switch to select your desired color temperature: 2700K (Soft White), 3000K (Warm White), 3500K (Bright White), 4000K (Neutral White), or 5000K (Daylight).
- Wählen Sie Wattage: Locate the 'WATTAGE SETTING' switch on the back of the downlight. Slide the switch to select your desired wattage: Low (12W), Med (20W), or High (30W). This will adjust the lumen output accordingly.
- Dimmfunktion: If connected to a compatible 0-10V dimmer, the light output can be adjusted from 20% to 100% brightness using the dimmer control.
Image: Maxxima 8-inch Recessed Commercial LED Downlight with CCT and Wattage Wahlschalter.
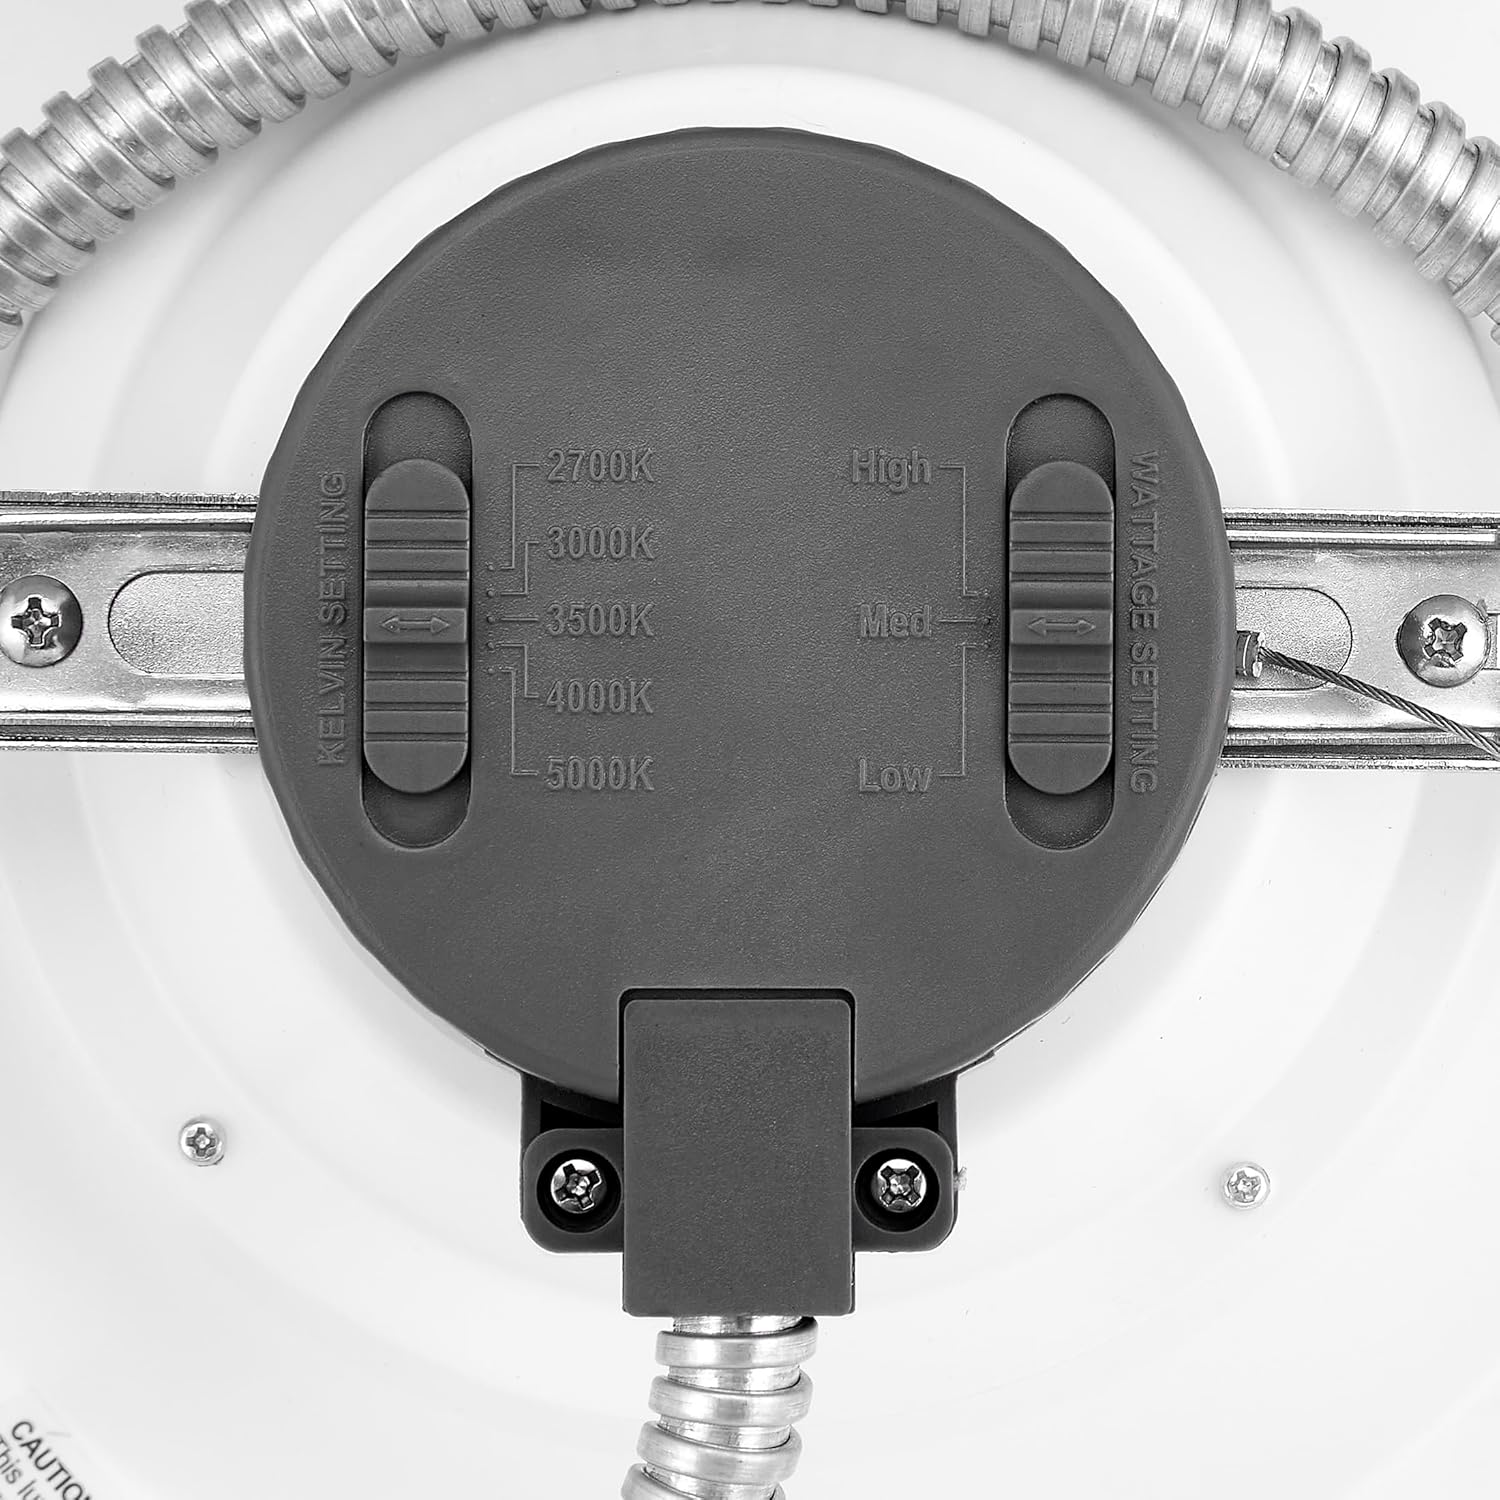
Dieses Bild liefert eine detaillierte Ansicht. view of the back of the downlight, clearly showing the two slider switches for adjusting Kelvin (color temperature) and Wattage-Einstellungen.
Image: Commercial LED Downlight illustrating 5 CCT options.

This image visually demonstrates the different color temperature options (2700K, 3000K, 3500K, 4000K, 5000K) available with the 8-inch commercial LED downlight.
Wartung
The Maxxima LED Downlight requires minimal maintenance. Ensure power is off before cleaning.
- Reinigung: Wischen Sie die Armatur mit einem weichen, trockenen oder leicht feuchten Tuch ab.amp Verwenden Sie kein Tuch. Scharfe Chemikalien, Scheuermittel oder Lösungsmittel, da diese die Oberfläche oder elektrische Bauteile beschädigen können.
- Inspektion: Überprüfen Sie die Leuchte regelmäßig auf Beschädigungen oder lose Verbindungen. Sollten Sie Mängel feststellen, wenden Sie sich an einen qualifizierten Elektriker.
Fehlerbehebung
| Problem | Mögliche Ursache | Lösung |
|---|---|---|
| Licht geht nicht an | No power to the fixture; Loose wiring connection; Faulty switch/breaker | Check power supply at the circuit breaker. Verify all wire connections are secure. Test the switch or replace if faulty. |
| Das Licht flackert oder wird unerwartet schwächer | Inkompatibler Dimmer; Lose Verkabelung; Lautstärketage Schwankungen | Ensure a compatible 0-10V dimmer is used. Check all wiring connections. Consult an electrician for voltage-Probleme. |
| Falsche Farbtemperatur oder Helligkeit | CCT/Wattage selector switches set incorrectly | Adjust the CCT and Wattage selector switches on the back of the fixture to the desired settings. |
Garantie
This Maxxima LED Downlight is backed by a 5-year manufacturer's warranty. This warranty covers defects in materials and workmanship under normal use. For warranty claims or further details, please contact Maxxima customer support.
Unterstützung
For technical assistance, troubleshooting, or product information, please contact Maxxima customer support. You can find contact details and additional resources on the official Maxxima webWebsite oder durch Besuch der Maxxima Store bei Amazon.