1. Einleitung
This user manual provides essential information for the safe and effective operation of the RockSeed CM1 True-RMS Clamp Meter. Please read this manual thoroughly before using the device and retain it for future reference. The RockSeed CM1 is a versatile digital multimeter designed for measuring AC/DC voltage, AC current, resistance, continuity, diode, and temperature, featuring True-RMS for accurate readings on non-linear signals.
2. Sicherheitshinweise
Always adhere to basic safety precautions when using electrical testing equipment to prevent personal injury or damage to the meter or equipment under test. This device complies with CAT III 600V safety standards.
- Nicht anwenden voltagoder Stromstärke, die die für den Zähler festgelegten maximalen Grenzwerte überschreitet.
- Beim Arbeiten an unter Spannung stehenden Stromkreisen ist äußerste Vorsicht geboten.
- Stellen Sie sicher, dass die Messleitungen in gutem Zustand sind und keine Beschädigungen an der Isolierung aufweisen.
- Verify the meter's function by testing a known voltage or current source before use.
- Das Messgerät darf nicht in Betrieb genommen werden, wenn es beschädigt erscheint oder das Gehäuse geöffnet ist.
- Vor Funktionsänderungen die Messleitungen aus dem Stromkreis entfernen.
- Tauschen Sie die Batterien aus, sobald die Anzeige für niedrigen Batteriestand erscheint, um genaue Messwerte zu gewährleisten.
3. Produktüberschreitungview
3.1 Enthaltene Komponenten
- 1 x RockSeed CM1 True-RMS Clamp Meter
- 1 x K-Typ Thermoelement
- 1 x Test Leads (Pair)
- 2 x 1.5 V AAA-Batterien
- 1 x Benutzerhandbuch (dieses Dokument)
- 1 x Cloth Pouch
3.2 Meter Layout
The RockSeed CM1 clamp meter features a compact design with an intuitive layout for ease of use.

Image 3.2.1: The RockSeed CM1 Clamp Meter shown with its test leads, K-type thermocouple, AAA batteries, and protective cloth pouch.

Abbildung 3.2.2: Eine detaillierte view of the CM1's LCD display, rotary function dial, and control buttons, highlighting its various measurement capabilities.
Zu den Hauptkomponenten gehören:
- Clamp Kiefer: Wird zur berührungslosen Wechselstrommessung verwendet.
- Funktionsrad: Wählt den gewünschten Messmodus aus (z. B. AC/DC-Volumenmessung).tage, AC Current, Resistance, Temperature).
- LCD Anzeige: Zeigt Messwerte, Einheiten und Funktionsanzeigen an. Verfügt über eine Hintergrundbeleuchtung für schlechte Lichtverhältnisse.
- Tasten: Include 'RAN' (Range), 'V-Alert' (NCV), 'HOLD' (Data Hold), and 'SEL' (Select/Backlight).
- Eingangsbuchsen: 'COM' (Common) and 'INPUT' for connecting test leads.

Image 3.2.3: This image illustrates the test lead input jacks and the unique test line buckle design, which helps secure leads and prevent dust ingress.
4. Einrichtung
4.1 Einlegen der Batterie
The RockSeed CM1 requires two 1.5V AAA batteries for operation. These are included in the package.
- Suchen Sie den Batteriefachdeckel auf der Rückseite des Messgeräts.
- Öffnen Sie die Abdeckung mit einem Schraubendreher.
- Legen Sie die beiden AAA-Batterien ein und achten Sie dabei auf die richtige Polarität (+ und -).
- Bringen Sie die Batteriefachabdeckung wieder an und sichern Sie sie mit der Schraube.
4.2 Anschließen der Testleitungen
Für die meisten Messungen (Vol.tage, resistance, continuity, diode, temperature), test leads are required.
- Stecken Sie die schwarze Messleitung in die Eingangsbuchse „COM“ (Common).
- Stecken Sie die rote Messleitung in die Buchse „INPUT“.
- For temperature measurements, connect the K-type thermocouple to the designated input ports, observing polarity if applicable.
5. Bedienungsanleitung
Turn the function dial to the desired measurement mode. The meter features auto-ranging for most functions, simplifying operation.
5.1 AC/DC-Voltage Messung (V~)
- Drehen Sie den Funktionswähler auf die Position 'V~'.
- Schließen Sie die Messleitungen parallel an den zu messenden Stromkreis oder das Bauteil an.
- Das Display zeigt die Lautstärke antage reading. Use the 'SEL' button to switch between AC and DC voltage falls erforderlich.
5.2 AC Current Measurement (A~)
The CM1 uses its clamp jaw for non-contact AC current measurement, offering True-RMS accuracy and a resolution up to 1mA.
- Turn the function dial to the 'A~' position.
- Öffne dieamp Die Zange sollte nur einen Leiter des Stromkreises umschließen. Stellen Sie sicher, dass die Zange vollständig geschlossen ist.
- The display will show the AC current reading.

Abbildung 5.2.1: Die clamp meter is shown in use, measuring the AC current flowing through a single conductor of an outdoor air conditioning unit.
5.3 Widerstandsmessung (Ω)
- Turn the function dial to the 'Ω' position.
- Stellen Sie sicher, dass der Stromkreis oder das Bauteil spannungsfrei ist, bevor Sie die Messleitungen anschließen.
- Schließen Sie die Messleitungen an das Bauteil an, um dessen Widerstand zu messen.
5.4 Kontinuitätsprüfung (☊)
- Turn the function dial to the 'Ω' position and press 'SEL' until the continuity symbol (☊) wird angezeigt.
- Schließen Sie die Messleitungen an den Stromkreis oder das Bauteil an.
- If the resistance is below a certain threshold (typically 50Ω), the meter will emit an audible beep, indicating continuity.
5.5 Diodentest (▲)
- Turn the function dial to the 'Ω' position and press 'SEL' until the diode symbol (▲) wird angezeigt.
- Schließen Sie die rote Messleitung an die Anode und die schwarze Messleitung an die Kathode der Diode an.
- Das Display zeigt die Vorwärtslautstärke an.tagEs kommt zu einem Spannungsabfall. Vertauschen Sie die Anschlüsse, um auf einen offenen Stromkreis zu prüfen, was auf eine funktionierende Diode hinweist.
5.6 Temperaturmessung
- Turn the function dial to the temperature symbol.
- Connect the K-type thermocouple to the input jacks.
- Platzieren Sie die Spitze des Thermoelements auf oder in der Nähe des Objekts, dessen Temperatur gemessen werden soll.
- Das Display zeigt die Temperaturanzeige in Celsius oder Fahrenheit an.

Image 5.6.1: The CM1 is shown measuring the temperature of water in a glass using the included K-type thermocouple.
5.7 Berührungslose Voltage (NCV) Detection (V-Alert)
Die NCV-Funktion ermöglicht die schnelle Erkennung von Wechselstromspannungen.tage ohne direkten Kontakt, wodurch die Sicherheit erhöht wird.
- Press the 'V-Alert' button.
- Move the top of the meter near a conductor or outlet.
- Wenn AC-Voltage is detected, the meter will beep and the NCV indicator will light up.
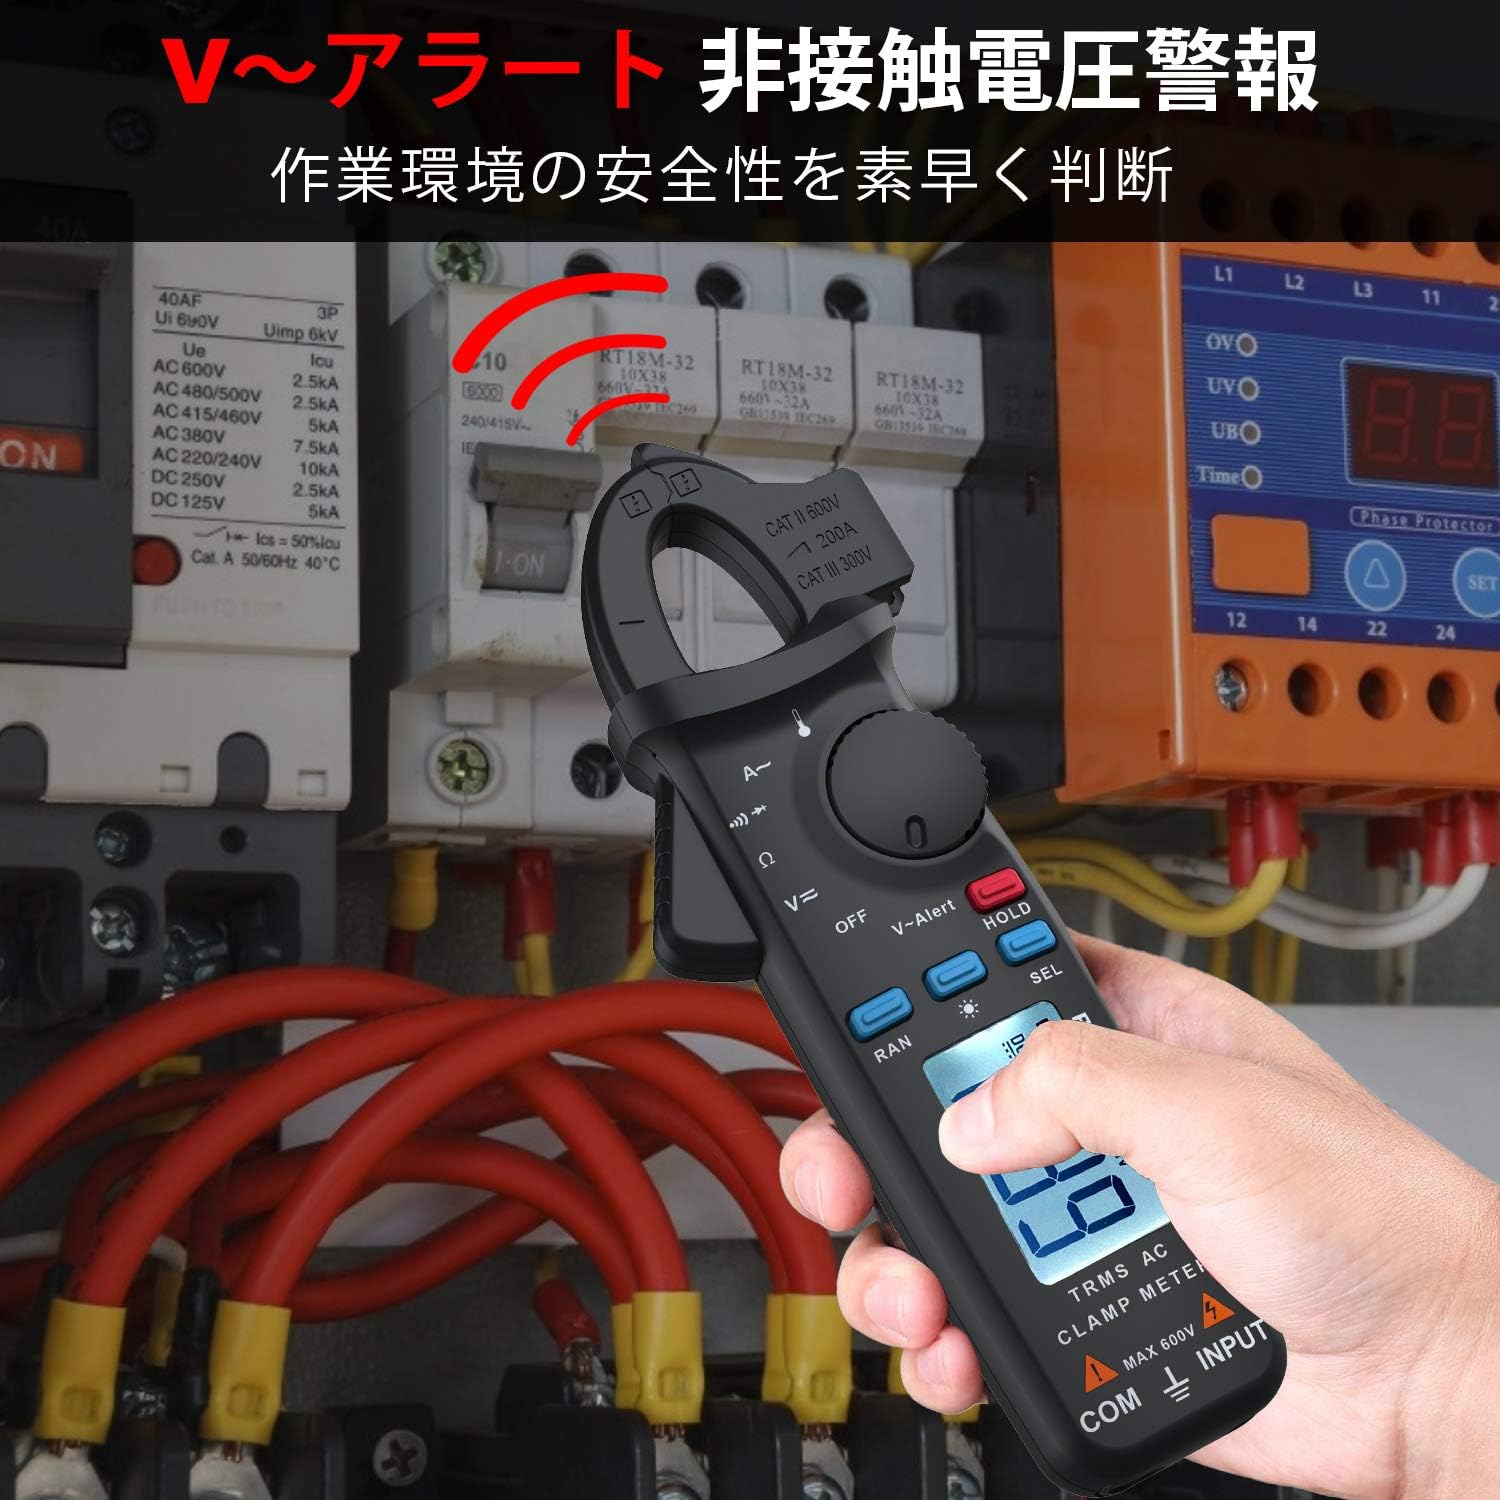
Abbildung 5.7.1: Die clamp meter is used to detect non-contact voltage near a circuit breaker panel, indicating the presence of live AC voltage.
5.8 Sonderfunktionen
- Daten halten (HOLD): Drücken Sie die Taste „HOLD“, um den aktuellen Messwert auf dem Display einzufrieren. Drücken Sie erneut, um die Taste zu lösen.
- Hintergrundbeleuchtung: Press and hold the 'SEL' button to activate the display backlight for improved visibility in dark environments. Press again to turn off.
- Auto Range (RAN): The meter automatically selects the appropriate measurement range. Press 'RAN' to switch to manual ranging, then press again to cycle through ranges. Press and hold 'RAN' to return to auto-ranging.
- Automatisches Ausschalten: Das Messgerät schaltet sich nach etwa 15 Minuten Inaktivität automatisch ab, um die Batterielebensdauer zu verlängern.
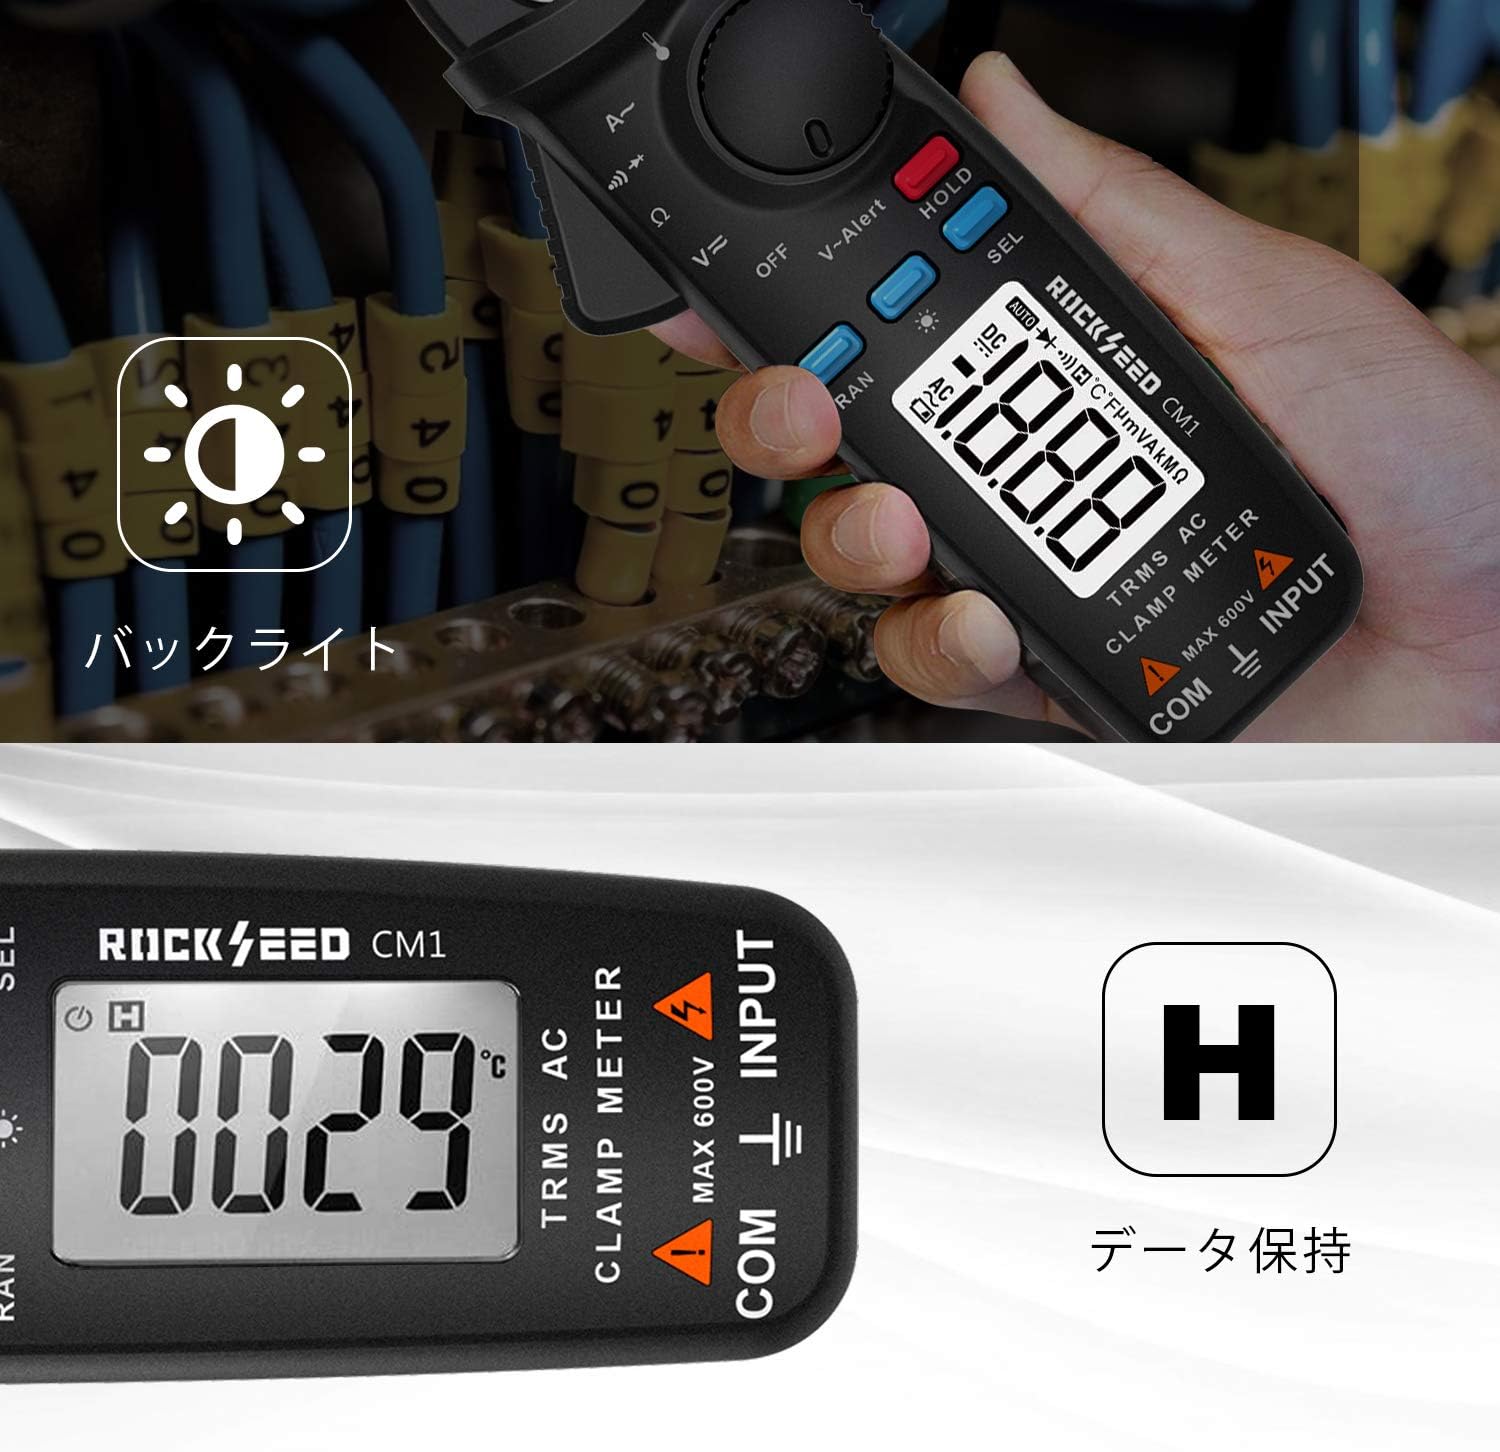
Image 5.8.1: The meter's display is illuminated by its backlight, and the 'H' symbol indicates that the data hold function is active, freezing the displayed reading.
6. Wartung
6.1 Reinigung
Wischen Sie das Gehäuse des Zählers mit einem Desinfektionsmittel ab.amp Mit einem Tuch und mildem Reinigungsmittel reinigen. Keine Scheuermittel oder Lösungsmittel verwenden. Vor Gebrauch sicherstellen, dass das Messgerät vollständig trocken ist.
6.2 Batteriewechsel
Wenn die Anzeige für niedrigen Batteriestand erscheint, tauschen Sie die Batterien wie in Abschnitt 4.1 beschrieben aus. Entfernen Sie die Batterien, wenn das Messgerät längere Zeit nicht benutzt wird.
6.3 Speicherung
Store the meter in its protective cloth pouch in a cool, dry place, away from direct sunlight and extreme temperatures.
7. Fehlerbehebung
| Problem | Mögliche Ursache | Lösung |
|---|---|---|
| Das Messgerät schaltet sich nicht ein | Leere oder falsch eingelegte Batterien | Batteriepolarität prüfen; Batterien austauschen. |
| Keine Messwerte oder instabile Messwerte | Incorrect function selected; poor test lead connection; circuit issue | Verify function dial setting; ensure secure test lead connection; check circuit integrity. |
| Clamp jaw reading is zero or incorrect | Multiple conductors in jaw; jaw not fully closed | Ensure only one conductor is enclosed; close jaw completely. |
| Anzeige für niedrigen Batteriestand | Batterien sind schwach | Ersetzen Sie die Batterien sofort. |
8. Spezifikationen
| Besonderheit | Spezifikation |
|---|---|
| Modell | CM1 |
| Marke | Steinsamen |
| Messtyp | True-RMS Clamp Meter |
| AC/DC-Voltage | Ja |
| Wechselstrom | Yes (up to 200A, 1mA resolution) |
| Widerstand | Ja |
| Kontinuität | Ja |
| Diodentest | Ja |
| Temperatur | Ja (mit Thermoelement vom Typ K) |
| NCV (Kontaktlose Voltage) | Ja |
| Anzeige | LCD mit Hintergrundbeleuchtung |
| Stromquelle | 2 x 1.5V AAA-Batterien (im Lieferumfang enthalten) |
| Automatische Abschaltung | Ja (nach 15 Minuten) |
| Daten halten | Ja |
| Sicherheitsbewertung | KAT III 600V |
| Material | ABS-Kunststoff |
| Maße | Ca. 19.8 x 9 x 4.4 cm |
| Gewicht | Ca. 140 g |
9. Garantie und Support
The RockSeed CM1 True-RMS Clamp Meter is covered by a ZWEIJÄHRIGE Garantie ab Kaufdatum. Diese Garantie deckt Material- und Verarbeitungsfehler bei normalem Gebrauch ab.
For technical support, warranty claims, or any product-related questions, please contact RockSeed customer service through the retailer where the product was purchased or refer to the contact information provided on the product packaging or official RockSeed webWebsite.