1. Einleitung
The YOSUDA PRO Magnetic Exercise Bike 010C is designed for effective indoor cycling workouts. Featuring a hyper-quiet magnetic system and robust alloy steel construction, it offers a smooth and stable exercise experience. This manual provides essential information for assembly, operation, maintenance, and troubleshooting to ensure safe and optimal use of your exercise bike.
Hauptmerkmale:
- Hyper Quiet Magnetic System: Operates at less than 20 dB for silent workouts.
- Robuste Kapazität: Supports users up to 400 lbs with heavy alloy steel construction.
- Einstellbarer Widerstand: 50 lbs flywheel with 100 micro-adjustable magnetic resistance levels.
- Intelligente Konnektivität: Bluetooth support for sports apps and real-time data tracking.
- Comfort & Customization: 4-way adjustable seat and 2-way adjustable handlebars for personalized fit.
- Integriertes Display: Large screen monitor displays RPM, time, speed, distance, calories, and odometer. Includes a tablet holder.
2. Einrichtung
2.1 Montage
The YOSUDA PRO Magnetic Exercise Bike is designed for straightforward assembly, with most major components pre-assembled. Tools and a detailed guide are included to assist you.
- Auspacken: Carefully remove all components from the packaging. Ensure all parts listed in the manual are present.
- Stabilisatoren anbringen: Befestigen Sie die vorderen und hinteren Stabilisatoren mit den mitgelieferten Schrauben und Werkzeugen am Hauptrahmen.
- Pedale installieren: Attach the pedals to the crank arms. Note that pedals are typically marked 'L' for left and 'R' for right. Ensure they are tightened securely.
- Sattelstütze montieren: Insert the seat post into the main frame and adjust to an initial comfortable height.
- Montage der Lenkerstütze: Insert the handlebar post into the main frame and adjust to an initial comfortable height.
- Monitorkabel anschließen: Connect the monitor cables from the main frame to the display unit.
- Monitor installieren: Secure the monitor onto the handlebar post.
- Wasserflaschenhalter installieren: Attach the water bottle holder to the designated area on the frame.

Bild: Überview of YOSUDA PRO Magnetic Exercise Bike components during assembly.
2.2 Erste Anpassungen
Die richtige Einstellung von Sattel und Lenker ist entscheidend für Komfort und effektives Training.
- Sitzverstellung: The seat can be adjusted 4-ways (up/down and forward/backward). Loosen the adjustment knob, slide the seat to your desired position, and tighten the knob securely. Ensure your knees have a slight bend at the bottom of the pedal stroke.
- Lenkereinstellung: The handlebars can be adjusted 2-ways (up/down). Loosen the adjustment knob, raise or lower the handlebars to a comfortable height, and tighten the knob. Your back should be straight and comfortable.
- Pedalriemen: Adjust the toe-caged pedal straps to secure your feet firmly in place. This prevents your feet from slipping during intense workouts.
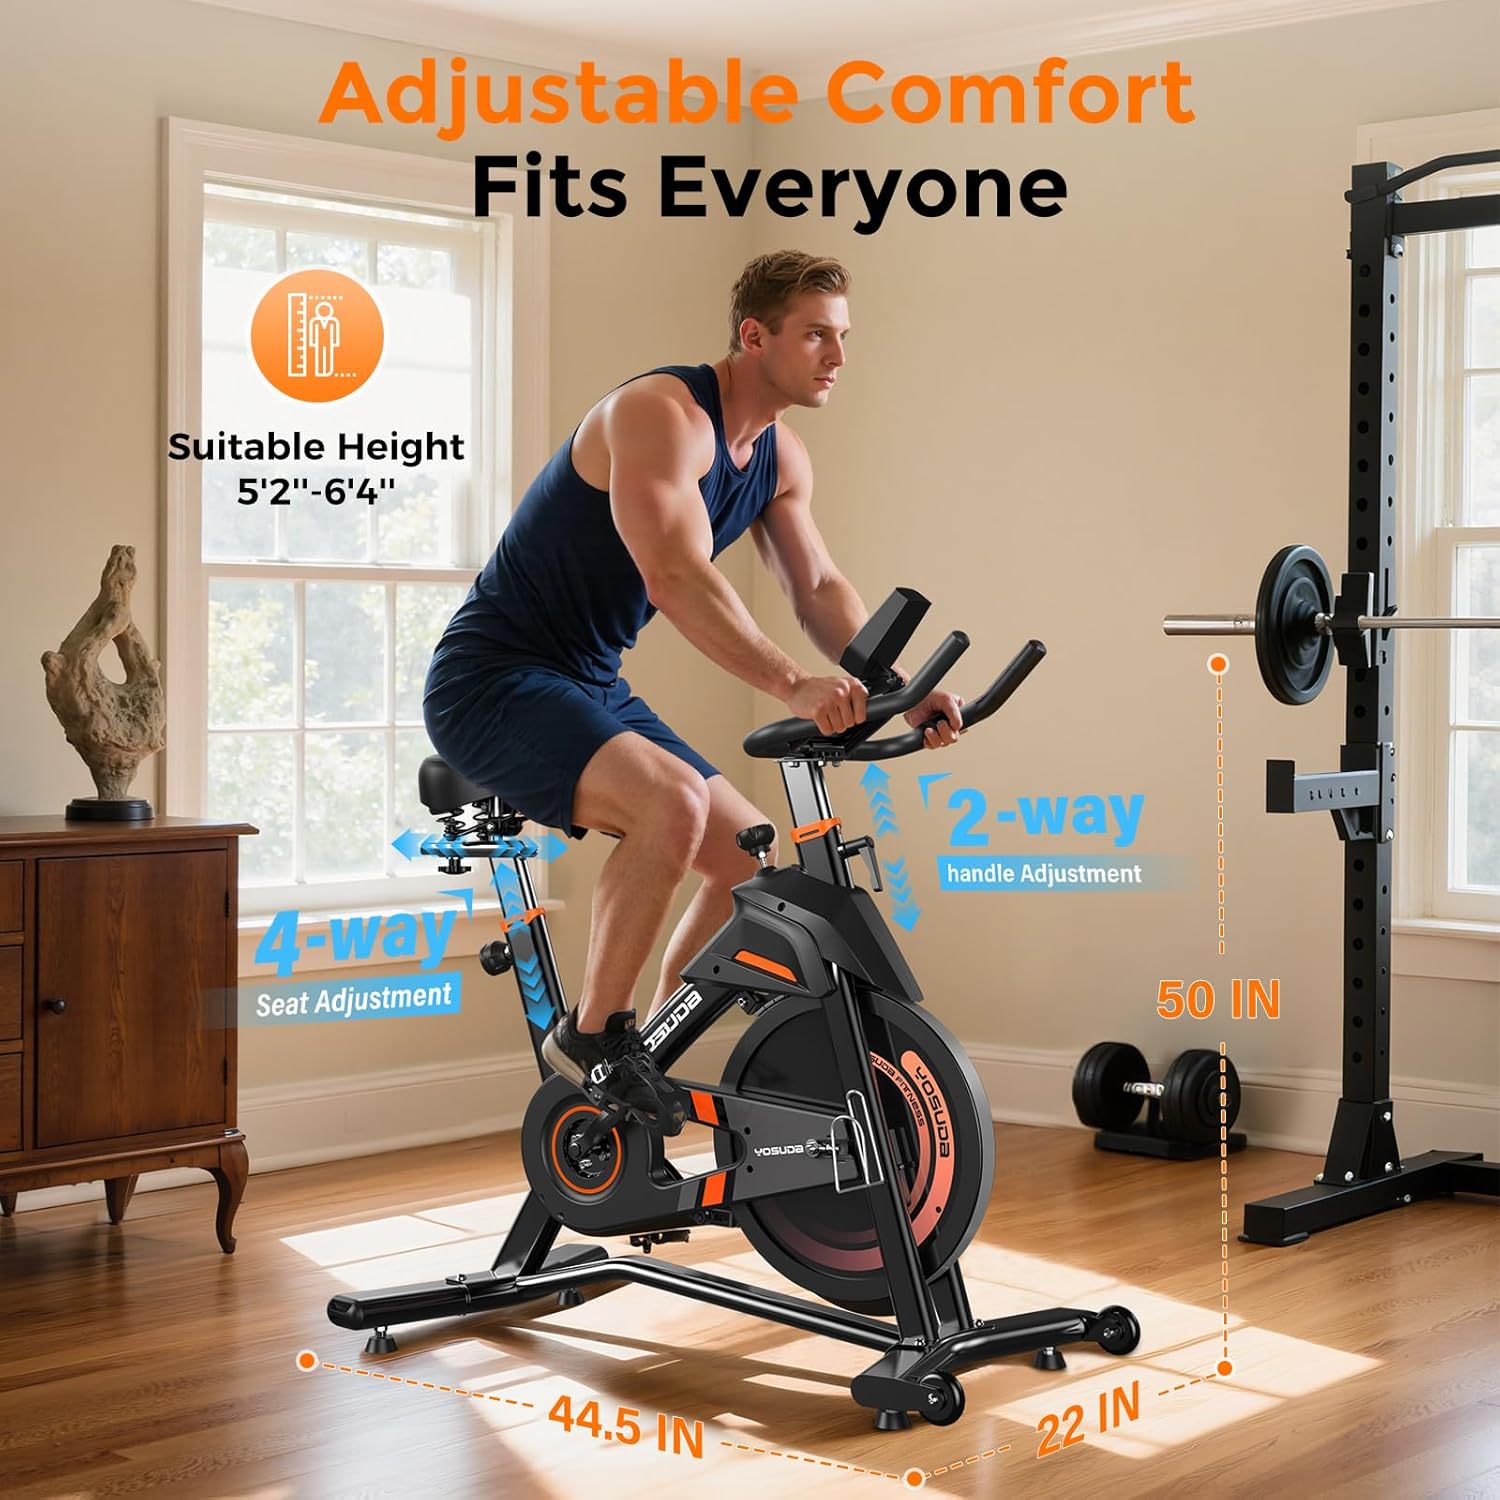
Bild: Detailliert view of the adjustable seat and handlebars for personalized comfort.
3. Bedienung
3.1 Powering On and Monitor Functions
The exercise bike is pedal-powered and does not require an external power source for operation. The monitor is battery-operated.
- Automatische Aktivierung: The monitor automatically turns on when you start pedaling.
- Anzeigemetriken: The large screen monitor displays:
- Drehzahl: Umdrehungen pro Minute
- ZEIT: Dauer Ihres Trainings
- GESCHWINDIGKEIT: Current speed in miles
- ENTFERNUNG: Total distance covered in miles
- KALORIEN: Geschätzte verbrannte Kalorien
- KILOMETERZÄHLER: Total accumulated distance
- Daten zurücksetzen: To clear workout data, press and hold the "RESET" button on the monitor.
- Tablet-Halter: Utilize the integrated tablet holder to place your device for entertainment or to follow workout programs.

Image: Close-up of the exercise bike's monitor and tablet holder.
3.2 Widerstand einstellen
The YOSUDA PRO Magnetic Exercise Bike features 100 micro-adjustable magnetic resistance levels, allowing for precise control over your workout intensity.
- Widerstand erhöhen: Turn the resistance knob clockwise to increase the magnetic resistance, making pedaling harder.
- Widerstand verringern: Turn the resistance knob counter-clockwise to decrease the magnetic resistance, making pedaling easier.
- Not-Halt: Press down firmly on the resistance knob to engage the emergency brake and quickly stop the flywheel.

Image: The resistance knob and flywheel, illustrating the magnetic resistance system.
3.3 Intelligente Funktionen und App-Integration
This exercise bike is equipped with Bluetooth connectivity to enhance your workout experience.
- Connect to Apps: Pair your device via Bluetooth with compatible sports apps to track your exercise data, participate in virtual courses, and monitor your progress.
- Echtzeitdaten: Receive real-time recording of exercise data directly to your connected device.

Image: User engaging with virtual rides through top fitness applications.
4. Wartung
Regular maintenance ensures the longevity and safe operation of your YOSUDA PRO Magnetic Exercise Bike.
- Reinigung: Wischen Sie das Fahrrad mit Werbung abamp Nach jedem Gebrauch mit einem Tuch abwischen, um Schweiß und Staub zu entfernen. Scheuermittel vermeiden.
- Pedalprüfung: Inspect and re-tighten pedals every 1-2 months to ensure they remain secure for safe use. Loose pedals can cause injury or damage.
- Riemenantrieb: The silent belt drive system requires minimal maintenance. Keep the area around the belt clean and free of debris.
- Stabilitätsprüfung: Periodically check all bolts and nuts to ensure they are tight. Re-tighten as necessary to maintain the bike's stability.
5. Fehlerbehebung
If you encounter any issues with your exercise bike, refer to the following common solutions:
- Quietschgeräusche: Check all connection points and ensure they are tightened. Apply a small amount of lubricant to moving parts if necessary, avoiding the flywheel and brake system.
- Instabiles Fahrrad: Ensure the bike is placed on a flat, level surface. Adjust the leveling feet on the stabilizer bars until the bike is stable.
- Monitor zeigt kein Bild an: Check the batteries in the monitor and replace them if needed. Ensure the sensor cable is securely connected.
- Widerstandsprobleme: If resistance feels inconsistent or unresponsive, check the connection of the resistance cable to the knob and the magnetic brake system.
6. Spezifikationen
| Besonderheit | Detail |
|---|---|
| Marke | YOSUDA |
| Modellname | L-007C |
| Besonderheit | Light Commercial, Magnetic, Smart with Bluetooth |
| Farbe | Schwarz-Orange |
| Stromquelle | Pedalbetrieben (nicht elektrisch) |
| Empfohlene Verwendung | Innenbereich |
| Artikelgewicht | 37.65 Kilogramm (ca. 83 Pfund) |
| Material | Legierter Stahl |
| Widerstandsmechanismus | Magnetisch |
| Technische Daten | 50"T x 22"B x 44.5"H |
| Maximalgewichtsempfehlung | 400 Pfund |
| Anzahl der Widerstandsstufen | 100 |
| Antriebssystem | Gürtel |
7. Garantie und Support
YOSUDA is committed to providing excellent customer service and product support.
- Technischer Dienst: Enjoy 24/7 technical support for any inquiries or assistance you may need with your exercise bike.
- Kontaktinformationen: For specific warranty details or to reach customer support, please refer to the contact information provided in your product packaging or visit the official YOSUDA webWebsite.
8. Offizielle Produktvideos
Derzeit stehen keine offiziellen Verkäufervideos zum Einbetten zur Verfügung.