
1. Einleitung
The Massive Audio Primo Series P8 Monoblock Mega Amplifier is a high-performance Class D amplifier designed for car audio systems. This manual provides essential information for proper installation, operation, and maintenance of your P8 amplifier, um optimale Leistung und Langlebigkeit zu gewährleisten.

Abbildung 1.1: Oben view of the Massive Audio Primo Series P8 Monoblock AmpVerstärker, Showcasing sein schlankes Design und seine kompakte Form.
2. Sicherheitshinweise
Please read and understand all safety instructions before installing or operating this amplifier. Failure to follow these guidelines may result in injury or damage to the product or vehicle.
- Always disconnect the vehicle's battery negative terminal before making any electrical connections.
- Sorgen Sie für ausreichende Belüftung um das ampKühlmittel, um eine Überhitzung zu verhindern.
- Verwenden Sie für die Strom-, Masse- und Lautsprecheranschlüsse die in diesem Handbuch angegebenen Kabel mit dem entsprechenden Querschnitt.
- Montieren Sie die ampDer Verstärker wird sicher befestigt, um Bewegungen während der Fahrzeugfahrt zu verhindern.
- Vermeiden Sie die Installation ampVerstärker in Bereichen, die Feuchtigkeit oder starken Vibrationen ausgesetzt sind.
- Für optimale Sicherheit und Leistung wird eine fachgerechte Installation empfohlen.
3. Packungsinhalt
Prüfen Sie beim Auspacken, ob alle Artikel vorhanden sind:
- One (1) Massive Audio Primo Series P8 Monoblock Mega Ampschwerer
- Benutzerhandbuch (dieses Dokument)
- Montagezubehör (falls im Lieferumfang enthalten)
4. Hauptmerkmale
Das P8 amplifier incorporates advanced features for superior audio performance and reliability:
- Input Sensitivity Low Level: 400mVrms ~ 10Vrms
- Auto Hi-Level Input via RCA Input
- 12v Remote Output When Hi-level Signal is Used
- Parametric EQ with 0 - 12 dB Boost
- All Models Linkable with Single RCA for easy upgrade
- Short Circuit, Thermal, Reverse Voltage, and Over Voltage-Schutz
- N-Channel Circuitry for High-Efficiency
- 24 dB Low Pass Crossovers with an adjustable range of 30Hz - 220Hz
- Heavy Duty Power Supply
- Beleuchtetes Logo
- Heavy-Duty Aluminum Heat Sink
- Entworfen und entwickelt in den USA
- Proprietary "Bass Kompressor" Circuitry provides Low-Frequency Enhancement
- Extreme Power in a Small Footprint
- "Q Control" to fine-tune the curve on the bass boost
- "Clip Limit Switch" allows the amplifier to take up to 16.5 volts
- Adjustable Low Pass 18dB Sub Harmonic Filter with a range of 0Hz - 60Hz
- Adjustable center frequency range of 30-80 Hz
- Nickel-Plated Connectors
- High-Efficiency Class "D" Design
5. Einrichtung und Installation
Eine fachgerechte Installation ist entscheidend für die Leistung und Sicherheit Ihres Produkts. amplifier. Consult a professional installer if you are unsure about any steps.
5.1. Montageort
- Choose a dry, well-ventilated area away from direct sunlight or heat sources.
- Stellen Sie sicher, dass die Montagefläche ausreichend stabil ist, um das Gewicht zu tragen. ampGewicht des Verstärkers.
- Sorgen Sie für ausreichend Platz um das/die/den ampfür die Luftzirkulation.
5.2. Kabelverbindungen
Refer to the diagram below for proper wiring of power, ground, remote, and speaker connections.

Image 5.1: Rear panel of the P8 ampVerstärker mit Anschlüssen für Strom, Masse, Fernbedienung und Lautsprecher.
5.2.1. Power Connection (+12V)
Connect a heavy-gauge power cable (e.g., 4 AWG or larger) from the amplifier's +12V terminal to the positive terminal of the vehicle's battery. Install an appropriate fuse (not supplied) within 18 inches (45 cm) of the battery.
5.2.2. Ground Connection (GND)
Connect a heavy-gauge ground cable (e.g., 4 AWG or larger) from the ampVerbinden Sie den GND-Anschluss des Verstärkers mit einer sauberen, unlackierten Metalloberfläche des Fahrzeugchassis. Achten Sie auf eine sichere Verbindung mit niedrigem Widerstand.
5.2.3. Remote Turn-On (REM IN/OUT)
Connect a 18-gauge wire from your head unit's remote output to the amplifier's REM IN terminal. The REM OUT terminal can be used to daisy-chain the remote signal to other amplifizierer.
5.2.4. Speaker Connection (SPEAKER)
Connect your subwoofer(s) to the SPEAKER terminals. Ensure the total impedance of the connected speakers is not below 0.5 Ohm. Observe correct polarity (+ to + and - to -).
5.2.5. Signal Input (LINE IN)
Schließen Sie RCA-Kabel von den Vor-/Unterbuchsen Ihres Autoradios an.amp Ausgabe an die amplifier's LINE IN RCA inputs. The amplifier also supports auto hi-level input via the RCA inputs.
6. Bedienung und Einstellungen
Das P8 amplifier features various controls to fine-tune your audio system. Familiarize yourself with these controls for optimal sound.
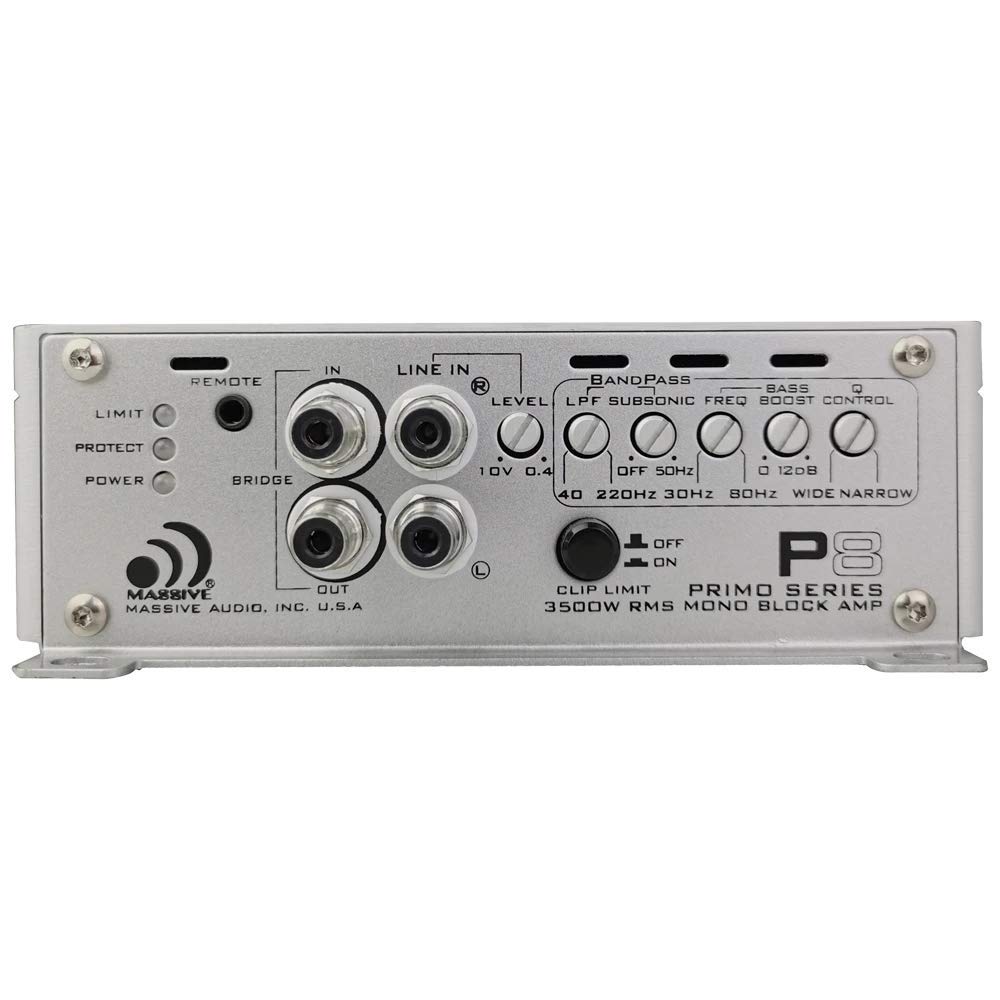
Image 6.1: Front panel of the P8 amplifier displaying the control layout for audio adjustments.
6.1. Systemsteuerung überview
- FERNBEDIENUNG: Input for optional remote bass control knob.
- LIMIT/PROTECT/POWER Indicators: LEDs indicating amplifier-Status.
- LINE-IN: RCA inputs for audio signal.
- LEVEL (Input Sensitivity): Adjusts the input gain to match the head unit's output. Range: 400mVrms - 10Vrms.
- LPF (Tiefpassfilter): Adjusts the upper frequency limit for the subwoofer. Range: 30Hz - 220Hz (24 dB/octave).
- SUBSONIC FREQ (High Pass Filter): Filters out ultra-low frequencies below the audible range to protect subwoofers. Range: 0Hz - 60Hz (18 dB/octave).
- BASS-BOOST: Increases bass output at a specific frequency. Range: 0 - 12 dB.
- Q CONTROL: Fine-tunes the bandwidth of the bass boost.
- CLIP LIMIT SWITCH: Ermöglicht die amplifier to handle up to 16.5 volts, preventing clipping at high input levels.
6.2. Erste Einrichtung und Anpassungen
- Setzen Sie alle amplifier controls (LEVEL, LPF, SUBSONIC, BASS BOOST) to their minimum or off positions.
- Stellen Sie die Lautstärke Ihres Autoradios auf etwa 75 % der Maximallautstärke ein.
- Erhöhen Sie langsam die amplifier's LEVEL control until you hear slight distortion, then back off slightly.
- Adjust the LPF to suit your subwoofers and personal preference, typically between 60Hz and 100Hz for subwoofers.
- Set the SUBSONIC FREQ to protect your subwoofers from frequencies below their resonant frequency, usually around 20Hz to 30Hz.
- Use the BASS BOOST and Q CONTROL sparingly to enhance bass, avoiding excessive boost that can lead to distortion or speaker damage.
7. Wartung
Regelmäßige Wartung trägt dazu bei, die Langlebigkeit und Leistungsfähigkeit Ihres Geräts zu gewährleisten. ampschwerer.
- Behalten Sie die ampDer Verstärker muss sauber und frei von Staub und Schmutz sein. Verwenden Sie zum Reinigen ein weiches, trockenes Tuch.
- Überprüfen Sie regelmäßig alle Kabelverbindungen auf festen Sitz und Korrosion.
- Stellen Sie sicher, dass die amplifier's cooling fins are not obstructed to maintain proper heat dissipation.
8. Anleitung zur Fehlerbehebung
Wenn Sie Probleme mit Ihrem amplifier, refer to the table below for common problems and solutions.
| Problem | Mögliche Ursache | Lösung |
|---|---|---|
| Kein Strom / Betriebsanzeige aus | Blown fuse, poor power/ground connection, faulty remote wire. | Check inline fuse near battery. Verify +12V, GND, and REM connections. Ensure remote wire has +12V when head unit is on. |
| No Sound / Protect LED On | Speaker short circuit, impedance too low, overheating, faulty RCA cables. | Check speaker wiring for shorts. Verify speaker impedance is 0.5 Ohm or higher. Ensure adequate ventilation. Check RCA cable integrity. |
| Verzerrter Klang | Gain set too high, improper LPF/Subsonic settings, poor signal quality, low voltage. | Reduce LEVEL (gain) control. Adjust LPF and Subsonic filters. Check RCA cables. Verify vehicle's electrical system. |
| Amplifier überhitzt | Unzureichende Belüftung, zu niedriger Widerstand, anhaltend hohe Leistung. | Umzug amplifier for better airflow. Check speaker impedance. Reduce listening volume or duration. |
9. Technische Daten
| Spezifikation | Wert |
|---|---|
| RMS-Leistung (1 Ohm) | 2300w x 1 |
| RMS-Leistung (2 Ohm) | 1400w x 1 |
| RMS-Leistung (0.5 Ohm) | 3500w x 1 |
| Spitzenleistung | 7000w x 1 |
| Minimale Impedanz | 0.5 Ohm |
| Bass-Boost-Frequenz | 30Hz - 120Hz |
| Gesamte harmonische Verzerrung (THD) | Weniger als 0.03% |
| Signal-Rausch-Verhältnis (S/N) | Mehr als 100 dB |
| Subsonic-Filter (HPF) | 0-60 Hz |
| Cinch-Eingangslautstärketage | 400 mV bis 10 V |
| Frequenzgang | 10Hz - 220Hz |
| Abmessungen (L x B x H) | 19.9" x 6.5" x 2.1" |
| Bandtage | 12 Volt (DC) |
| Maximales Versorgungsvolumentage | 12 Volt |
| Montagetyp | Freistehende |
| Modellnummer | P8 |
| Hersteller | Massive Audio |
10. Garantieinformationen
Massive Audio products typically come with a limited manufacturer's warranty. Please refer to the official Massive Audio website or your purchase documentation for specific warranty terms and conditions, including coverage period and claim procedures. Keep your proof of purchase for warranty validation.
11. Kundendienst
For technical assistance, service, or further inquiries regarding your Massive Audio Primo Series P8 Monoblock Amplifier, please visit the official Massive Audio website or contact their customer support department. You can also visit the Massive Audio Store on Amazon for product information: