
1. Einleitung
The VGEBY YCX-003 MPPT Solar Charge Controller is designed to manage power flow from your solar panels to your battery bank and connected loads. It features an industrial-grade master chip for accurate monitoring and control, ensuring efficient charging and protection for your battery system. This controller automatically adapts to 12V or 24V systems and incorporates advanced Maximum Power Point Tracking (MPPT) technology for high charging efficiency.
Zu den Hauptfunktionen gehören:
- Maintaining optimal battery charge levels.
- Protection against over-charging and over-discharging.
- Prevention of reverse charging from battery to solar panels at night.
- Reverse polarity protection for both battery and solar panels.
- Automatic load cut-off and recovery based on battery voltage.
- Built-in thunder protection.
- Automatic temperature compensation for charging voltage.
2. Einrichtung und Installation
Eine korrekte Installation ist entscheidend für den sicheren und effizienten Betrieb Ihres Solarladereglers. Bitte befolgen Sie diese Schritte sorgfältig.
2.1 Schaltplan

Figure 1: Wiring connections for the solar charge controller.
2.2 Verbindungsschritte
Connect the components in the following order to prevent damage to the controller or other system components:
- Schließen Sie die Batterie an: First, connect the battery to the controller's battery terminals. Ensure correct polarity (positive to positive, negative to negative). The controller will automatically detect the system voltage (12 V oder 24 V).
- Schließen Sie das Solarpanel an: Next, connect the solar panel to the controller's solar panel terminals. Ensure correct polarity.
- Schließen Sie die Last an: Finally, connect your DC loads to the controller's load terminals. Ensure correct polarity.
Wichtig: Always connect the battery first and disconnect the load first when disassembling the system.
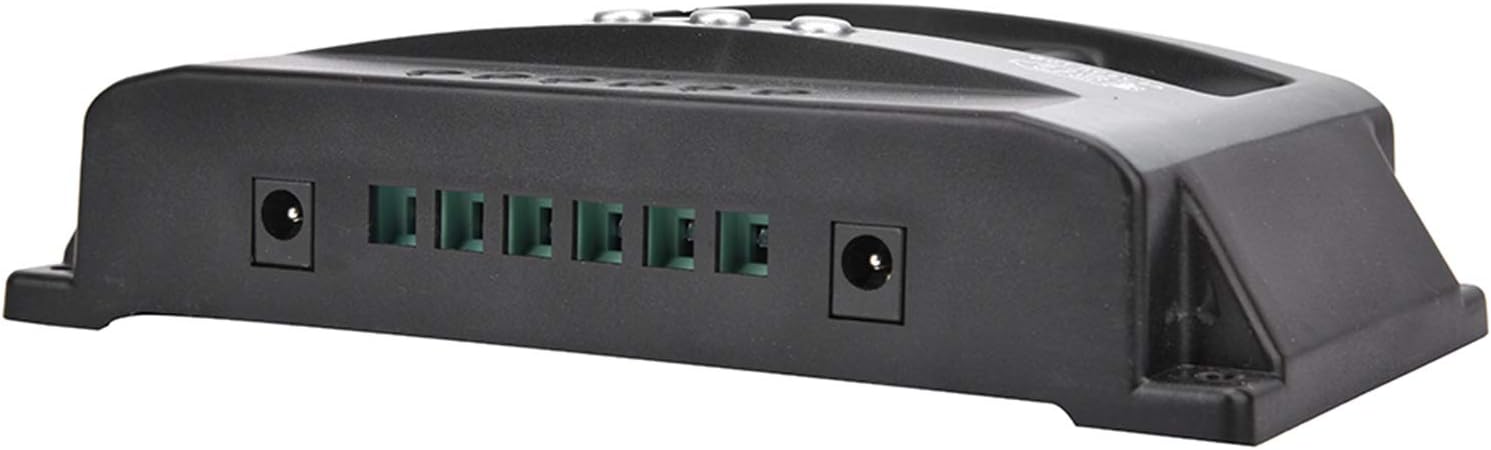
Figure 2: Connection terminals on the side of the controller.
3. Bedienungsanleitung
The VGEBY YCX-003 controller features a large LCD display and user-friendly buttons for monitoring and adjusting parameters.
3.1 LCD-Display und Tasten

Figure 3: Front panel with LCD display and control buttons.
The LCD display provides real-time information on battery voltage, charging current, discharge current, and system status. The buttons allow you to navigate through display modes and adjust certain charging and discharging parameters.
3.2 Adjustable Parameters
The controller allows for adjustment of floating charge voltage, Entladeschlussvolumentage, and discharge recovery voltage. Refer to the on-screen menu for specific adjustment procedures. These parameters are factory-set to default values suitable for most lead-acid batteries but can be customized if needed.
3.3 USB-Ausgang
The controller includes a 5V/2A USB output for charging small electronic devices. This output is active when the battery has sufficient charge.

Figure 4: USB charging capability.
4. Wartung
To ensure the longevity and optimal performance of your VGEBY YCX-003 MPPT Solar Charge Controller, periodic maintenance is recommended.
- Sauberkeit: Halten Sie den Controller sauber und frei von Staub und Schmutz. Verwenden Sie zum Reinigen ein trockenes Tuch.
- Verbindungen: Periodically check all wiring connections to ensure they are secure and free from corrosion. Loose connections can lead to power loss or overheating.
- Belüftung: Ensure the controller is installed in a well-ventilated area to prevent overheating.
5. Fehlerbehebung
The VGEBY YCX-003 controller is designed with several built-in protection features. If the system is not operating as expected, check the following:
- Kein Display/Stromanschluss: Überprüfen Sie die Batterieanschlüsse und stellen Sie sicher, dass die Batterie ausreichend geladen ist.tage.
- Kein Aufladen: Verify solar panel connections and ensure adequate sunlight. Check for reverse polarity on solar panel connections.
- Laden funktioniert nicht: Check load connections and ensure the battery voltage is above the discharge recovery voltage. The controller automatically cuts off the load if battery voltage ist zu niedrig.
- Fehlercodes/Warnungen: The controller has built-in protections for overheating, overcurrent, short circuit, open circuit, and reverse connection. If a fault occurs, the controller will automatically recover once the issue is resolved. Consult the display for any specific indicators.
- Umgekehrte Polarität: The controller has reverse polarity protection for both the battery and solar panels. If connected incorrectly, the controller will not operate until the polarity is corrected.
6. Technische Daten

Figure 5: VGEBY YCX-003 MPPT Solar Charge Controller.
| Besonderheit | Spezifikation |
|---|---|
| Modell | YCX-003 |
| Systemlautstärketage | 12V/24V Adaptive |
| Solarpanel Voltage | 12 V, 18 V, 24 V, 36 V |
| Schwebeladung Voltage | 13.7 V (Standard, einstellbar) |
| Entladeschluss Voltage | 10.7 V (Standard, einstellbar) |
| Entlastungserholungsvoltage | 12.6 V (Standard, einstellbar) |
| Ruhestrom | <10 mA |
| USB-Ausgang | 5V / 2A max |
| Bewertete Stromoptionen | 40 A, 50 A, 60 A, 100 A |
| Max. PV Voltage | 50 V |
| Max. PV-Eingangsleistung | 750 W (12 V) / 1500 W (24 V) |
| Maße | Ca. 170 x 92 x 45 mm (6.7 x 3.6 x 1.8 Zoll) |
| Material | ABS + ROHS |
| Hersteller | VGEBY |
7. Garantie und Support
For warranty information or technical support, please refer to the documentation provided at the time of purchase or contact VGEBY customer service directly. Ensure you have your product model number (YCX-003) and purchase details available when seeking support.