1. Einleitung
Thank you for choosing the nooa Cordless Hair Clippers. This professional haircut kit is designed for smooth and fast trimming, offering versatility and convenience for personal grooming. This manual provides essential information for the safe and effective use, maintenance, and care of your new hair clipper.
2. Packungsinhalt
Bitte überprüfen Sie, ob alle unten aufgeführten Artikel in Ihrem Paket enthalten sind:
- 1 x Haarschneider
- 4 x Plastic Guide Combs (various lengths)
- 1 x Haarkamm
- 1 x Hair Cutting Scissor
- 1 x Reinigungsbürste
- 1 x Reinigungsschwamm
- 1 x Schutzkappe
- 1 x USB-Ladekabel
- 1 x Aufbewahrungstasche

Image 2.1: The nooa Cordless Hair Clipper shown with all its accompanying accessories, including guide combs, scissors, cleaning tools, charging cable, and storage bag.
3. Wichtige Sicherheitshinweise
Bitte lesen und verstehen Sie alle Sicherheitshinweise, bevor Sie dieses Produkt verwenden. Die Nichtbeachtung dieser Hinweise kann zu Stromschlag, Brand oder schweren Verletzungen führen.
- Always turn off the hair clipper before attempting to remove or attach the cutter head.
- Do not wash the hair clipper with water while it is connected to the charging cable.
- Ensure the charging port is completely dry and free of water before connecting the USB charging cable.
- When the LED indicator displays a battery power level below 10%, it is recommended to charge the device promptly.
- Bewahren Sie dieses Produkt außerhalb der Reichweite von Kindern auf, um Unfälle zu vermeiden.
4. Produktüberschreitungview
The nooa Cordless Hair Clipper features a self-sharpening ceramic titanium alloy blade for precise cutting. It includes an adjustable trimming length setting directly on the clipper body and supports additional guide combs for extended length options. An LED display provides battery status and operational mode information.

Abbildung 4.1: Eine detaillierte view of the clipper's precision blades, highlighting the ceramic cutter and titanium alloy components, along with the adjustable length dial.

Image 4.2: The hair clipper is depicted next to a sleeping infant, emphasizing its low noise operation (below 60 decibels) during use.
5. Aufladen des Geräts
The hair clipper is equipped with a rechargeable 2500mAh lithium battery. To charge the device:
- Stellen Sie sicher, dass der Haarschneider ausgeschaltet ist.
- Connect the provided USB charging cable to the charging port on the bottom of the clipper.
- Stecken Sie das andere Ende des USB-Kabels in ein kompatibles USB-Netzteil (nicht im Lieferumfang enthalten) oder in einen USB-Anschluss.
- The LED indicator will display the charging status and current battery percentage.
A full charge typically takes approximately 3 hours and provides up to 200 minutes of cordless operation. It is recommended to use the provided USB charging cable for optimal performance.

Image 5.1: The hair clipper is shown connected to its USB charging cable, with the LED display indicating battery charge status and operational modes.
6. Setup and Length Adjustment
The clipper offers precise length adjustment through its integrated dial and additional guide combs.
6.1 Einstellen der Schnittlänge
The clipper itself has 5 accurate trimming length settings: 0.8mm, 1.2mm, 1.6mm, 2.0mm, and 2.5mm. Rotate the dial on the clipper body to select your desired length.
6.2 Anbringen der Führungskämme
For longer cutting lengths, attach one of the four plastic guide combs. These combs provide additional trimming lengths, extending the range from 0.8mm up to 14.5mm when combined with the clipper's internal settings.
- Stellen Sie sicher, dass der Haarschneider ausgeschaltet ist.
- Wählen Sie den gewünschten Führungskamm aus.
- Align the comb with the clipper head and push it firmly until it clicks into place.
- To remove, gently pull the comb away from the clipper head.
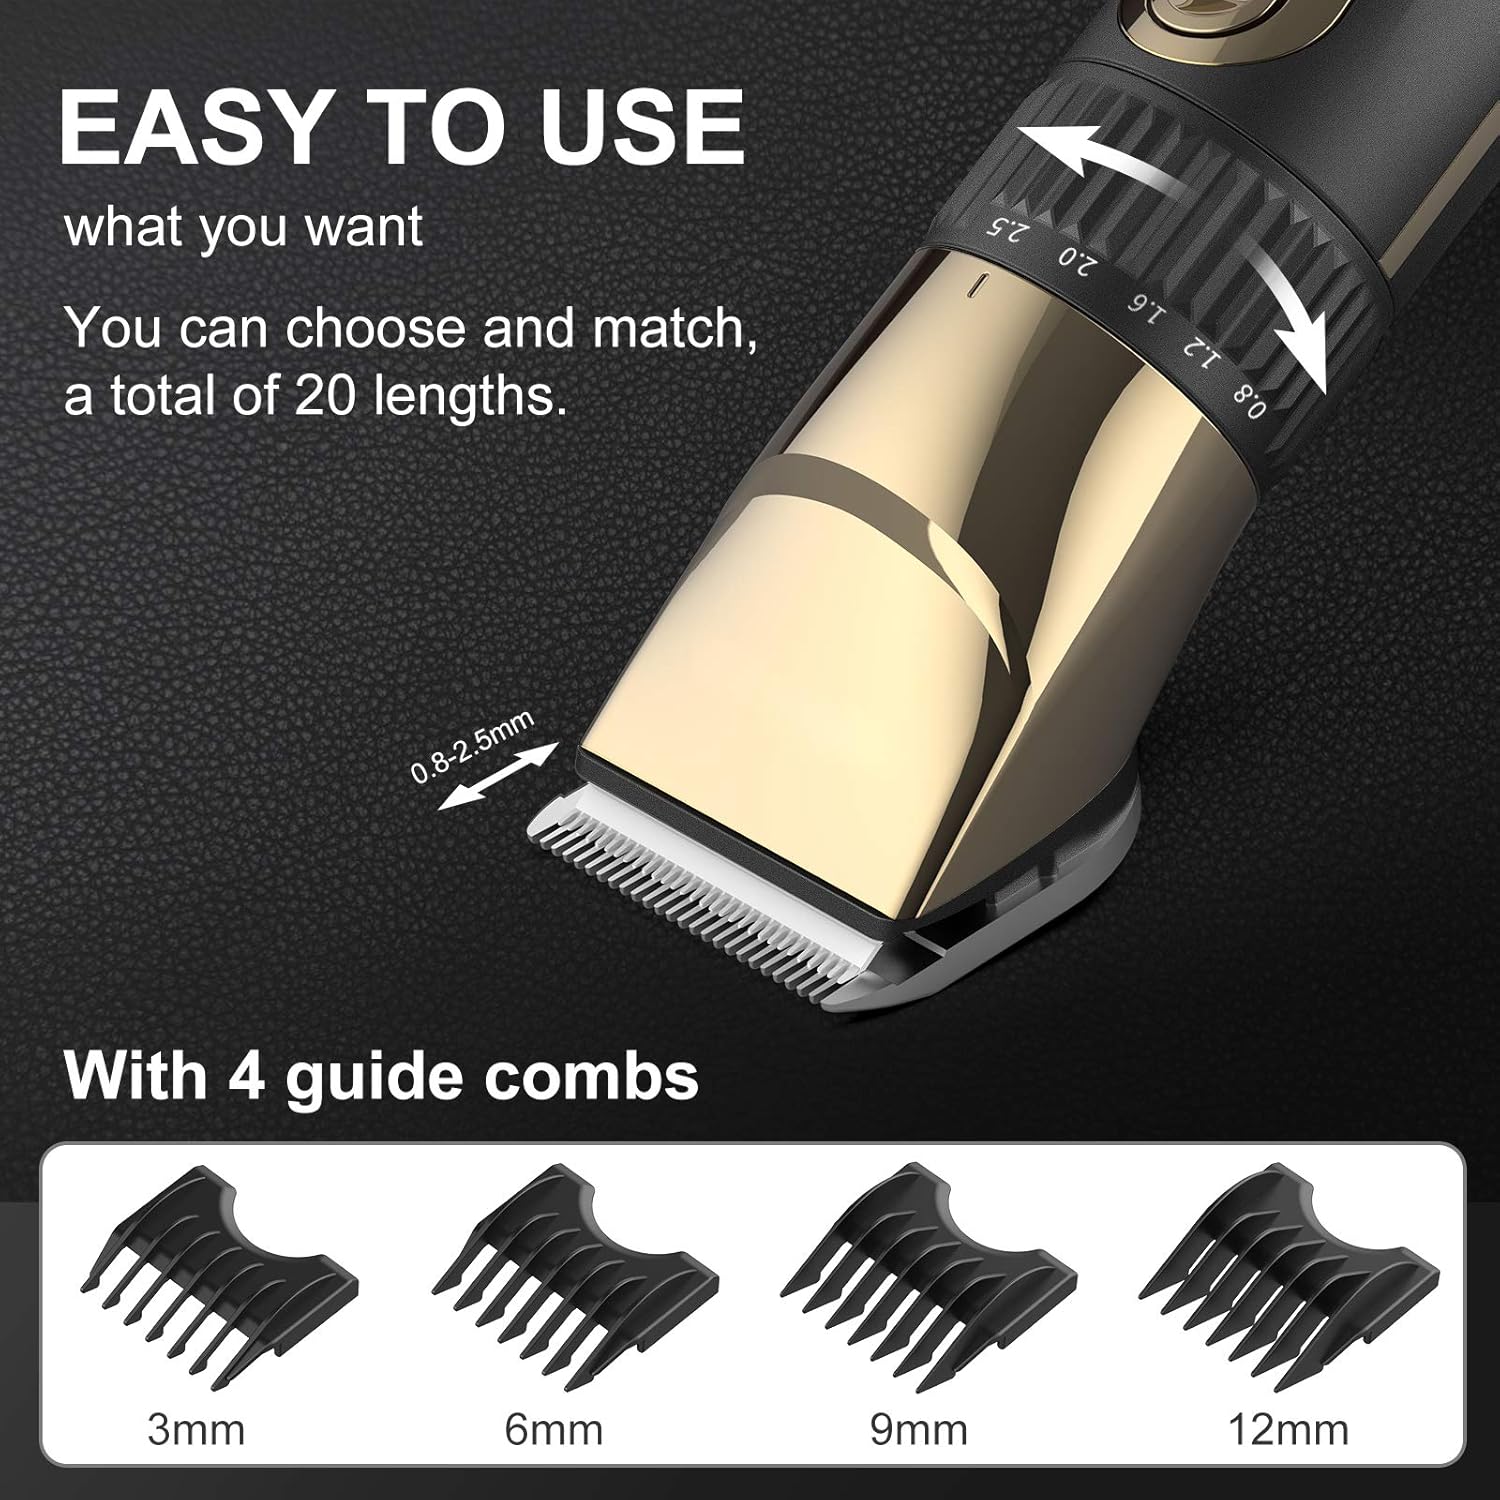
Image 6.1: The hair clipper's adjustable length dial is shown in detail, alongside the four interchangeable guide combs (3mm, 6mm, 9mm, 12mm) that offer a total of 20 length options.
7. Operating the Hair Clipper
The nooa hair clipper is designed for ease of use, suitable for both beginners and experienced users.
- Ein-/Ausschalten: Drücken Sie den Ein-/Ausschalter, um den Haarschneider ein- oder auszuschalten.
- Geschwindigkeitseinstellungen: The clipper offers two speed settings. The first speed setting operates at less than 60 decibels, suitable for general use or sensitive areas. The second speed setting provides more power for thicker or coarser hair, or for faster trimming.
- Beschneiden: Hold the clipper firmly and move it against the direction of hair growth for an even cut. Use the included hair comb to guide and lift hair as needed.

Image 7.1: A collage demonstrating the versatility of the nooa hair clipper, showing its use for beard trimming, children's haircuts, and professional-style fades.
8. Wartung und Reinigung
Regular cleaning and maintenance will ensure the longevity and optimal performance of your hair clipper.
8.1 Wasserdichtes Design
The nooa hair clipper is waterproof, allowing for easy cleaning under running water. However, ensure the charging port is dry before charging.
8.2 Reinigen der Klingen
- Schalten Sie den Haarschneider aus.
- Gently push the blade head to detach it from the clipper body.
- Rinse the detached blade head under running water to remove hair clippings.
- Verwenden Sie die mitgelieferte Reinigungsbürste, um hartnäckige Haare oder Schmutz zu entfernen.
- Allow the blade head to air dry completely before reattaching it to the clipper.
- Periodically apply a small amount of clipper oil (not included) to the blades for smooth operation and to prevent rust.

Image 8.1: A three-step visual guide demonstrating how to remove the blade head from the clipper and rinse it under running water for cleaning.
9. Fehlerbehebung
If you encounter any issues with your nooa hair clipper, please refer to the following common solutions:
| Problem | Mögliche Ursache | Lösung |
|---|---|---|
| Clipper does not turn on or has low power. | Batterie ist leer. | Charge the clipper fully (approximately 3 hours). Check the LED display for battery level. |
| Clipper is not cutting effectively or pulls hair. | Die Klingen sind stumpf, verschmutzt oder nicht richtig ausgerichtet. | Clean the blades thoroughly. Ensure no hair is trapped. Apply clipper oil. If blades are dull, consider professional sharpening or replacement. |
| Der Haarschneider macht ungewöhnliche Geräusche. | Blades may be dry or misaligned. | Turn off the clipper, remove and clean the blades, then reattach them securely. Apply clipper oil. If the issue persists, contact customer support. |
10. Spezifikationen
| Besonderheit | Detail |
|---|---|
| Marke | nooa |
| Modellnummer | G-9932 |
| Klingenmaterial | Ceramic, Titanium Alloy |
| Stromquelle | Batteriebetrieben (kabellos/kabelgebunden) |
| Akku-Typ | 1 Lithium-Polymer-Akku (im Lieferumfang enthalten) |
| Batteriekapazität | 2500 mAh |
| Ladezeit | Ca. 3 Stunden |
| Laufzeit | Ca. 200 Minuten |
| Wasserdicht | Ja |
| Geräuschpegel | Less than 60 decibels (at first speed setting) |
| Technische Daten | 22 x 10 x 5.5 cm |
| Produktgewicht | 442 g |
| UPC | 791711043317 |
11. Garantie und Support
The nooa Cordless Hair Clippers come with a 12-month quality warranty from the date of purchase. This warranty covers manufacturing defects under normal use. Please retain your proof of purchase for warranty claims.
For technical support, warranty service, or any questions regarding your product, please contact nooa customer service through the retailer where the product was purchased.