
1. Einleitung
Thank you for choosing the XTUGA ES USB/MP3/Bluetooth Professional Audio Mixer. This manual provides essential information for the safe and efficient operation of your mixer. Please read it thoroughly before use and retain it for future reference.
The XTUGA ES series mixers (ES802/ES1202) are designed for professional audio applications, offering features such as USB/MP3 playback and recording, Bluetooth connectivity, built-in digital effects, and +48V phantom power for condenser microphones. Its ultra-thin design and robust metal chassis make it suitable for various environments, including DJ setups, stage performances, and recording studios.
2. Sicherheitshinweise
- Stromversorgung: Verwenden Sie ausschließlich das angegebene Netzteil. Stellen Sie sicher, dass die Lautstärketage passt zu Ihrer örtlichen Stromversorgung.
- Belüftung: Blockieren Sie nicht die Lüftungsöffnungen. Sorgen Sie für ausreichende Luftzirkulation um das Gerät herum, um eine Überhitzung zu vermeiden.
- Wasser und Feuchtigkeit: Do not expose the mixer to rain, moisture, or any liquids. Do not place objects filled with liquids on the mixer.
- Wärmequellen: Keep the mixer away from heat sources such as radiators, heat registers, stoves, or other apparatus (including ampKonverter (Lüfter), die Wärme erzeugen.
- Reinigung: Nur mit einem trockenen Tuch reinigen. Vor der Reinigung die Stromzufuhr unterbrechen.
- Wartung: Versuchen Sie nicht, dieses Produkt selbst zu warten. Überlassen Sie alle Wartungsarbeiten qualifiziertem Servicepersonal.
- Erdung: Sorgen Sie für eine ordnungsgemäße Erdung, um Stromschläge zu vermeiden.
- Kabelmanagement: Achten Sie darauf, dass die Stromkabel nicht betreten oder eingeklemmt werden, insbesondere an Steckern, Steckdosen und an der Stelle, an der sie aus dem Gerät austreten.
3. Produktüberschreitungview
The XTUGA ES series mixer features a compact, durable design with a comprehensive set of controls for versatile audio mixing. It includes multiple input channels, a 3-band equalizer per channel, built-in digital effects, and various connectivity options.

Abbildung 3.1: Front view of the XTUGA ES Series Professional Audio Mixer, showing all input channels, faders, EQ knobs, and the central control panel with USB/MP3 display.
Hauptmerkmale:
- Kanäle: Available in 8 or 12 mono channel configurations with stereo inputs.
- Voramplifier: High-quality microphone preamplifizierer.
- Ausgleich: 3-band EQ on each mono channel for precise tone shaping.
- Konnektivität: USB/MP3 playback and recording, Bluetooth function for wireless audio streaming.
- Phantomspeisung: +48V Phantomspeisung für Kondensatormikrofone.
- Digitale Effekte: Built-in digital effects processor.
- Überwachung: Headphone monitoring and dual 12-band main level display.
- Langlebiges Design: Ultra-thin metal chassis for durability and portability.
4. Einrichtung
4.1 Stromanschluss
- Stellen Sie sicher, dass sich der Netzschalter des Mischpults in der Position „AUS“ befindet.
- Schließen Sie das mitgelieferte Netzteil an den Stromeingang des Mischpults an.
- Stecken Sie den Netzadapter in eine geeignete Wechselstromsteckdose.
- Turn the mixer's power switch to "ON". The power indicator will illuminate.
4.2 Eingangsverbindungen
Der Mixer unterstützt verschiedene Eingangsquellen:
- Mikrofone: Connect microphones to the XLR inputs (MIC) on each channel. For condenser microphones requiring phantom power, ensure the +48V button is activated (see Section 5.2).
- Leitungspegelgeräte: Connect instruments, keyboards, or other line-level devices to the 1/4" TRS/TS LINE inputs on each channel.
- Stereo-Eingänge: Use the dedicated stereo input channels for devices like CD players or external media players.
4.3 Ausgangsanschlüsse
- Hauptausgang: Schließen Sie Ihre Hauptlautsprecher an oder amplifier to the MAIN L/R outputs (XLR or 1/4" TRS).
- Kopfhörerausgang: Schließen Sie Kopfhörer zum Abhören an den PHONES-Ausgang an.
- AUX-Send: Use the AUX SEND output to connect to external effects processors or monitor speakers.
4.4 Computeranschluss (USB)
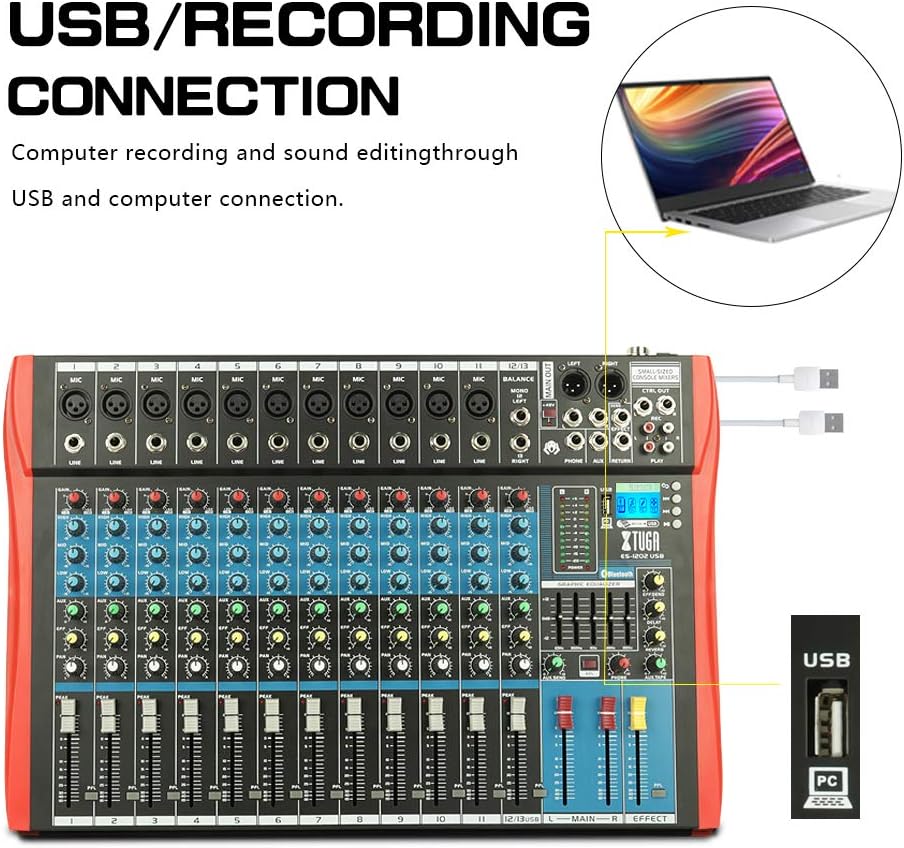
Abbildung 4.1: Diagram illustrating the USB connection for computer recording and sound editing. Connect the mixer's USB port to your computer using a standard USB cable.
So verwenden Sie das Mischpult mit einem Computer zur Aufnahme oder Wiedergabe:
- Connect a USB cable from the mixer's USB port to an available USB port on your computer.
- The mixer will typically be recognized as a standard audio device. No special drivers are usually required for basic functionality.
- Select the mixer as your input/output device in your computer's sound settings or digital audio workstation (DAW) software.
5. Bedienungsanleitung
5.1 Kanalsteuerung
- DAZUGEWINNEN: Adjusts the input sensitivity for each channel. Set this to achieve a strong signal without clipping (the PEAK LED should only flash occasionally).
- EQ (HÖHEN, MITTEN, TIEFEN): 3-Band-Equalizer zur Klangformung jedes Kanals.

Abbildung 5.1: Visual representation of the 3-band EQ frequency response curves. The HIGH band boosts/cuts above 12kHz, the MID band sweeps from 250Hz to 6kHz, and the LOW band boosts/cuts below 80Hz.
- HOCH: Adjusts frequencies above 12 kHz (±15 dB).
- MITTE: Adjusts frequencies between 150 Hz and 3.5 kHz (±15 dB). This is a sweepable mid-range control.
- NIEDRIG: Adjusts frequencies below 80 Hz (±15 dB).
- WIRKUNG: Sends a portion of the channel signal to the built-in effects processor.
- SCHWENKEN: Passt die Stereoposition des Kanalsignals (von links nach rechts) an.
- KANAL-FADER: Controls the output level of each individual channel to the main mix.
- PEAK-LED: Leuchtet auf, wenn das Eingangssignal zu hoch ist und somit eine mögliche Übersteuerung angezeigt wird. Reduzieren Sie die Verstärkung (GAIN), wenn diese LED häufig aufleuchtet.
5.2 +48V Phantomspeisung
The mixer provides +48V phantom power for condenser microphones. To activate:
- Ensure all channel faders and the main fader are set to their minimum positions.
- Connect your condenser microphone(s) to the XLR inputs.
- Press the +48V PHANTOM POWER button. An indicator light will confirm activation.
- Gradually raise the channel faders and main fader to the desired levels.
Caution: Do not activate phantom power when dynamic microphones or other devices not requiring +48V are connected, as this may cause damage.
5.3 Bluetooth-Verbindung

Abbildung 5.2: Close-up of the Bluetooth and MP3 control panel, showing the digital LCD display and control buttons.
So verbinden Sie ein Bluetooth-Gerät:
- Press the "MODE" button on the MP3 player section until "Bluetooth" is selected on the digital display.
- On your mobile phone, tablet, or other Bluetooth-enabled device, search for available Bluetooth devices.
- Select "XTUGA MIXER" (or similar name) from the list to pair.
- Sobald die Kopplung hergestellt ist, können Sie Audio von Ihrem Gerät über den Mixer abspielen.
5.4 USB/MP3-Wiedergabe und -Aufnahme
The mixer supports U-DISK MP3 playback and direct recording to a USB drive.
- MP3-Wiedergabe: Stecken Sie einen USB-Stick mit MP3 ein fileStecken Sie das Kabel in den USB-Anschluss. Der Mixer erkennt das Kabel automatisch und beginnt mit der Wiedergabe. files. Use the control buttons (PLAY/PAUSE, PREV, NEXT) on the MP3 player section to navigate.
- Aufnahme: To record the main mix to a USB drive, ensure a formatted USB drive is inserted. Press the "REC" button on the MP3 player section to start recording. Press it again to stop.
5.5 digitale Effekte
The mixer includes a built-in digital effects processor. Use the "EFFECT" knob on each channel to send signal to the effects. The main "EFFECT" fader controls the overall level of the effects return to the main mix. Adjust the effect type and parameters using the dedicated controls in the effects section.
5.6 Überwachung
Connect headphones to the PHONES jack to monitor the main mix. The PHONES level knob controls the headphone volume. The main LED meters provide a visual indication of the main output level.

Abbildung 5.3: Close-up of the main LED level meters, showing output levels for Left (L) and Right (R) channels, along with the USB and PC connection ports.
6. Wartung
- Reinigung: Regularly wipe the mixer's surface with a soft, dry, lint-free cloth. Do not use abrasive cleaners, solvents, or waxes.
- Lagerung: When not in use for extended periods, store the mixer in a cool, dry place, away from direct sunlight and extreme temperatures. Cover the unit to protect it from dust.
- Kabelpflege: Vermeiden Sie übermäßiges Biegen oder Verdrehen der Kabel. Trennen Sie die Kabel, indem Sie am Stecker ziehen, nicht am Kabel selbst.
7. Fehlerbehebung
| Problem | Mögliche Ursache | Lösung |
|---|---|---|
| Keine Tonausgabe |
|
|
| Verzerrter Ton |
|
|
| Bluetooth stellt keine Verbindung her |
|
|
| USB/MP3 not playing or recording |
|
|
8. Spezifikationen
| Besonderheit | Spezifikation |
|---|---|
| Marke | XTUGA |
| Modell | ES802/1202 |
| Anzahl der Kanäle | 8 oder 12 (je nach Modell) |
| Konnektivitätstechnologie | Aux-Anschluss, Bluetooth, USB |
| Stromquelle | Kabelgebundene Elektrik |
| Frequenzgang | Microphone line input to any output: ±1.5 dB, 20 Hz ~ 20 KHz |
| Gesamtklirrfaktor + Rauschen | Sensitivity -30dB, Mix output +14dBu <0.02% @ 1 KHz or EQ (stereo input) |
| Crosstalk (1 KHz) | Channel mute > 90 dB, Fader off > 90 dB, AUX send port closed > 83 dB |
| Mono EQ (Q(MF): 1.5) | Low: 80Hz ± 15dB, Mid (sweepable): 150Hz-3.5KHz ± 15dB, High: 12 KHz ± 15 dB |
| Stereo EQ (Q(MF): 0.8) | Low: 80Hz ± 15dB, Mid: 720Hz ± 15dB, High: 12KHz ± 15dB |
| Energieaufnahme | Weniger als 35 W |
| Betriebstemperatur | 5°C bis +40°C |
| Audioeingang | XLR, Line, and Digital Inputs |
| UPC | 784124158662 |
| GTIN | 784124158662 |
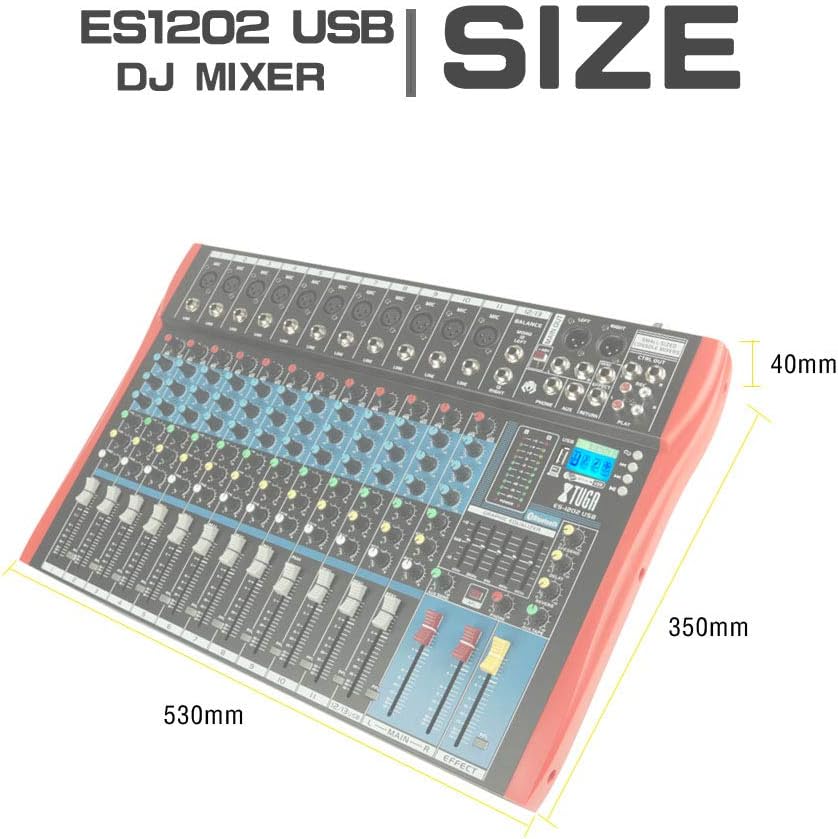
Abbildung 8.1: Dimensions of the XTUGA ES1202 USB Mixer, showing approximate measurements of 530mm (width), 350mm (depth), and 40mm (height).
9. Garantie und Support
9.1 Garantieinformationen
XTUGA products are designed and manufactured to high-quality standards. For specific warranty terms and conditions, please refer to the warranty card included with your product or contact your local XTUGA distributor or retailer. Keep your proof of purchase for warranty claims.
9.2 Kundendienst
If you encounter any issues or have questions regarding your XTUGA ES USB/MP3/Bluetooth Professional Audio Mixer that are not covered in this manual, please contact XTUGA customer support or your authorized dealer for assistance. Please have your model number (ES802/1202) and purchase information ready when contacting support.