
Thincol BST-I-W1-A4-O5-P2
Thincol AC Current Transducer User Manual
Model: BST-I-W1-A4-O5-P2
1. Einleitung
This user manual provides comprehensive instructions for the installation, operation, and maintenance of the Thincol AC Current Transducer (Model: BST-I-W1-A4-O5-P2). This device is designed to convert AC 0-5A current signals into DC 0-10V output signals, making it suitable for various industrial control and dispatching systems. Please read this manual thoroughly before using the product to ensure safe and efficient operation.
2. Sicherheitshinweise
Beachten Sie stets die folgenden Sicherheitsvorkehrungen, um Verletzungen oder Schäden am Gerät zu vermeiden:
- Stellen Sie sicher, dass die Stromversorgungslautstärketage matches the device's requirements (DC 24V ± 10%).
- Installation und Verkabelung dürfen nur von qualifiziertem Fachpersonal durchgeführt werden.
- Vor dem Anschließen oder Einstellen jeglicher Einstellungen die Stromzufuhr unterbrechen.
- Setzen Sie das Gerät keiner übermäßigen Feuchtigkeit, Staub oder extremen Temperaturen aus.
- Verify all connections are secure to prevent short circuits or improper operation.
- The device is designed for industrial applications; use it only for its intended purpose.
3. Produktüberschreitungview
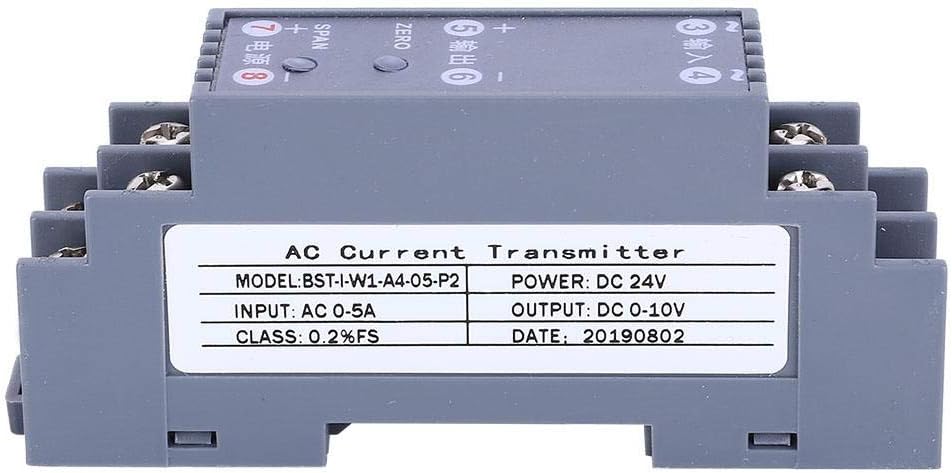
Figure 3.1: Thincol AC Current Transducer (Model: BST-I-W1-A4-O5-P2).
3.1. Beschreibung
The Thincol AC Current Transducer (Model: BST-I-W1-A4-O5-P2) is a high-precision signal transmitter housed in an ABS flame-retardant plastic shell. It features a one-in one-out channel configuration, converting AC 0-5A input to DC 0-10V output. Designed for reliability, it offers strong anti-interference ability and good stability, preventing instant waves. Its compact design supports standard DIN35MM rail installation.
3.2. Hauptmerkmale
- Hohe Präzision: Supports 0.2% SF accuracy for reliable signal conversion.
- Schnelle Antwort: Quick response time of ≤100MS.
- Robustes Design: ABS flame-retardant plastic shell with stainless steel terminal blocks for durability.
- Starke Störfestigkeit: Prevents instant waves, ensuring stable operation.
- Einfache Installation: Compatible with international standard DIN35MM card slot guide rail installation.
- Breite Anwendung: Ideal for electrical installations, automatic control, and dispatching systems in various industries.
3.3. Packungsinhalt
- 1 x Thincol AC Current Transducer (Model: BST-I-W1-A4-O5-P2)
4. Spezifikationen
| Parameter | Wert |
|---|---|
| Modell | BST-I-W1-A4-O5-P2 |
| Artikeltyp | Sender |
| Kanalkonfiguration | One-in one-out |
| Netzteil Voltage | DC 24 V ± 10% |
| Nennleistungsaufnahme | ≤ 1 W |
| Ansprechzeit | ≤100MS |
| Isolationsfestigkeit | 2000V AC / 1 MIN |
| Isolationswiderstand | ≥100 MΩ |
| Umgebungstemperatur | -20°C bis 55°C |
| Material | ABS flame retardant plastic |
| Genauigkeit | 0.2% SF |
| Eingang | Wechselstrom 0-5 A |
| Ausgabe | DC 0-10V |
| Installation | DIN35MM Rail Mount |

Figure 4.1: Product dimensions of the AC Current Transducer.
5. Einrichtung und Installation
Follow these steps for proper installation of the AC Current Transducer:
- Montage: The transducer is designed for DIN35MM rail installation. Securely clip the device onto a standard 35mm DIN rail in your electrical cabinet or control panel.
- Stromversorgungsanschluss: Connect the DC 24V power supply to terminals 7 (+) and 8 (-) as indicated on the device. Ensure the polarity is correct.
- AC Current Input Connection: Connect the AC current source (0-5A) to terminals 3 (Input) and 4 (Input). Ensure the input current is within the specified range.
- DC-Voltage Output Connection: Connect your receiving device (e.g., PLC, display, data acquisition system) to terminals 5 (+) and 6 (-) for the DC 0-10V output. Observe correct polarity.
- Verdrahtungsprüfung: Double-check all wiring connections for tightness and correct polarity before applying power. The stainless steel terminal blocks are designed for secure and fast wiring.

Figure 5.1: AC Current Transducer installed in a control panel with wiring connections.
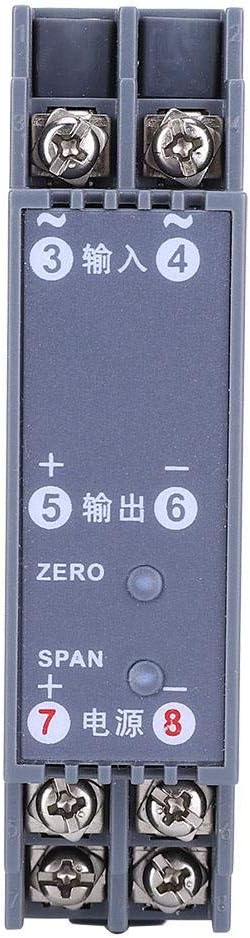
Abbildung 5.2: Oben view of the transducer showing terminal connections and adjustment points.
6. Bedienungsanleitung
Once the transducer is correctly installed and powered, it will begin converting the AC current input to a DC voltage output. Calibration may be required for precise measurements.
6.1. Erste Inbetriebnahme
After completing all wiring, apply DC 24V power to the device. The transducer will power on and begin processing the input signal.
6.2. Calibration (ZERO and SPAN Adjustment)
The transducer features ZERO and SPAN adjustment potentiometers to fine-tune the output signal. These are typically small screws accessible on the top of the unit.
- ZERO Adjustment: With no AC current input (0A), adjust the "ZERO" potentiometer until the DC output is 0V. This sets the lower limit of the output range.
- SPAN Adjustment: Apply a known maximum AC current input (e.g., 5A) to the device. Adjust the "SPAN" potentiometer until the DC output is 10V. This sets the upper limit of the output range.
- Repeat ZERO and SPAN adjustments as necessary for optimal accuracy.
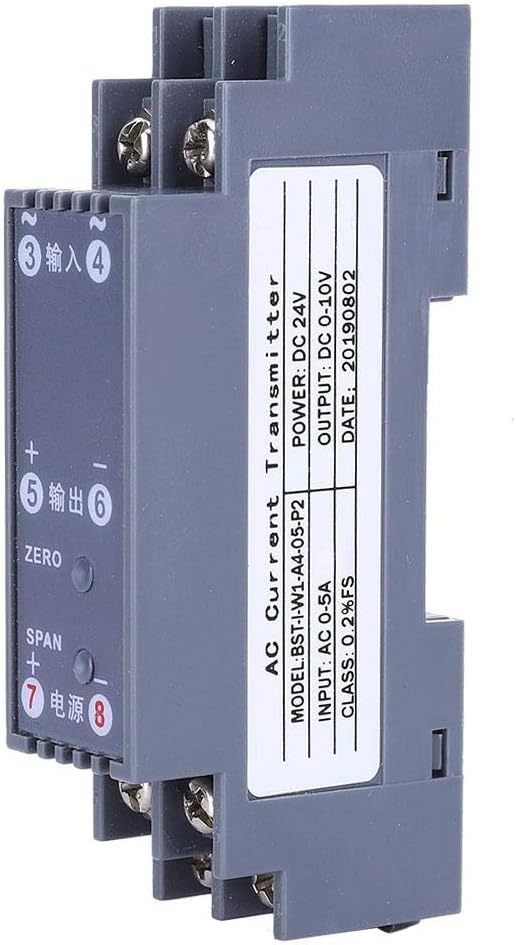
Abbildung 6.1: Seite view highlighting ZERO and SPAN adjustment points.
7. Wartung
The Thincol AC Current Transducer is designed for low maintenance. However, regular checks can ensure its longevity and reliable performance:
- Reinigung: Halten Sie das Gerät sauber und frei von Staub und Schmutz. Verwenden Sie zum Reinigen ein weiches, trockenes Tuch. Verwenden Sie keine flüssigen Reiniger oder Lösungsmittel.
- Verbindungsprüfungen: Periodically inspect all wiring connections to ensure they remain tight and secure. Loose connections can lead to inaccurate readings or device malfunction.
- Umgebungsbedingungen: Ensure the operating environment remains within the specified ambient temperature range (-20°C to 55°C) and is free from excessive humidity.
- Neukalibrierung: If you suspect a drift in accuracy, perform the ZERO and SPAN calibration procedure as described in Section 6.2.
8. Fehlerbehebung
If you encounter issues with your AC Current Transducer, refer to the following common problems and solutions:
| Problem | Mögliche Ursache | Lösung |
|---|---|---|
| Kein Ausgangssignal | No power supply; Incorrect wiring; Faulty input signal. | Verify DC 24V power supply is connected and active. Check all wiring connections for correctness and tightness. Ensure AC current input is present. |
| Inaccurate output reading | Needs calibration; Input current outside range; Interference. | Perform ZERO and SPAN calibration (Section 6.2). Confirm AC input current is within 0-5A. Check for strong electromagnetic interference sources nearby. |
| Unstable output signal | Loose connections; Electrical noise; Faulty unit. | Tighten all terminal connections. Ensure proper grounding. If problem persists, contact support. |
| Device not mounting securely on DIN rail | Incorrect DIN rail size; Damaged mounting clip. | Ensure you are using a standard 35mm DIN rail. Inspect the mounting clip for damage. |
If the problem persists after attempting these solutions, please contact Thincol customer support for further assistance.
9. Garantie und Support
Specific warranty information for the Thincol AC Current Transducer (Model: BST-I-W1-A4-O5-P2) was not provided with this product documentation. For details regarding warranty coverage, technical support, or service, please refer to the product packaging or contact Thincol directly through their official webSite oder Kundendienstkanäle.
Thincol Customer Support: Please visit the official Thincol webWebsite mit Kontaktinformationen, FAQs und weiteren Ressourcen.
Ask a question about this manual
Ask about setup, troubleshooting, compatibility, parts, safety, or missing instructions. Manuals+ will review the question and use this page’s manual context to help answer it.