
Sorand AC 230V Floor Heating Thermostat
Sorand AC 230V Digital Programmable Floor Heating Thermostat User Manual
Model: AC 230V Floor Heating Thermostat
Einführung
This manual provides comprehensive instructions for the installation, operation, and maintenance of your Sorand AC 230V Digital Programmable Floor Heating Thermostat. Please read this manual carefully before installation and use to ensure proper function and safety.
The thermostat is designed for electronic floor heating systems and other electrical heating elements. It features a large LCD with backlight, programmable temperature settings, and internal/external temperature sensing capabilities.
Sicherheitshinweise
- Die Installation muss von einem qualifizierten Elektriker durchgeführt werden.
- Stellen Sie sicher, dass die Stromversorgung vor der Installation oder Wartung unterbrochen ist.
- Das Thermostat darf weder Wasser noch übermäßiger Feuchtigkeit ausgesetzt werden.
- Innerhalb der angegebenen Lautstärke betreibentage und Stromgrenzen.
Packungsinhalt
Überprüfen Sie, ob alle Artikel im Paket vorhanden sind:
- 1 x Sorand AC 230V Digital Programmable Floor Heating Thermostat
- 1 x External Temperature Sensor Cable (approx. 3 meters)
- 2 x Befestigungsschrauben
- 1 x Benutzerhandbuch (dieses Dokument)

Image: Contents of the Sorand thermostat package, showing the main unit, external sensor cable, mounting screws, and the instruction manual.
Setup und Installation
Wichtig: Installation should only be carried out by a qualified electrician. Ensure the main power supply is turned off before commencing any wiring work.
Schaltplan
Refer to the wiring diagram on the back of the thermostat unit for correct connections. The terminals are typically labeled as follows:
- L1, N1: Power input (AC 230V)
- LOAD (1, 2): Connection to the heating element
- NTC (5, 6): Connection for the external floor temperature sensor

Bild: Rückseite view of the Sorand thermostat, displaying the wiring terminals and a simplified diagram for electrical connections.
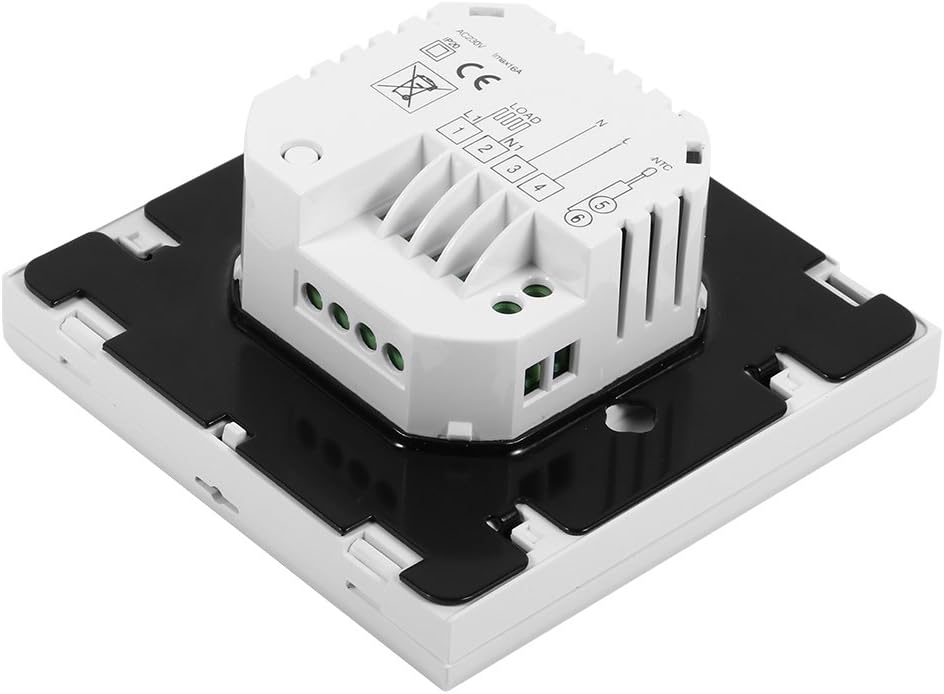
Abbildung: Seite view of the Sorand thermostat, illustrating the internal components and ports for wiring connections.
Montage
- Prepare a standard electrical wall box (86x86mm recommended).
- Connect the power supply, heating load, and external sensor wires according to the wiring diagram.
- Carefully push the wired thermostat into the wall box.
- Befestigen Sie den Thermostat mit den mitgelieferten Schrauben an der Wanddose.
- Bringen Sie die Frontplatte des Thermostats an.
Bedienungsanleitung
The thermostat features a large LCD and touch-sensitive buttons for easy operation.
Tastenfunktionen
- ⏻ (Leistung): Schaltet den Thermostat ein/aus.
- ↻ (Mode/Cycle): Schaltet zwischen manuellem Modus und programmierbarem Modus um.
- ⏱ (Clock/Time): Sets the time and enters programming mode.
- ▲ (Up Arrow): Increases temperature setting or adjusts values.
- ▼ (Down Arrow): Decreases temperature setting or adjusts values.

Bild: Vorderseite view of the Sorand thermostat, highlighting the LCD screen and the five touch-sensitive control buttons below it.
Einstellen von Uhrzeit und Tag
- Halten Sie die ⏱ 3 Sekunden lang gedrückt, um in den Zeiteinstellungsmodus zu gelangen.
- Verwenden Sie die ▲ Und ▼ Tasten zum Einstellen der Stunde, dann drücken ⏱ Um dies zu bestätigen und zur Minutenanzeige zu wechseln, dann zum Wochentag.
- Drücken ⏱ again to exit, or wait for 10 seconds for automatic exit.
Betrieb im manuellen Modus
Im manuellen Modus hält das Thermostat eine vom Benutzer eingestellte konstante Temperatur aufrecht.
- Drücken Sie die ↻ button to switch to manual mode (indicated by a hand icon or similar on the display).
- Verwenden Sie die ▲ Und ▼ Tasten zum Einstellen der gewünschten Temperatur.
- The thermostat will now maintain this temperature.
Programmable Mode Operation (6 Periods)
The thermostat allows for 6 programmable periods per day, enabling different temperature settings at different times.
- Drücken Sie die ↻ button to switch to programmable mode (indicated by a clock icon or similar).
- Halten Sie die ⏱ button for 3 seconds to enter programming mode.
- The display will show the first period (e.g., "Period 1"). Use ▲ Und ▼ to set the start time and desired temperature for this period.
- Drücken ⏱ to move to the next period and repeat the process for all 6 periods.
- After setting all periods, press ⏱ again or wait for automatic exit to save settings.
The thermostat will automatically follow the programmed schedule.
Sensor Selection (Internal/External)
The thermostat can use its internal sensor or the external floor sensor. The selection method is typically found in advanced settings or by a specific button combination. Refer to the on-screen indicators for the active sensor.
Wartung
- Clean the thermostat's display and casinMit einem weichen, trockenen Tuch abwischen. Keine Scheuermittel oder Lösungsmittel verwenden.
- Um eine optimale Leistung zu gewährleisten, stellen Sie sicher, dass der Thermostat frei von Staub und Schmutz ist.
- Das Gerät enthält keine vom Benutzer austauschbaren Teile. Versuchen Sie nicht, das Gerät zu öffnen oder zu reparieren.
Fehlerbehebung
| Problem | Mögliche Ursache | Lösung |
|---|---|---|
| Thermostat schaltet sich nicht ein. | Keine Stromversorgung; falsche Verkabelung. | Check circuit breaker. Verify wiring connections (consult a qualified electrician). |
| Heizung lässt sich nicht ein-/ausschalten. | Incorrect temperature setting; thermostat in OFF mode; wiring issue. | Adjust set temperature. Ensure thermostat is ON. Check heating element wiring. |
| Ungenaue Temperaturanzeige. | Sensor malfunction; incorrect sensor selected. | Verify sensor connection. Check if internal or external sensor is active. |
| Der Bildschirm ist leer oder flackert. | Stromschwankungen; interner Fehler. | Reset power to the thermostat. If issue persists, contact support. |
Technische Daten
| Besonderheit | Detail |
|---|---|
| Marke | Sorand |
| Modell | AC 230V Floor Heating Thermostat |
| Arbeitsvolumentage | Wechselstrom 230 V, 50/60 Hz |
| Laststrom | 12/16A (Electric Heating) |
| Genauigkeit | ±0.5℃ |
| Sollwert-Temperaturbereich | 5℃ - 35℃ |
| Grenztemperaturbereich | 5℃ - 99℃ |
| Energieaufnahme | <0.3 W |
| Temperatursensor | NTC (Internal and External) |
| Oberflächengröße | Ca. 86 x 86 x 40 mm (3.4 x 3.4 x 1.6 Zoll) |
| Kabellänge des externen Sensors | Ca. 3 Meter (9.8 Fuß) |
| Material | PC+ABS |
| Anzeigetyp | Digitales LCD-Display mit Hintergrundbeleuchtung |
| Kontrollmethode | Touchpad-Steuerung |
Garantie und Support
This product is covered by the manufacturer's standard warranty. Please refer to the product packaging or your point of purchase for specific warranty terms and conditions.
Bei technischen Problemen, Fragen zur Fehlerbehebung oder Garantieansprüchen wenden Sie sich bitte direkt an Ihren Händler oder den Hersteller. Bewahren Sie Ihren Kaufbeleg als Kaufnachweis auf.
Ask a question about this manual
Ask about setup, troubleshooting, compatibility, parts, safety, or missing instructions. Manuals+ will review the question and use this page’s manual context to help answer it.