1. Einleitung
This manual provides essential information for the safe and efficient installation, operation, and maintenance of your Zoeller Waste-Mate 290 Series Model J295 High Head Sewage Pump. Please read this manual thoroughly before attempting to install or operate the pump. Retain this manual for future reference.
The Zoeller Waste-Mate 290 Series J295 is a high-head submersible sewage pump designed for residential or light commercial dewatering and wastewater applications. It is capable of transferring groundwater, effluent, or raw sewage. Its vortex impeller design minimizes clogging and allows for the passage of 2-inch spherical solids. Constructed from durable cast iron with a powder-coated epoxy finish, this pump is built for corrosion resistance and efficient heat dissipation, ensuring a long service life.
2. Sicherheitshinweise
WARNING: Risk of electric shock. This pump is supplied with a grounding conductor and grounding-type attachment plug. To reduce the risk of electric shock, be certain that it is connected only to a properly grounded, grounding-type receptacle.
WARNING: Always disconnect the pump from the power source before handling or servicing.
- Stellen Sie sicher, dass alle elektrischen Anschlüsse den örtlichen Vorschriften und Verordnungen entsprechen.
- Do not operate the pump in an explosive atmosphere.
- Pumpen Sie keine brennbaren Flüssigkeiten.
- Tragen Sie während der Installation und Wartung geeignete persönliche Schutzausrüstung (PSA).
- Keep hands clear of the impeller and discharge opening when the pump is connected to power.
- Heben Sie die Pumpe nicht am Netzkabel an.
3. Packungsinhalt
Prüfen Sie beim Auspacken, ob alle Komponenten vorhanden und unbeschädigt sind:
- Zoeller Waste-Mate 290 Series J295 High Head Sewage Pump
- 20 Fuß Netzkabel
- Bedienungsanleitung (dieses Dokument)
Note: Additional accessories such as control panels (e.g., 10-1084, 10-1112) are sold separately.
4. Einrichtung und Installation
Proper installation is crucial for the pump's performance and longevity. If you are unsure about any step, consult a qualified professional.
4.1 Prüfungen vor der Installation
- Inspect the pump for any shipping damage.
- Stellen Sie sicher, dass die Stromversorgung dem Volumen der Pumpe entspricht.tage (200-208 Volts, 3 Phase).
- Verify the basin or pit is clean and free of debris.
4.2 Elektrischer Anschluss
This pump requires a 200-208 Volt, 3-phase electrical supply. All wiring must be performed by a qualified electrician in accordance with national and local electrical codes.
- Connect the pump to a dedicated circuit with appropriate overcurrent protection.
- Sorgen Sie für eine ordnungsgemäße Erdung, um Stromschläge zu vermeiden.
- The 20 ft power cord should not be modified or extended without consulting a qualified electrician.
4.3 Sanitäranschluss
The pump features a 2-inch NPT female flanged vertical discharge.
- Connect the discharge piping to the pump's flanged outlet. Use appropriate sealant for a watertight connection.
- Install a check valve in the discharge line to prevent backflow into the basin.
- Ensure the discharge piping is adequately supported to prevent strain on the pump.
- The pump is designed for submersible operation. Ensure it is fully submerged during use.
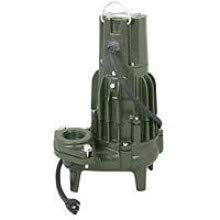
Figure 1: Zoeller Waste-Mate 290 Series J295 High Head Sewage Pump. This image shows the general appearance of the pump, highlighting its robust cast iron construction and discharge port.
5. Bedienungsanleitung
The Zoeller J295 is a manual pump, meaning its operation is typically controlled by an external control panel or switch (not included with the pump itself). It is designed for continuous duty when submerged.
5.1 Erstinbetriebnahme
- After installation, ensure the pump is fully submerged in the liquid to be pumped.
- Prüfen Sie, ob alle Wasserleitungen fest sitzen und dicht sind.
- Engage the power supply to the pump via its control panel or switch.
- Observe the pump's operation. It should start pumping liquid immediately.
- Check for any unusual noises or vibrations. If detected, disconnect power and investigate.
5.2 Normalbetrieb
- The pump is designed to operate automatically when connected to a compatible control panel with float switches.
- Stellen Sie sicher, dass die Pumpe basin remains free of excessive debris that could impede float switch operation or clog the pump.
- The maximum fluid temperature for continuous operation is 130°F (54°C). Do not exceed this temperature.
6. Wartung
Regular maintenance ensures optimal performance and extends the life of your pump. Always disconnect power before performing any maintenance.
6.1 Regelmäßige Kontrollen (monatlich)
- Basin Inspektion: Check the pump basin for excessive buildup of solids or debris. Clean as necessary.
- Pumpenbetrieb: Verify the pump cycles on and off correctly (if using a control panel).
- Abflussleitung: Ensure the discharge line is free of obstructions.
6.2 Jährliche Inspektion
- Laufradprüfung: Disconnect power, remove the pump from the basin, and inspect the impeller for wear or damage. Clear any lodged debris.
- Wellendichtung: Inspect the shaft seal for any signs of leakage. The pump features a single stainless steel carbon & ceramic rotary seal. If leakage is observed, professional service may be required.
- Netzkabel: Check the power cord for any signs of fraying, cuts, or damage. Replace if necessary.
7. Fehlerbehebung
Vor jeglichen Reparaturversuchen muss die Pumpe immer von der Stromversorgung getrennt werden.
| Problem | Mögliche Ursache | Lösung |
|---|---|---|
| Pumpe startet oder läuft nicht. | No power to the pump. Thermische Überlastung ausgelöst. Motorschaden. | Check circuit breaker/fuse. Ensure power cord is securely plugged in. Reset thermal overload (if applicable, 1 Ph only). Consult a qualified technician for motor issues. |
| Pump runs but does not pump water or pumps slowly. | Clogged impeller or discharge line. Luftschleuse. Geringe Lautstärketage. | Disconnect power, remove pump, and clear any obstructions from impeller and discharge. Ensure pump is fully submerged. Verify correct voltage liefern. |
| Pumpenzyklen zu häufig. | Check valve failure. Float switch issues (if applicable). Basin zu klein. | Inspect and replace check valve if faulty. Adjust or replace float switches. Consult a professional for basin Größe. |
| Übermäßige Geräusche oder Vibrationen. | Ablagerungen in der Pumpe. Abgenutzte Lager. Unsachgemäße Installation. | Disconnect power and clear debris. If noise persists, professional service may be required for bearings. Recheck installation for proper seating and support. |
8. Spezifikationen
| Besonderheit | Detail |
|---|---|
| Modell | J295 |
| Herstellerteilenummer | 295-0010 |
| Serie | Waste-Mate 290 Series |
| Produkttyp | High Head Sewage Pump |
| Anwendung | Sewage/Dewatering |
| Betrieb | Manual (requires external control) |
| Pferdestärken (PS) | 2 PS |
| Bandtage | 200-208 Volt |
| Phase | 3 Phase |
| Frequenz | 60 Hz |
| AmpAlter | 14.3 Amps |
| Geschwindigkeit | 3450 U/min |
| Dichtungstyp | Single (Stainless Steel Carbon & Ceramic Rotary) |
| Pumpengehäusematerial | Gusseisen |
| Laufradmaterial | Gusseisen |
| Laufradtyp | Verstopfungsfreier Wirbel |
| Maximale Feststoffverarbeitung | 2 inches spherical |
| Entladeanschluss | 2 inch NPT Flanged Vertical |
| Maximaler Durchfluss | 214 GPM (Gallonen pro Minute) |
| Maximale Förderhöhe | 75 Fuß |
| Kabellänge | 20 Fuß |
| Maximale Flüssigkeitstemperatur | 130°F (54°C) |
| Beenden | Corrosion-resistant, powder coated epoxy |
9. Garantie und Support
For warranty information and technical support, please contact Zoeller Company directly or visit their official webBewahren Sie Ihren Kaufbeleg als Kaufnachweis auf.
Zoeller Company Contact Information:
- Refer to the official Zoeller webDie aktuellsten Kontaktdaten finden Sie auf der Website oder der Produktverpackung.
Note: Warranty terms and conditions may vary. Please consult the official warranty statement provided with your product or on the manufacturer's webWebsite.