
1. Einleitung
Vielen Dank für Ihren Einkauf.asing the XTUGA ES602 Professional DJ Mixer. This manual provides essential information for the safe and efficient operation of your mixer. Please read it thoroughly before use and retain it for future reference.
The XTUGA ES602 is a versatile 7-channel mixing console designed for stage audio, DJ applications, and music production. It features XLR and LINE inputs, +48V phantom power, a built-in digital effect processor, USB/MP3 playback, and Bluetooth connectivity.
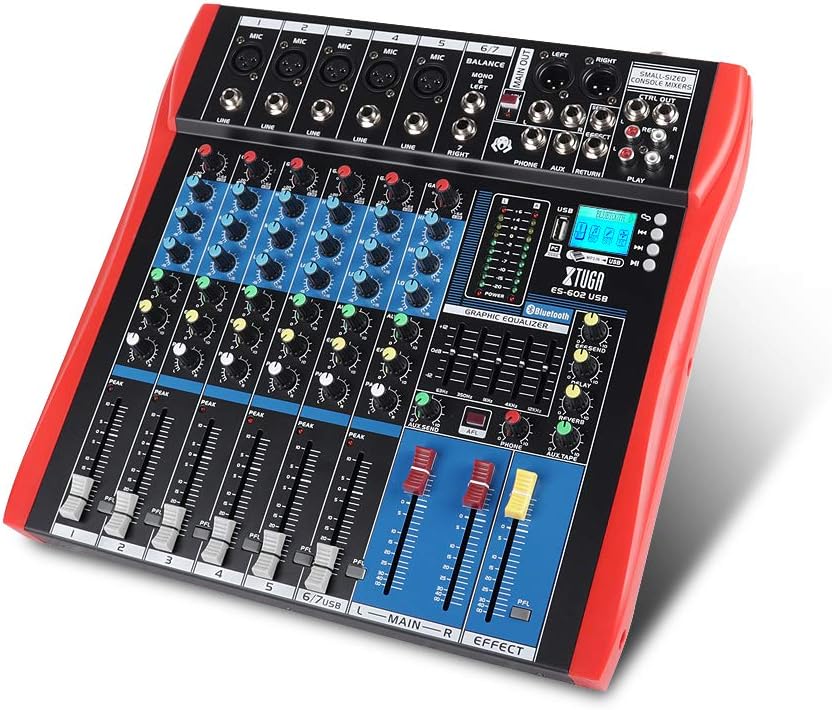
Figure 1: XTUGA ES602 Professional DJ Mixer overview. This image displays the top panel of the mixer, showing all input channels, control knobs, faders, and the master section with the USB/MP3/Bluetooth module.
2. Sicherheitshinweise
- Stromversorgung: Verwenden Sie ausschließlich das angegebene Netzteil. Stellen Sie sicher, dass die Lautstärketage passt zu Ihrer örtlichen Stromversorgung.
- Wasser und Feuchtigkeit: Setzen Sie das Gerät weder Regen noch Feuchtigkeit aus. Stellen Sie keine mit Flüssigkeiten gefüllten Gegenstände auf das Gerät.
- Belüftung: Sorgen Sie für ausreichende Belüftung. Blockieren Sie keine Belüftungsöffnungen.
- Wärmequellen: Halten Sie das Gerät von Wärmequellen wie Heizkörpern, Heizregistern, Öfen oder anderen wärmeerzeugenden Geräten fern.
- Reinigung: Clean only with a dry cloth. Avoid liquid cleaners.
- Wartung: Versuchen Sie nicht, dieses Gerät selbst zu reparieren. Überlassen Sie alle Wartungsarbeiten qualifiziertem Fachpersonal.
- Phantomspeisung: When using condenser microphones, ensure +48V phantom power is activated only after connecting the microphone and before connecting to other devices to prevent damage.
3. Funktionen
The XTUGA ES602 mixer offers a range of features for professional audio mixing:
- 7-Kanal-Mischpult: Equipped with XLR and LINE inputs for versatile connectivity.
- +48V Phantomspeisung: Available for condenser microphones.
- Individuelle Kanalsteuerung: Each channel features GAIN, 3-band EQ (HIGH, MID, LOW), AUX, EFFECT, PAN control knobs, and a volume fader.
- PFL (Pre-Fader Listen) Switch: Allows monitoring of individual channels via headphones.
- Built-in Digital Effect Processor: Includes REPEAT, EFF SEND, DELAY, SEND, and RETURN controls for integrated effects.
- USB/MP3 Playback and Recording: Direct USB input for MP3 playback from U-disk and recording capabilities.
- Bluetooth-Konnektivität: Seamlessly connect mobile phones, tablets, and other Bluetooth-enabled devices for audio playback.
- Hauptausgänge: XLR (L/R) and 1/4" (L/R) stereo output jacks.
- REC-Ausgang: Dedicated REC (L/R) output for external recording devices.
- Headset-Schnittstelle: Zur Audioüberwachung.
- LED-Anzeigen: Power and output level indicator lights for easy monitoring.
- Langlebiges Design: Ultra-thin, all-metal chassis for high density dust resistance and durability.
4. Bedienelemente und Funktionen
This section details the various controls and connections on your XTUGA ES602 mixer.
4.1 Eingangskanäle (Kanäle 1-7)
- MIC-Eingang (XLR): Connects balanced microphones.
- LINE Input (1/4" Jack): Connects line-level instruments or devices.
- +48V Phantomspeisungsschalter: Aktiviert die Phantomspeisung für Kondensatormikrofone an XLR-Eingängen.
- GAIN-Regler: Passt die Eingangsempfindlichkeit für jeden Kanal an.
- Regler für Höhen, Mitten und Tiefen: 3-band equalizer for adjusting the treble, midrange, and bass frequencies of each channel.
- AUX-Knopf: Controls the send level to the auxiliary output.
- EFFECT-Knopf: Controls the send level to the internal effect processor.
- PAN-Knopf: Adjusts the stereo position (left/right) of the channel.
- PFL Switch: Engages Pre-Fader Listen for monitoring the channel's signal before the fader.
- PEAK-LED: Leuchtet auf, wenn das Eingangssignal zu hoch ist, was auf eine mögliche Übersteuerung hinweist.
- Kanal-Fader: Regelt die Ausgangslautstärke des einzelnen Kanals.
4.2 Hauptteil
- MAIN OUT (XLR & 1/4" Jacks): Balanced stereo main outputs for connecting to ampLautsprecher oder Aktivlautsprecher.
- REC OUT (RCA Jacks): Stereo output for connecting to recording devices.
- PHONES Jack (1/4"): Stereo headphone output for monitoring.
- AUX SEND/RETURN Jacks: For connecting external effects processors or monitoring systems.
- HAUPT-Fader (L/R): Regelt die Gesamtlautstärke des Mischpults.
- EFFECT Level Knob: Adjusts the overall level of the internal effects.
- REPEAT, DELAY Knobs: Controls parameters of the digital effect processor.
- LEVEL-Meter: LED display showing the main output level.

Abbildung 2: Ausführlich view of the XTUGA ES602 mixer's channel controls and LED level meters. This image highlights the individual channel knobs for GAIN, EQ, AUX, EFFECT, PAN, and the main output level indicators.
4.3 USB/MP3/Bluetooth Module
- USB-Anschluss: For connecting a USB flash drive for MP3 playback or connecting to a computer for recording/playback.
- LCD Anzeige: Shows current mode, track information, and Bluetooth status.
- Bedientasten: Play/Pause, Stop, Previous/Next Track, Mode selection (USB/Bluetooth/PC).
- Bluetooth-Anzeige: Zeigt den Bluetooth-Verbindungsstatus an.

Figure 3: Close-up of the Bluetooth and MP3 connection section on the XTUGA ES602 mixer. This image shows the USB port, LCD display, and control buttons for media playback and Bluetooth pairing.
5. Einrichtung
Follow these steps to set up your XTUGA ES602 mixer.
5.1 Stromanschluss
- Stellen Sie sicher, dass sich der Netzschalter des Mischpults in der Position AUS befindet.
- Schließen Sie das mitgelieferte Netzteil an den Stromeingang des Mischpults an.
- Stecken Sie den Netzadapter in eine geeignete Wechselstromsteckdose.
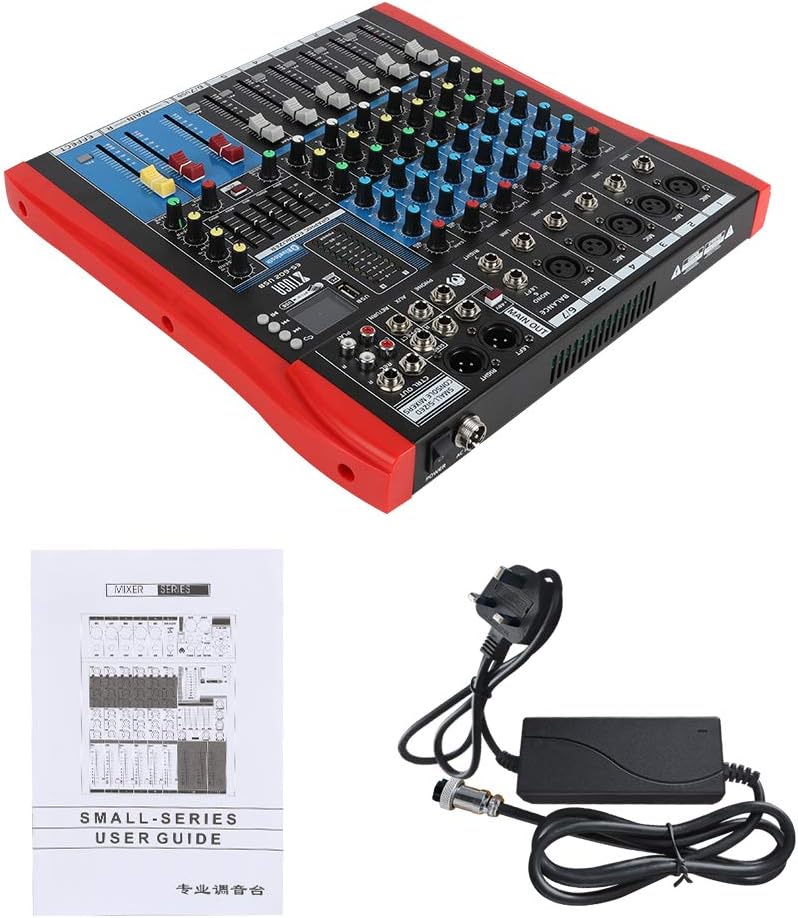
Figure 4: XTUGA ES602 mixer shown with its power adapter and user guide. This illustrates the components included for initial setup.
5.2 Anschließen von Mikrofonen und Instrumenten
- For microphones, connect XLR cables to the MIC-Eingang jacks. If using condenser microphones, activate the +48V PHANTOM Power Switch für den jeweiligen Kanal.
- For line-level instruments (keyboards, guitars with preamps, etc.), connect 1/4" TS/TRS cables to the LINE-Eingang Buchsen.
- Ensure all channel GAIN knobs are set to their minimum position before connecting.
5.3 Anschließen von Ausgabegeräten
- Schließen Sie Ihre Hauptlautsprecher an oder amplifier zu den MAIN OUT (XLR or 1/4") Buchsen.
- For recording, connect an external recording device to the REC OUT (RCA) Buchsen.
- Stecken Sie Kopfhörer in die TELEFONE Anschluss für Überwachungszwecke.
5.4 Verbindung zu einem Computer für Aufnahmen
- Connect a USB cable from the mixer's USB-Anschluss auf Ihren Computer.
- The mixer should be recognized as an audio device by your operating system.
- Select the mixer as the input device in your digital audio workstation (DAW) or recording software.
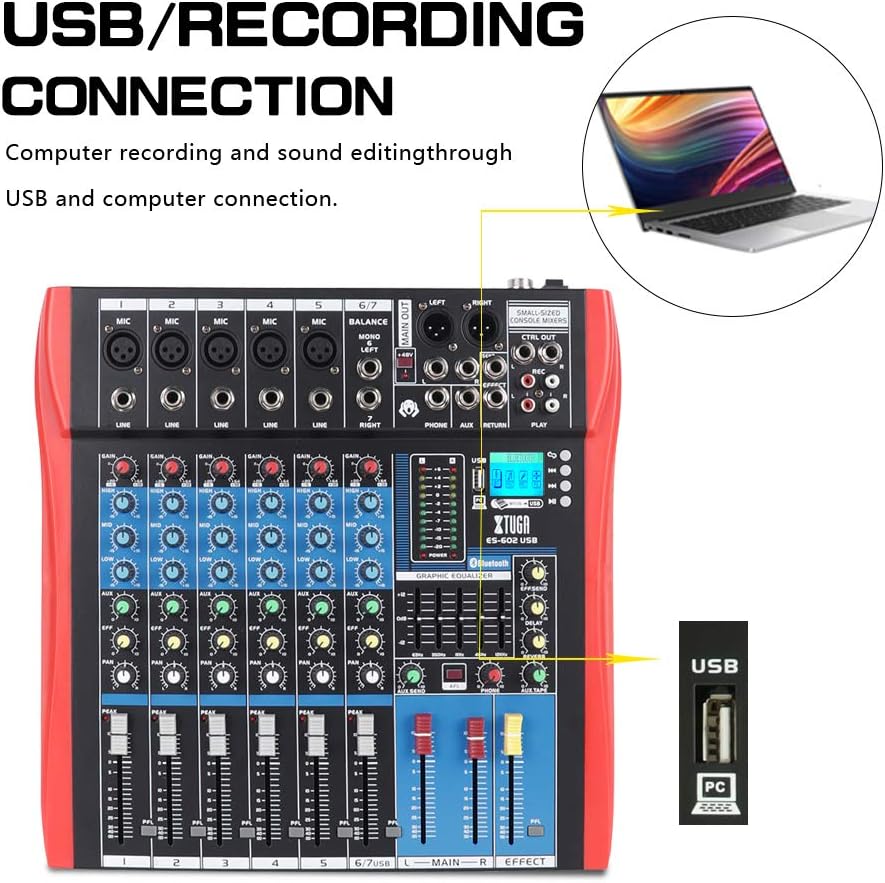
Figure 5: Illustration of the XTUGA ES602 mixer connected to a laptop via USB for recording and sound editing. This highlights the USB input port and its function.
6. Betrieb
This section covers the basic operation of your XTUGA ES602 mixer.
6.1 Einschalten und erste Pegeleinstellung
- After all connections are made, turn on your mixer's power switch.
- Heben Sie langsam an MAIN Faders auf eine angenehme Hörlautstärke.
- For each active input channel, gradually increase the GAIN-Regler bis zum PEAK LED flashes only occasionally during the loudest parts of the signal.
- Adjust individual Kanal-Fader to balance the mix.
6.2 Bluetooth verwenden
- Drücken Sie die MODE-Taste on the USB/MP3/Bluetooth module until "Bluetooth" appears on the LCD display. The Bluetooth indicator will flash.
- On your mobile device, search for Bluetooth devices and select "XTUGA MIXER" (or similar).
- Once paired, the Bluetooth indicator will become solid. You can now play audio from your device through the mixer.
- Use the module's control buttons for Play/Pause, Next/Previous track.
6.3 USB/MP3-Wiedergabe
- Stecken Sie einen USB-Stick mit MP3-Audiodateien ein. files in die USB-Anschluss.
- The mixer should automatically switch to USB mode and begin playback. If not, press the MODE-Taste , um USB auszuwählen.
- Use the control buttons to navigate tracks and control playback.
6.4 Aufnahme
- Auf USB-Laufwerk: In USB/MP3 mode, press the REC-Taste on the module to start recording the main mix to the connected USB drive. Press again to stop.
- Zum Computer: Ensure the mixer is connected to your computer via USB. Open your recording software and select the mixer as the input device. Start recording within your software.
6.5 Effekte verwenden
- Passen Sie die EFFEKT-Regler on individual channels to send a portion of that channel's signal to the internal effect processor.
- Verwenden Sie die EFFECT Level knob in the master section to control the overall volume of the applied effect.
- Passen Sie die WIEDERHOLEN Und VERZÖGERUNG knobs to fine-tune the characteristics of the digital effect.
7. Wartung
Durch sachgemäße Wartung wird die Langlebigkeit und optimale Leistung Ihres Mischers sichergestellt.
- Reinigung: Reinigen Sie die Außenseite des Mixers mit einem weichen, trockenen Tuch. Verwenden Sie keine Scheuermittel, Lösungsmittel oder Wachse.
- Staubschutz: When not in use, cover the mixer to protect it from dust and debris.
- Lagerung: Bewahren Sie den Mixer an einem kühlen, trockenen Ort fern von direkter Sonneneinstrahlung und extremen Temperaturen auf.
- Kabelmanagement: Vermeiden Sie es, Kabel übermäßig zu biegen oder zu knicken. Trennen Sie Kabel, indem Sie am Stecker ziehen, nicht am Kabel selbst.
8. Fehlerbehebung
Sollten Sie Probleme mit Ihrem Mixer haben, beachten Sie bitte die folgenden häufig auftretenden Probleme und Lösungen.
- Keine Tonausgabe:
- Prüfen Sie, ob der Mixer eingeschaltet ist.
- Stellen Sie sicher, dass alle MAIN Faders and individual Kanal-Fader are raised.
- Verify that output cables are securely connected to your ampVerstärker/Lautsprecher.
- Überprüfen Sie die Lautstärke auf Ihrem ampVerstärker/Lautsprecher.
- Kein Eingangssignal:
- Ensure microphones/instruments are properly connected to the correct input jacks.
- Überprüfen Sie, ob das GAIN-Regler for the respective channel is sufficiently turned up.
- Bei Verwendung eines Kondensatormikrofons sicherstellen +48 V PHANTOM-Spannung ist aktiviert.
- Test input sources (microphones, instruments) with another device to confirm they are working.
- Verzerrter Klang:
- Reduzieren Sie die GAIN-Regler for the offending channel if the PEAK LED leuchtet konstant.
- Senken Sie die MAIN Faders if the output level meter is consistently in the red.
- Prüfen Sie, ob die Kabel beschädigt sind.
- Probleme mit der Bluetooth-Verbindung:
- Ensure the mixer is in Bluetooth mode (LCD shows "Bluetooth").
- Stellen Sie sicher, dass Bluetooth auf Ihrem Mobilgerät aktiviert ist und sich das Gerät in Reichweite befindet.
- Versuchen Sie, das Gerät zu entkoppeln und anschließend erneut zu koppeln.
- USB-Wiedergabe funktioniert nicht:
- Ensure the USB drive is properly inserted and contains compatible MP3 files.
- Drücken Sie die MODE-Taste to ensure the mixer is in USB mode.
- Versuchen Sie es mit einem anderen USB-Laufwerk.
9. Spezifikationen
| Besonderheit | Spezifikation |
|---|---|
| Modellnummer | ES602 (also ES802/1202 series) |
| Anzahl der Kanäle | 7 |
| Konnektivitätstechnologie | Aux-Anschluss, Bluetooth, USB |
| Audioeingang | Aux-Anschluss, USB-Anschluss, XLR-Anschluss |
| Ausgangssteckertyp | Auxiliary, XLR |
| Stromquelle | Kabelgebundene Elektrik |
| Artikelgewicht | 3.59 kg |
| Technische Daten | 46 x 46 x 14 cm |
| Hersteller | XTUGA |
| UPC | 784124158754 |
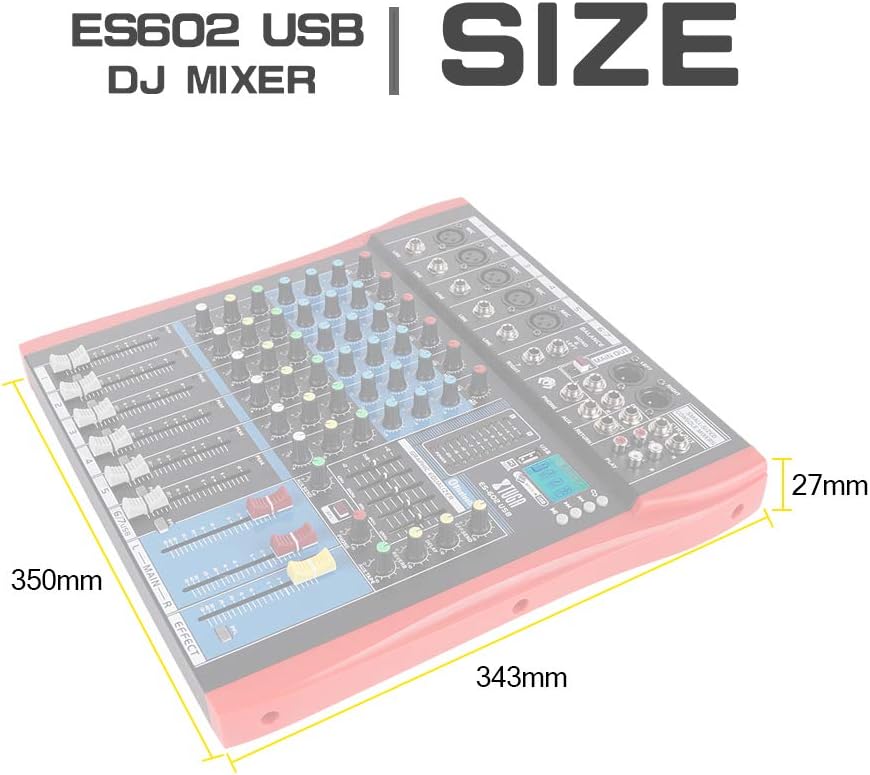
Figure 6: Dimensions of the XTUGA ES602 USB DJ Mixer, showing measurements of 350mm length, 343mm width, and 27mm height.
10. Garantie und Support
XTUGA products are designed for reliability and performance. For warranty information and technical support, please refer to the warranty card included with your product or visit the official XTUGA webBewahren Sie Ihren Kaufbeleg als Kaufnachweis für eventuelle Garantieansprüche auf.