1. Einleitung
Thank you for choosing the Estink 2.4-inch Smart Electronic Peephole Camera. This device provides enhanced home security with its wide-angle camera, clear TFT LCD screen, and 24-hour monitoring capabilities. This manual will guide you through the installation, operation, and maintenance of your new electronic peephole.
2. Produktmerkmale
- 2.4-Zoll-TFT-LCD-Bildschirm: Provides a clear and smooth display of visitors.
- 1 Megapixel HD Camera: Captures and records visitor information with high clarity.
- 145° Weitwinkel View: Offers a broad perspective of the area outside your door for comprehensive security.
- 24-Hour Security Monitoring: Equipped with an intelligent operating system for continuous surveillance.
- Manual Photo Recording: Allows users to manually capture photos of visitors.
- TF-Kartenspeicher: Supports up to 32GB TF card (not included) for storing recordings, with automatic overwrite functionality.
- Concealed Design: The outdoor camera resembles a traditional peephole, maintaining privacy.
- Einfache Installation: Designed for simple setup without the need for specialized tools or installers.
3. Packungsinhalt
Bitte prüfen Sie das Paket auf folgende Artikel:
- Indoor Display Unit (with 2.4-inch TFT LCD screen)
- Outdoor Peephole Camera
- Montagehalterung
- Set of Installation Screws (various lengths)
- Bedienungsanleitung

Image: All components of the Estink Smart Electronic Peephole Camera, including the indoor monitor, outdoor camera, mounting plate, and various screws.
4. Einrichtung und Installation
The Estink Smart Electronic Peephole Camera is designed for easy, direct installation. No special tools are required beyond a screwdriver.
4.1 Vor der Installation
- Ensure your door has an existing peephole or can accommodate a hole with a diameter of approximately 15-50mm (0.6-2 inches).
- The door panel thickness should be approximately 35-110mm (1.4-4.3 inches).
- Prepare 3 AAA batteries (not included) for the indoor display unit.
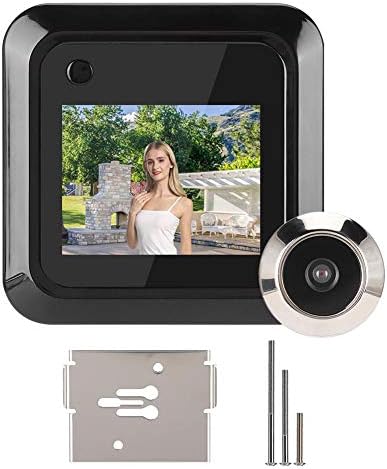
Image: The indoor display unit mounted on the door, showing a live view, with the outdoor camera visible through the door.
4.2 Installationsschritte
- Vorhandenes Guckloch entfernen: If present, unscrew and remove your old peephole from the door.
- Außenkamera einsetzen: Insert the outdoor peephole camera through the door hole from the outside. Ensure the camera is facing outwards and the cable is threaded through to the inside.
- Montagehalterung anbringen: From the inside of the door, place the mounting bracket over the camera cable and align it with the camera's threaded base.
- Sichere Kamera: Select the appropriate length screw from the provided set. Thread the screw through the mounting bracket and into the outdoor camera's threaded base. Tighten securely with a screwdriver until the outdoor camera is firmly in place.
- Innengerät anschließen: Connect the cable from the outdoor camera to the corresponding port on the back of the indoor display unit.
- Inneneinheit montieren: Align the indoor display unit with the mounting bracket and slide it downwards until it clicks into place.
- Batterien einlegen: Open the battery compartment on the back of the indoor unit and insert 3 AAA batteries, observing polarity.

Bild: Rückseite view of the indoor display unit, highlighting the battery compartment and connection points.
5. Bedienung
Operating your Estink Electronic Peephole Camera is straightforward.
5.1 ViewBesucher
- Press the power button on the indoor display unit to activate the screen.
- The screen will display a live view von der Außenkamera.
- The wide-angle lens provides a comprehensive view des Bereichs vor Ihrer Tür.

Image: A visual representation of the 160-degree wide-angle view provided by the camera, showing a broad area in front of a door.
5.2 Photo Recording
- Während viewing the live feed, press the designated photo button (usually the same as the power button or a separate button, refer to device markings) to capture a still image.
- Images will be saved to the inserted TF card.
- The system features an intelligent FIFO (First-In, First-Out) storage function, automatically overwriting the oldest files wenn die TF-Karte voll ist.

Image: The indoor unit displaying a photo, with icons indicating one-touch photo capture and TF card storage.
5.3 24-Hour Monitoring
The device is designed for continuous monitoring, providing security around the clock. Ensure batteries are adequately charged for uninterrupted operation.

Image: The electronic peephole camera shown in different environments, highlighting its application for continuous home security.
6. Wartung
To ensure optimal performance and longevity of your electronic peephole camera, follow these maintenance guidelines:
- Reinigung: Gently wipe the screen and camera lens with a soft, dry cloth. Avoid using abrasive cleaners or solvents.
- Batteriewechsel: When the battery indicator shows low power, replace the 3 AAA batteries in the indoor unit promptly.
- TF-Kartenverwaltung: In regelmäßigen Abständenview and back up important recordings from your TF card. Format the TF card occasionally to maintain performance.
- Umgebungsbedingungen: Ensure the outdoor camera is protected from extreme weather conditions if not already designed for it. The indoor unit should be kept in a dry environment.
7. Fehlerbehebung
If you encounter issues with your Estink Electronic Peephole Camera, refer to the following common problems and solutions:
| Problem | Mögliche Ursache | Lösung |
|---|---|---|
| Der Bildschirm lässt sich nicht einschalten | Low or dead batteries; incorrect battery installation; loose cable connection. | Replace batteries; ensure batteries are inserted with correct polarity; check that the cable between the outdoor camera and indoor unit is securely connected. |
| Kein Bild auf dem Bildschirm | Loose cable connection; faulty outdoor camera; screen malfunction. | Verify cable connection; contact customer support if the issue persists after checking connections. |
| Cannot record photos | Keine TF-Karte eingelegt; TF-Karte voll; TF-Kartenfehler. | Insert a TF card (up to 32GB); check if the TF card is full and back up/delete files; try formatting the TF card or using a different one. |
| Das Bild ist unscharf oder undeutlich. | Dirty camera lens; protective film still on lens/screen. | Clean the camera lens and screen with a soft cloth; remove any protective films. |
| Device does not fit door | Door hole or thickness outside specified range. | Ensure your door hole diameter is 15-50mm and door thickness is 35-110mm. If not, the product may not be compatible. |
8. Spezifikationen
| Besonderheit | Detail |
|---|---|
| Hersteller | Estink |
| Modellnummer | Estink9p6stdxgnk |
| Artikelgewicht | 7.4 Unzen |
| Farbe | Schwarz |
| Bandtage | 1 Volt |
| Applicable Door Hole | Approx. 15 - 50mm (0.6 - 2 inches) |
| Türblattstärke | Approx. 35 - 110mm (1.4 - 4.3 inches) |
| Stromquelle | 3 x AAA-Batterien (nicht enthalten) |
| Lagerung | TF-Karte (bis zu 32 GB, nicht im Lieferumfang enthalten) |
| Kameraauflösung | 1 Megapixel |
| Viewing-Winkel | 145° (or 160° as per some descriptions) |
9. Offizielles Produktvideo
Video: An official product video demonstrating the features and functionality of the Estink 2.4-inch Smart Electronic Peephole Camera. This video showcases the device's design, screen clarity, and ease of use.
10. Garantie und Support
For warranty information or technical support, please refer to the product packaging or contact the seller directly through your purchase platform. Keep your purchase receipt for any warranty claims.