1. Einleitung
This manual provides detailed instructions for the installation, operation, maintenance, and troubleshooting of your ATOTO AC-HD03LR 720P Rear View Backup Camera. Please read this manual thoroughly before using the product to ensure correct usage and optimal performance. Keep this manual for future reference.
2. Produktüberschreitungview
Hauptmerkmale
- HD 720P Video Output: Provides clear 720P HD video signals for enhanced visibility.
- 180-Degree Ultra-Wide Angle: Bietet ein weites Feld von view um tote Winkel zu minimieren.
- Real-time Rear View (LRV): Zeigt die Rückseite an view in real-time even when driving forward, aiding in obstacle avoidance.
- Virtueller Surround View (VSV) Parking Assist: Compatible with specific ATOTO head units to provide a simulated bird's-eye view zum Parken.
- Nachtsichtfähigkeit: Gewährleistet klare Sicht bei schlechten Lichtverhältnissen.
- Wasserdichtigkeitsklasse IP67: Entwickelt, um verschiedenen Wetterbedingungen standzuhalten.
- Einfache Installation: Simple setup with an included 8-meter extension wire.
Kompatibilität
This camera is specifically designed for use with the following ATOTO car stereo models:
- ATOTO A6PF/PL/PP series
- ATOTO S8 series (excluding S8 UN/PN/MS/Gen4 models)
- ATOTO S8 Gen1 models (requires firmware update for LRV function)
Notiz: Diese Kamera ist nicht kompatibel with ATOTO A6GC, F7, A5, or X10 models, or other car stereo brands.

Image: The 180-degree wide-angle view provides a significantly broader perspective compared to standard cameras, enhancing situational awareness. The 720P image quality ensures clear and detailed visuals, superior to 480-line resolution.
3. Packungsinhalt
Bitte überprüfen Sie, ob alle unten aufgeführten Artikel in Ihrem Paket enthalten sind:
- 1x ATOTO AC-HD03LR Rear Wide-Angle Camera
- 1x 8-Meter Extension Wire
- 2x Befestigungsschrauben
- 1x Adhesive Sticker
- 1x Calibration Cloth

Image: The package includes the AC-HD03LR camera (01), an 8-meter extension wire (02), two screws (03), an adhesive sticker (04), and a calibration cloth (05).
4. Einrichtung und Installation
Schaltplan
Follow the wiring diagram below for proper connection to your ATOTO car stereo system. Ensure all connections are secure to prevent signal loss or power issues.
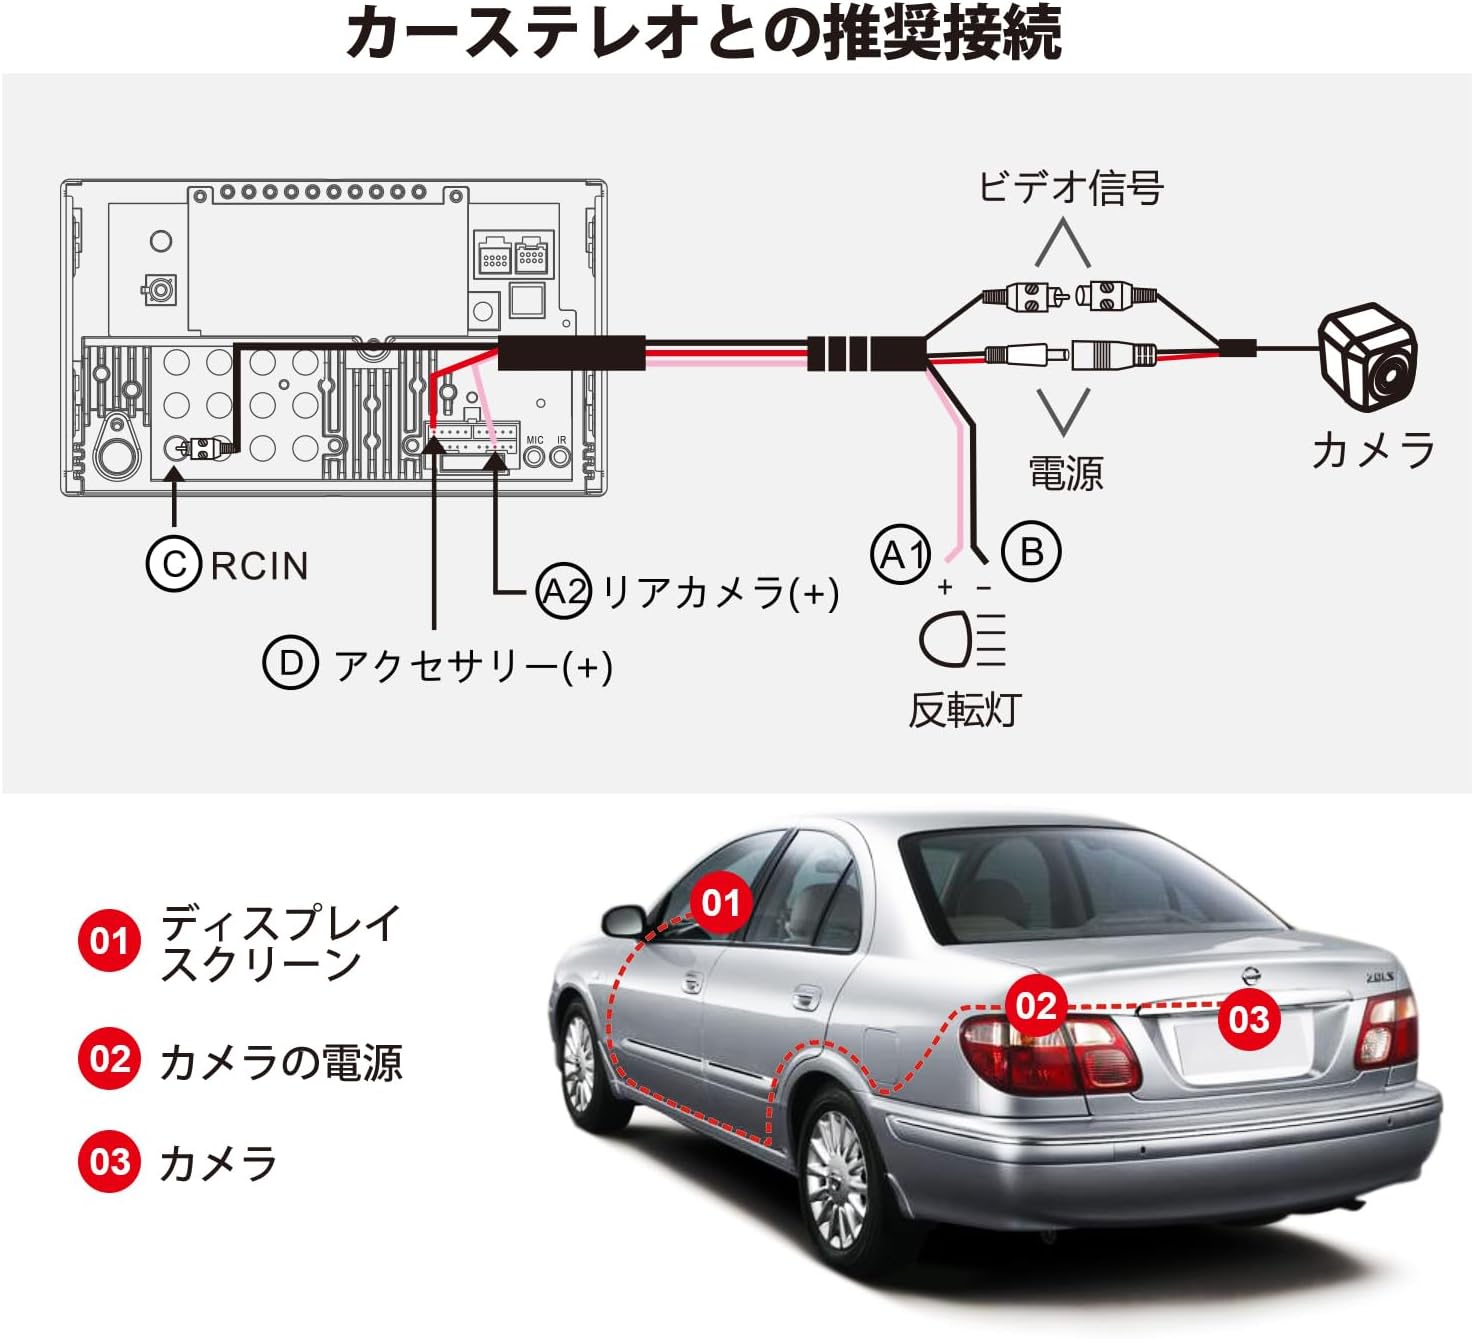
Image: Recommended connection diagram. The camera's video signal connects to the car stereo's RCIN (C). The camera's power (A1, B) connects to the reversing light and accessory power (D), while the rear camera trigger wire (A2) connects to the car stereo's rear camera input.
Installationsschritte
- Montieren Sie die Kamera: Choose a suitable location on the rear of your vehicle, typically near the license plate, for optimal viewing. Secure the camera using the provided screws or adhesive sticker.
- Verlegen Sie das Kabel: Carefully route the 8-meter extension wire from the camera to the car stereo unit. Ensure the cable is protected from sharp edges, heat, and moving parts.
- Strom anschließen: Connect the camera's power wire (red) to the vehicle's reversing light power supply (typically 12V). Connect the ground wire (black) to a suitable chassis ground point.
- Videosignal anschließen: Plug the RCA video connector from the camera's extension wire into the 'RCIN' (Rear Camera Input) port on your ATOTO car stereo.
- Connect Trigger Wire: Connect the camera's trigger wire (usually a thin red wire on the RCA cable) to the 'Rear Camera (+)' or 'Reverse Gear Signal' input on your ATOTO car stereo. This tells the stereo when to switch to the camera view.
- Testfunktionalität: Before finalizing the installation, turn on your car stereo and engage reverse gear to ensure the camera displays correctly.
5. Bedienungsanleitung
Virtueller Surround View (VSV) Parking
The VSV function, available on compatible ATOTO S8 (Gen2) Android car stereos, uses the AC-HD03LR camera to create a simulated bird's-eye view of your vehicle's surroundings. This feature significantly enhances parking safety by providing a comprehensive overhead perspective.
- To activate VSV, ensure your ATOTO S8 (Gen2) head unit has the necessary firmware and image stitching algorithm.
- The system will process the camera's 180-degree input to generate a dynamic, simulated 360-degree view on your car stereo screen.
- Your vehicle's position and surrounding obstacles will be clearly distinguished on the display.

Image: A simulated bird's-eye view from the VSV parking assist system, showing the vehicle's position relative to parking lines and surrounding objects.
Real-time Rear View (LRV)
The LRV function allows you to view the rear of your vehicle in real-time, even when driving forward. This is particularly useful for monitoring traffic behind you or checking for blind spots.
- This feature is supported by specific ATOTO head units and requires a firmware update for S8 Gen1 models.
- Consult your car stereo's manual for instructions on how to activate and switch to the real-time rear view Anzeige.
Kamerakalibrierung
Calibration is essential for accurate VSV display. The included calibration cloth is used to help the system map the camera's view correctly. Perform calibration in a flat, open area with good lighting.

Image: Vehicle positioned over the calibration cloth. The distance between the cloth's center and the rear bumper may vary by vehicle type, but the entire cloth should be visible on screen for proper calibration.

Image: Calibration steps on the car stereo display. Step 1: Select Vehicle Size by entering parameters. Step 2: Start Calibration by touching 'Calibration' on the rear camera video screen. Step 3: Center the Rear Video Image if the camera is not centrally mounted. Step 4: Trim Rear View Kamera Footage to remove black blocks in corners and adjust the back shade.
6. Wartung
Regelmäßige Wartung gewährleistet die Langlebigkeit und optimale Leistung Ihrer Kamera.
- Reinigung: Reinigen Sie das Kameraobjektiv regelmäßig mit einem weichen Tuch.amp Verwenden Sie ein Tuch, um Schmutz, Staub oder Wasserflecken zu entfernen. Vermeiden Sie scheuernde Reinigungsmittel, die die Linse zerkratzen könnten.
- Inspektion: Regularly check the camera's mounting and wiring for any signs of damage, corrosion, or loose connections. Ensure the camera is securely fastened.
- Wassereinwirkung: While the camera is IP67 waterproof, avoid directing high-pressure water jets directly at the camera during car washes, as this could potentially compromise the seal over time.
7. Fehlerbehebung
If you encounter issues with your ATOTO AC-HD03LR camera, refer to the following common problems and solutions:
| Problem | Mögliche Ursache | Lösung |
|---|---|---|
| Kein Bild auf dem Bildschirm | Lose Videokabelverbindung Die Kamera wird nicht mit Strom versorgt. Falsche Triggerdrahtverbindung Kamerafehler | Check RCA video cable connection at both ends. Verify camera power supply (12V) and ground connections. Ensure trigger wire is correctly connected to the car stereo's reverse input. Test camera with another compatible display if possible. |
| Das Bild ist unscharf oder verzerrt. | Schmutzige Linse Falscher Kamerawinkel Firmware issue on head unit Calibration required/incorrect | Reinigen Sie das Kameraobjektiv. Passen Sie den Kamerawinkel für optimale Ergebnisse an. view. Ensure car stereo firmware is up-to-date. Perform camera calibration as per instructions. |
| VSV/LRV not working | Incompatible head unit Firmware not updated Calibration not performed | Confirm head unit compatibility (ATOTO A6PF/PL/PP, S8 series). Update car stereo firmware, especially for S8 Gen1 models. Perform camera calibration. |
| Image has black blocks in corners | Calibration trimming needed | Follow Step 4 of the calibration process to trim the video footage. |
8. Spezifikationen
| Besonderheit | Spezifikation |
|---|---|
| Produktmodell | AC-HD03LR (North American version, with license plate mounting bracket) |
| Bildsensorformat | 1/2.9 Zoll CMOS |
| Pixel | 1280 (H) x 720 (V) |
| Weißabgleich | Automatisch |
| Gegenlichtkompensation | Ja |
| Rauschunterdrückung | 3D-DNR |
| Videobildrate | 720P bei 30FPS |
| Videosignalausgang | Analog HD signal, 1.0 Vp-p / 75Ω |
| Betriebslautstärketage | Gleichstrom 12 V |
| Betriebsstrom | 130MA ~ 150MA |
| Betriebstemperatur | -30℃ ~ +80℃ (-22°F ~ 176°F) |
| Hinteren View Richtlinie | Not built-in, provided by car stereo system |
| Wasserdichtigkeit | IP67 |
| Nachtsicht | Ja |
| Linsenfeld von View | 180 Grad |
| Montagetyp | Oberflächenmontage |
9. Garantie und Support
ATOTO products are designed for reliability and performance. For warranty information, technical support, or service inquiries, please refer to the warranty card included with your product or visit the official ATOTO website. You can also contact ATOTO customer service directly through their support channels.
Official ATOTO WebWebsite: www.myatoto.com