1. Einleitung
Thank you for choosing the Depusheng DT8 Professional 8-Channel Mixer. This manual provides essential information for the safe and efficient operation of your new audio mixer. Please read this manual thoroughly before use and retain it for future reference.

Figure 1: Depusheng DT8 Professional 8-Channel Mixer overview.
2. Sicherheitshinweise
- Stromversorgung: Verwenden Sie ausschließlich das angegebene Netzteil. Stellen Sie sicher, dass die Lautstärketage passt zu Ihrer örtlichen Stromversorgung.
- Wasser und Feuchtigkeit: Setzen Sie den Mixer weder Wasser, Regen noch übermäßiger Feuchtigkeit aus. Stellen Sie keine mit Flüssigkeit gefüllten Gegenstände auf das Gerät.
- Belüftung: Sorgen Sie für ausreichende Belüftung. Blockieren Sie keine Belüftungsöffnungen.
- Wärmequellen: Halten Sie den Mixer von Wärmequellen wie Heizkörpern, Heizlüftern, Öfen oder anderen wärmeerzeugenden Geräten fern.
- Reinigung: Vor der Reinigung die Stromzufuhr unterbrechen. Ein trockenes, weiches Tuch verwenden. Keine flüssigen oder Aerosol-Reinigungsmittel verwenden.
- Wartung: Versuchen Sie nicht, dieses Produkt selbst zu warten. Überlassen Sie alle Wartungsarbeiten qualifiziertem Servicepersonal.
- Phantomspeisung: When using +48V phantom power, ensure microphones are connected before activating to prevent damage.
3. Produktüberschreitungview
The Depusheng DT8 is a professional 8-channel audio mixer designed for various applications, including live performances, studio recording, and home use. It features built-in DSP digital effects, USB playback, Bluetooth connectivity, and +48V phantom power.
Hauptmerkmale:
- Built-in DSP digital effects for enhanced audio.
- Eight audio input interfaces for versatile connectivity.
- USB playback function for direct media access.
- +48V phantom power supply for condenser microphones.
- Drei-stage equilibrium adjustment (3-band EQ) on all channels.
- Wireless Bluetooth audio streaming.
- Ultra-thin and robust casing with dust-resistant rotary knobs.
4. Einrichtung
4.1 Stromanschluss
Connect the provided power adapter to the AC IN socket on the rear panel of the mixer. Plug the adapter into a suitable power outlet. Use the Power Switch to turn the unit on or off.

Figure 2: Rear panel showing Power Switch and external power input socket. The USB interface is also visible on the top panel.
4.2 Audioeingangsanschlüsse
The DT8 mixer offers various input options:
- XLR-Eingänge: For microphones. Channels 1-8 feature XLR inputs.
- 6.35-mm-Klinkeneingänge: For line-level instruments or other audio sources. Channels 1-8 also feature 6.35mm unbalanced jack inputs.
- Stereo-Line-Eingänge: Dedicated stereo line inputs for devices like keyboards or media players.
- USB-Schnittstelle: Connect a USB flash drive for MP3 playback or connect to a computer for digital audio interface functionality.
4.3 Audioausgangsanschlüsse
Connect your monitoring and recording equipment to the appropriate output interfaces:
- Main Output (MIX L/R): XLR and 6.35mm jack outputs for connecting to main speakers or power amplifizierer.
- Control Room Output (CTRL ROOM): 6.35mm jack outputs for connecting to studio monitors.
- Monitor Headphones (PHONES): 6.35-mm-Stereo-Klinkenbuchse für Kopfhörer-Monitoring.
- Hilfssender (AUX SEND): 6.35mm jack for sending audio to external effects processors or monitor mixes.
- Effect Send (EFFECT): 6.35mm jack for sending audio to the internal effects processor.
- REC Output (RCA): RCA outputs for connecting to recording devices.
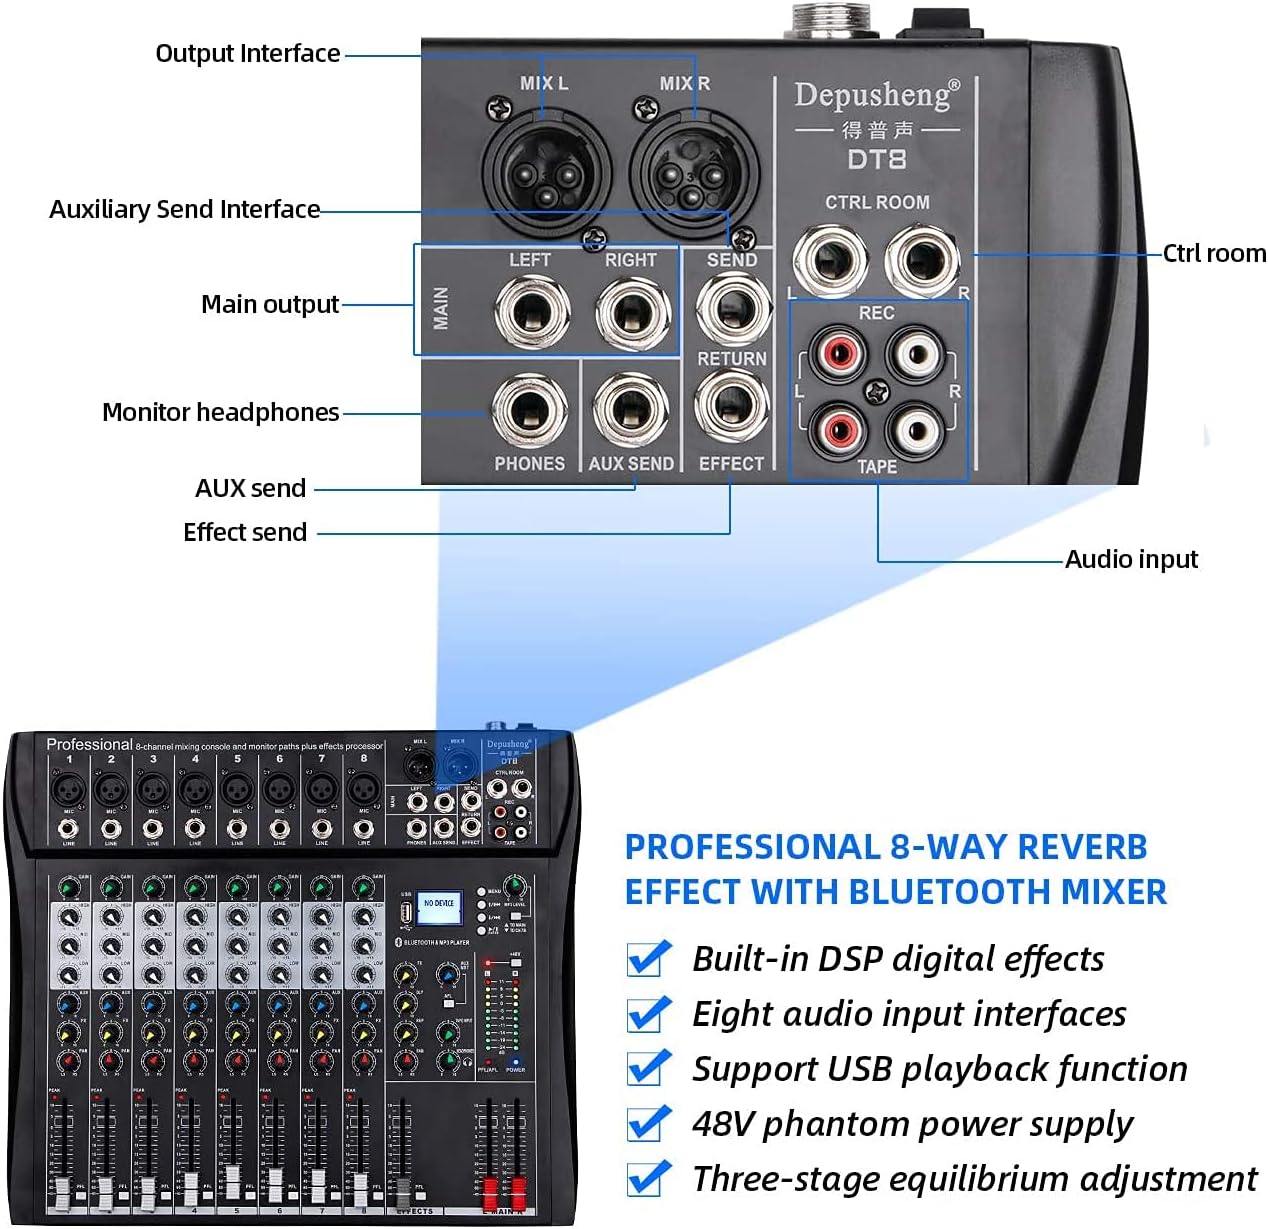
Figure 3: Rear panel showing various output and auxiliary interfaces.
5. Bedienungsanleitung
5.1 Kanalsteuerung
Each input channel features the following controls:
- DAZUGEWINNEN: Adjusts the input sensitivity for the microphone or line input.
- HIGH, MID, BASS (EQ): Three-band equalizer for adjusting the treble, midrange, and bass frequencies of the input signal.
- FX: Steuert die Signalstärke, die an den internen Effektprozessor gesendet wird.
- SCHWENKEN: Passt die Stereoposition des Kanalsignals (von links nach rechts) an.
- PFL (Pre-Fader Listen): Activates pre-fader monitoring of the channel through headphones.
- Lautstärkeregler: Regelt den Ausgangspegel des Kanals im Verhältnis zum Hauptmix.

Abbildung 4: Ausführlich view of a single channel strip with Gain, EQ, Effect, Balance, and Volume Fader controls.
5.2 USB/MP3 Player Operation
The integrated USB/MP3 player allows for direct playback of audio files from a USB flash drive or connection to a computer.
- USB-Schnittstelle: Insert a USB flash drive into the USB port. The display will show "NO DEVICE" until a compatible device is detected.
- Steuerung: Use the dedicated buttons for Previous Song, Next Song, Play/Pause, and Enter to navigate and control playback.
- MP3-Level: Adjust the volume of the MP3 player using the corresponding level control.

Figure 5: MP3 player controls, FX section, and +48V phantom power button.
5.3 Bluetooth-Konnektivität
To stream audio wirelessly via Bluetooth:
- Stellen Sie sicher, dass der Mixer eingeschaltet ist.
- Activate Bluetooth mode on the mixer (refer to the display for mode selection).
- On your smartphone or tablet, search for available Bluetooth devices and select "Depusheng DT8" (or similar name).
- Sobald die Kopplung hergestellt ist, können Sie Audio von Ihrem Gerät zum Mischpult streamen.

Figure 6: Illustrates Bluetooth wireless streaming from a smart device to the mixer.
5.4 Phantomspeisung (+48 V)
The mixer provides +48V phantom power for condenser microphones. Locate the +48V button on the mixer's control panel. Press this button to activate phantom power. Ensure all condenser microphones are connected before activating phantom power to prevent damage.
6. Wartung
- Reinigung: Wischen Sie die Oberfläche des Mischers regelmäßig mit einem weichen, trockenen Tuch ab. Vermeiden Sie scheuernde Reiniger oder Lösungsmittel.
- Staubschutz: Um Staubansammlungen, insbesondere an Fadern und Knöpfen, zu vermeiden, sollte das Mischpult bei Nichtgebrauch abgedeckt werden.
- Lagerung: Lagern Sie das Gerät an einem kühlen, trockenen Ort, geschützt vor direkter Sonneneinstrahlung und extremen Temperaturen.
- Kabelmanagement: Ensure cables are neatly organized and not under strain to prevent damage to connectors and ports.
7. Fehlerbehebung
| Problem | Mögliche Ursache | Lösung |
|---|---|---|
| Kein Strom | Netzkabel nicht angeschlossen; Netzschalter ausgeschaltet; Netzteil defekt | Check power cable connection; Turn on power switch; Test with another power adapter if available |
| Keine Tonausgabe | Volume faders down; Output cables disconnected; Speakers off/faulty | Increase master and channel faders; Check all output cable connections; Verify speakers are powered on and working |
| Kein Eingangssignal | Input cable disconnected; Gain knob too low; Microphone/instrument off/faulty; Phantom power off for condenser mics | Check input cable connections; Increase GAIN knob; Verify microphone/instrument functionality; Activate +48V phantom power for condenser mics |
| Probleme mit der Bluetooth-Verbindung | Mischpult nicht im Bluetooth-Modus; Gerät zu weit entfernt; Störungen | Ensure mixer is in Bluetooth mode; Move device closer to mixer; Reduce other wireless interference |
| USB-Wiedergabe funktioniert nicht | USB-Laufwerk nicht korrekt eingesteckt; Inkompatibel file Formatierung; USB-Laufwerk defekt | USB-Laufwerk wieder einstecken; Audio sicherstellen files are in a compatible format (e.g., MP3); Try a different USB drive |
8. Spezifikationen
| Besonderheit | Detail |
|---|---|
| Modellnummer | DT8 |
| Anzahl der Kanäle | 8 |
| Produktabmessungen (L x B x H) | 33.6 x 39 x 3.5 cm |
| Artikelgewicht | 4.67 Kilogramm |
| Konnektivitätstechnologie | Bluetooth, USB |
| Stromquelle | Stromkabel |
| Frequenzgang | 20 Hz (Mindestwert angegeben) |
| Ausgangssteckertyp | 6.35 mm, RCA, XLR |
| Audioeingang | Mikrofon, Musik |
| Sound Level / Noise Level | 90 Dezibel |
| Bandtage | 220 Volt (Wechselstrom) |
| Hersteller | Depusheng |
9. Garantie und Support
For warranty information and technical support, please refer to the documentation included with your purchase or contact Depusheng customer service through their official webBesuchen Sie die Website oder wenden Sie sich an Ihren Händler. Bewahren Sie Ihren Kaufbeleg für Garantieansprüche auf.