
Teslong TD450D85L1 Articulating Borescope User Manual
Model: TD450D85L1
1. Einleitung
The Teslong TD450D85L1 Articulating Borescope is a professional inspection tool designed for visual examination of hard-to-reach areas. It features a two-way 180-degree articulating probe, an integrated 4.5-inch IPS LCD monitor, and high-definition imaging capabilities. This manual provides essential information for the safe and effective use of your borescope.
2. Sicherheitshinweise
- Non-Waterproof Probe: The inspection probe of this borescope is NICHT WASSERDICHT. Do not submerge the probe or any part of the device in water or other liquids. Doing so will cause damage and void the warranty.
- Vermeiden Sie die Verwendung des Geräts in Umgebungen mit extremen Temperaturen oder hoher Luftfeuchtigkeit.
- Halten Sie das Gerät von starken Magnetfeldern fern.
- Versuchen Sie nicht, das Gerät zu zerlegen oder zu verändern. Reparaturen dürfen nur von autorisiertem Fachpersonal durchgeführt werden.
- Ensure the device is fully charged before use to prevent unexpected power loss during inspections.

3. Packungsinhalt
Bitte überprüfen Sie, ob alle unten aufgeführten Artikel in Ihrem Paket enthalten sind:
- TD450D85L1 Articulating Borescope Unit (with integrated 4.5-inch IPS monitor)
- USB-Kabel Typ C.
- 8 GB MicroSD-Karte (vorinstalliert)
- Tragetasche
- Benutzerhandbuch

4. Produktüberschreitungview und Funktionen
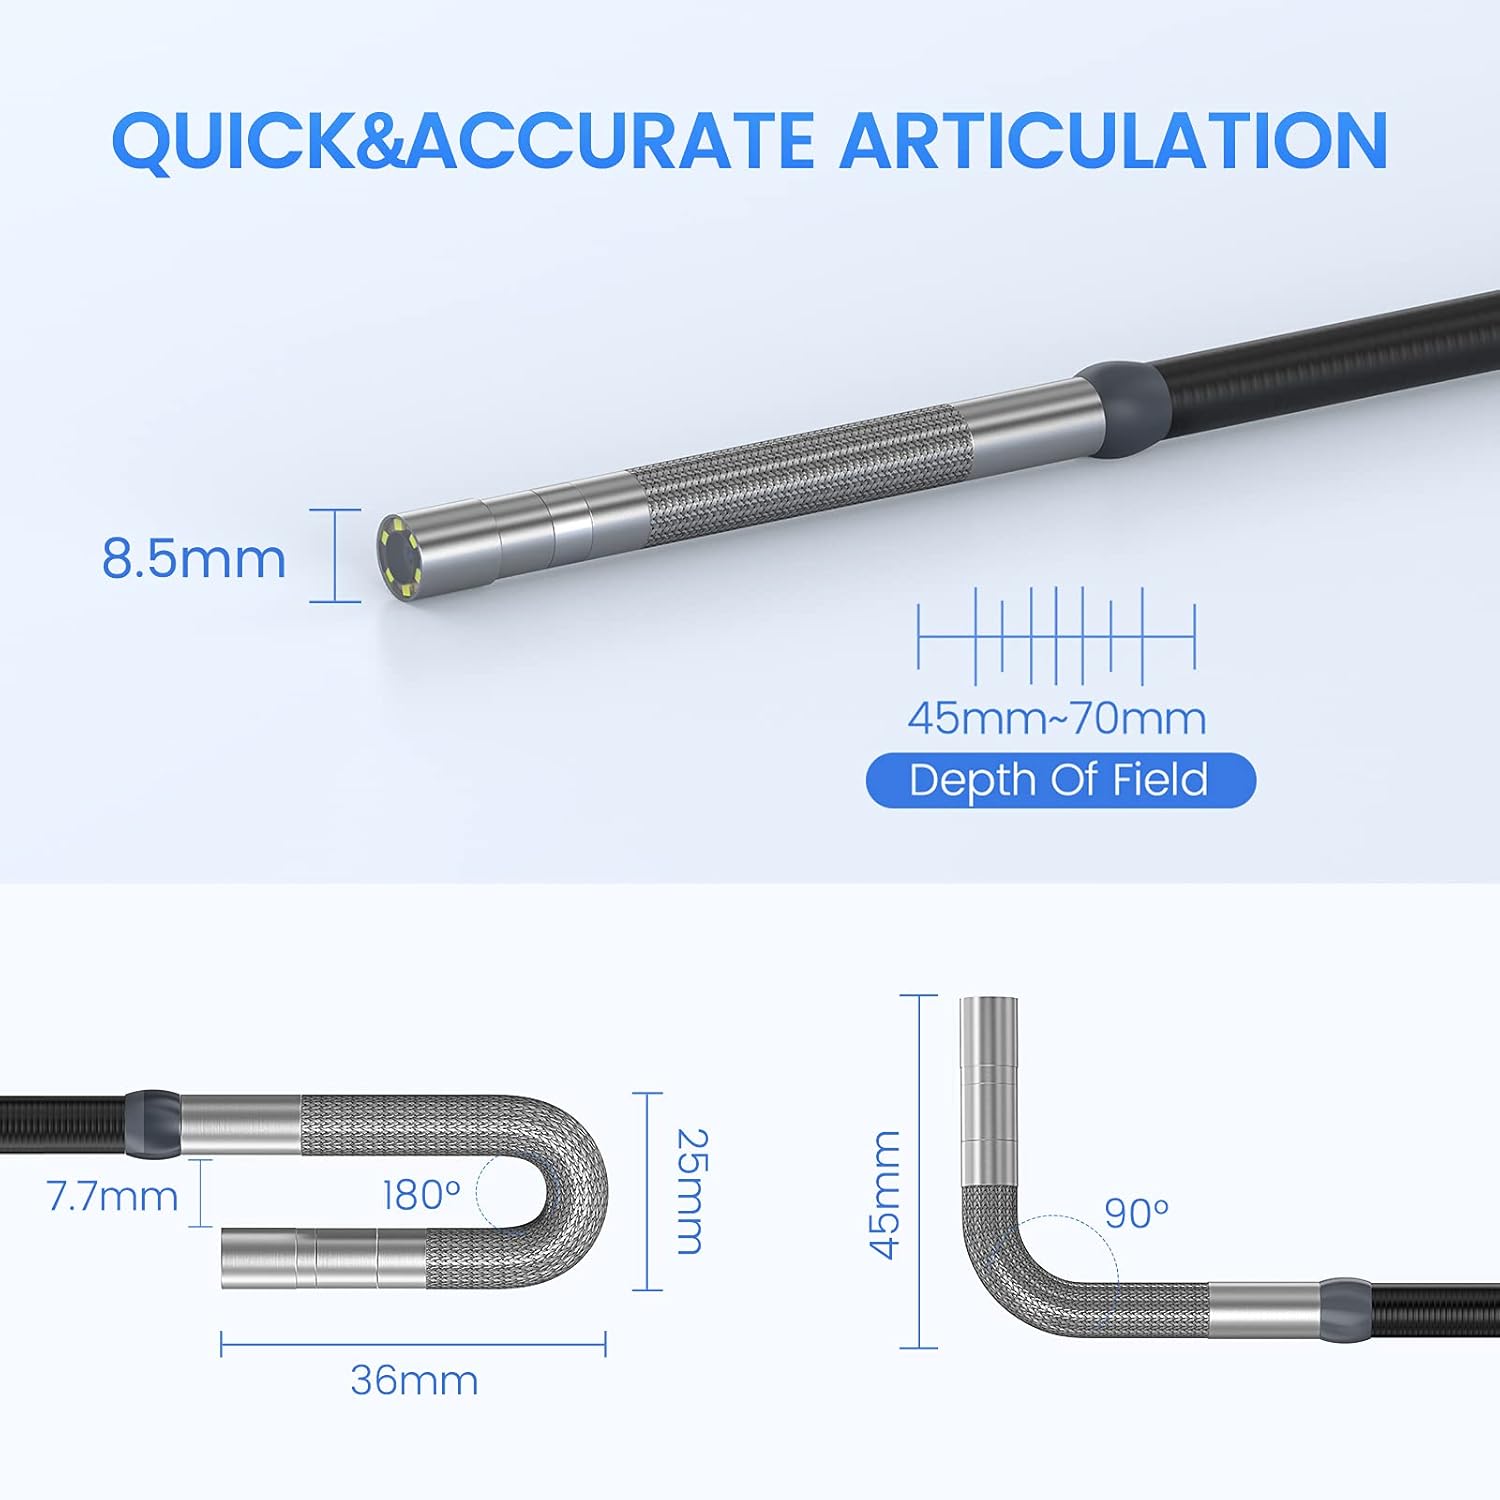
The Teslong TD450D85L1 is an advanced inspection camera designed for detailed visual inspections. It features a flexible gooseneck probe with an 8.5mm diameter and a 2.0MP CMOS sensor, providing 1080P HD image and video capture. The integrated 4.5-inch IPS LCD monitor offers a clear view without the need for external devices or Wi-Fi connections.
Hauptmerkmale:
- Two-Way 180° Articulation: Allows precise control of the probe tip for navigating complex spaces and maintaining optimal viewwinkeln.
- Integrated 4.5-inch IPS LCD Monitor: Provides a clear, real-time display of the inspection area. No smartphone, Wi-Fi, or app required.
- Hochauflösende Bildgebung: 1080P HD resolution with a 2.0MP CMOS sensor for capturing detailed images and videos.
- Einstellbare LED-Beleuchtung: Built-in highlighting LEDs ensure clear visibility in dark conditions.
- Foto- und Videoaufnahmen: Supports JPG image and AVI video recording directly to the included 8GB MicroSD card. Includes a microphone and speaker for audio recording.
- Lange Akkulaufzeit: Equipped with a built-in 5000mAh rechargeable battery for extended operation.


5. Einrichtung
5.1 Erstaufladung
- Connect the USB Type-C charging cable to the borescope's charging port.
- Stecken Sie das andere Ende des USB-Kabels in ein Standard-USB-Netzteil (nicht im Lieferumfang enthalten) oder in einen USB-Anschluss Ihres Computers.
- Allow the device to charge fully before first use. The charging indicator light will change when charging is complete.
5.2 Installation der microSD-Karte
The 8GB MicroSD card is typically pre-installed. If it needs to be inserted or replaced:
- Locate the MicroSD card slot on the side of the monitor unit.
- Schieben Sie die MicroSD-Karte vorsichtig mit den goldenen Kontakten nach unten ein, bis sie einrastet.
- Zum Entfernen die Karte leicht hineindrücken, bis sie herausspringt.

6. Bedienungsanleitung
6.1 Ein-/Ausschalten
- Zum Einschalten die Ein-/Aus-Taste gedrückt halten, bis der Bildschirm aufleuchtet.
- Zum Ausschalten die Ein-/Aus-Taste gedrückt halten, bis sich der Bildschirm ausschaltet.
6.2 Controlling Articulation
The borescope probe features two-way 180-degree articulation. Use the control knob on the handle to adjust the direction of the probe tip:
- Rotate the knob clockwise or counter-clockwise to bend the probe tip left or right.
- The articulation can be locked in position for stable viewing.

6.3 Einstellen der LED-Beleuchtung
The probe tip is equipped with adjustable LED lights to illuminate the inspection area. Use the dedicated button on the monitor unit to cycle through different brightness levels or turn the lights off.
6.4 Fotografieren und Videoaufnahmen
- So nehmen Sie ein Foto auf: Während im Leben view, press the Photo button (usually indicated by a camera icon) to capture a still image.
- Video drehen: Press the Video button (usually indicated by a video camera icon) to start recording. Press it again to stop recording. The device will record audio through its built-in microphone.
- All captured media is saved to the installed MicroSD card.
6.5 ZuviewMedien
Greifen Sie über das Hauptmenü auf den Wiedergabemodus zu view captured photos and videos. Use the navigation buttons to browse through your media files.
7. Wartung
- Reinigung: Gently wipe the monitor screen and the probe with a soft, dry cloth. For stubborn dirt on the probe, use a slightly damp cloth and ensure it is completely dry before storage. Do not use abrasive cleaners or solvents.
- Lagerung: Bewahren Sie das Endoskop in seinem Tragekoffer an einem kühlen, trockenen Ort, fern von direkter Sonneneinstrahlung und extremen Temperaturen auf.
- Batteriepflege: Für eine optimale Akkulaufzeit laden Sie das Gerät regelmäßig auf und vermeiden Sie es, es über längere Zeiträume vollständig zu entladen. Bei längerer Lagerung laden Sie es alle paar Monate auf etwa 50 % auf.
- Software-Updates: Überprüfen Sie die Angaben des Herstellers webBesuchen Sie die Website regelmäßig, um nach verfügbaren Firmware-Updates zu suchen.
8. Fehlerbehebung
| Problem | Mögliche Ursache | Lösung |
|---|---|---|
| Gerät lässt sich nicht einschalten. | Schwache Batterie. | Laden Sie das Gerät vollständig auf. |
| Kein Bild auf dem Bildschirm. | Probe cable not securely connected. | Ensure the probe cable is firmly connected to the monitor unit. |
| Das Bild ist unscharf oder dunkel. | Insufficient lighting; dirty camera lens; incorrect focus. | Adjust LED brightness. Clean the camera lens. Ensure the object is within the 45-70mm depth of field. |
| Es können keine Fotos/Videos aufgenommen werden. | MicroSD-Karte voll oder nicht richtig eingesetzt; Kartenfehler. | Prüfen Sie, ob die microSD-Karte richtig sitzt. Löschen Sie unnötige Informationen. fileTauschen Sie die Karte aus. Formatieren Sie die Karte gegebenenfalls (dadurch werden alle Daten gelöscht). |
| Articulation is stiff or unresponsive. | Mechanical obstruction; debris in articulation mechanism. | Carefully inspect the probe tip for any obstructions. Do not force articulation. Contact customer support if the issue persists. |
9. Spezifikationen
| Besonderheit | Spezifikation |
|---|---|
| Modellname | Articulating Endoscope Inspection Camera (TD450D85L1) |
| Bildschirmgröße | 4.5 Zoll IPS-LCD |
| Effektive Standbildauflösung | 2 Megapixel |
| Auflösung der Videoaufnahme | 1080p |
| Sondendurchmesser | 8.5 mm |
| Artikulation | Two-Way 180 Degrees |
| Macro Focus Range (Depth of Field) | 45-70 mm |
| Echter Winkel von View | 60 Grad |
| Sensortyp | CMOS |
| Medientyp | Micro-SD-Karte (8 GB im Lieferumfang enthalten) |
| File Format | JPG (Bilder), AVI (Videos) |
| Audioaufnahme | Yes (with internal microphone) |
| Konnektivitätstechnologie | USB |
| Batteriekapazität | 5000 mAh (wiederaufladbar) |
| Wasserbeständigkeit | Not Waterproof (probe) |
10. Garantie und Support
Your Teslong TD450D85L1 Articulating Borescope comes with a 12 Monate Garantie Ab Kaufdatum. Diese Garantie deckt Herstellungsfehler ab und gewährleistet eine zuverlässige Funktion bei normalem Gebrauch.
For technical assistance, troubleshooting, or warranty claims, please contact Teslong customer service. Refer to the contact information provided on the official Teslong website or in your product packaging for the most up-to-date support channels.
Please have your model number (TD450D85L1) and purchase details ready when contacting support.