
1. Einführung und Endeview
This manual provides detailed instructions for assembling and maintaining your ROBOTIME Vintage Car 3D Wooden Puzzle (Model TG504). This DIY model kit is designed for enthusiasts aged 8 and up, offering a rewarding building experience and a beautiful display piece.
Die Vintage Car model features a retro design with intricate details, making it a unique addition to any collection. No special tools or glue are required for assembly, as pieces are designed to interlock, though some reviews mention glue is provided and can be helpful for certain parts.
2. Packungsinhalt
Before beginning assembly, please verify that all components are present and undamaged. The package for your ROBOTIME Vintage Car 3D Wooden Puzzle (Model TG504) should contain the following:
- 164 precisely laser-cut wooden puzzle pieces.
- Detailed English instruction manual with step-by-step diagrams.
- Small bottle of white glue (as noted in customer reviews, may be included for optional use on delicate parts).

Figure 2.1: Package contents including wooden sheets and instruction manual.
3. Montageanleitung
Assembly of the Vintage Car model typically takes 2-3 hours. Follow the numbered steps in the included English instruction manual carefully. Patience is key for a successful build.
- Vorbereitung: Carefully remove all wooden pieces from their sheets. It is recommended to sand the tabs of the wooden pieces before assembly to ensure a smoother fit and prevent breakage, as some parts can be delicate.
- Folgen Sie den nummerierten Schritten: The instruction manual provides clear, numbered diagrams for each step. Identify the corresponding pieces by their numbers.
- Ineinandergreifendes Design: Most pieces interlock without the need for glue. Apply gentle, even pressure to connect parts. Avoid excessive force to prevent damage.
- Optional Glue Use: For very small or delicate parts, or sections that require bending (as noted in some user experiences), the provided glue can be used to secure them. Apply a minimal amount of glue to avoid excess. Allow sufficient drying time if glue is used.
- Letzter Schliff: Once all pieces are assembled, ensure all connections are secure. The model is now ready for display.
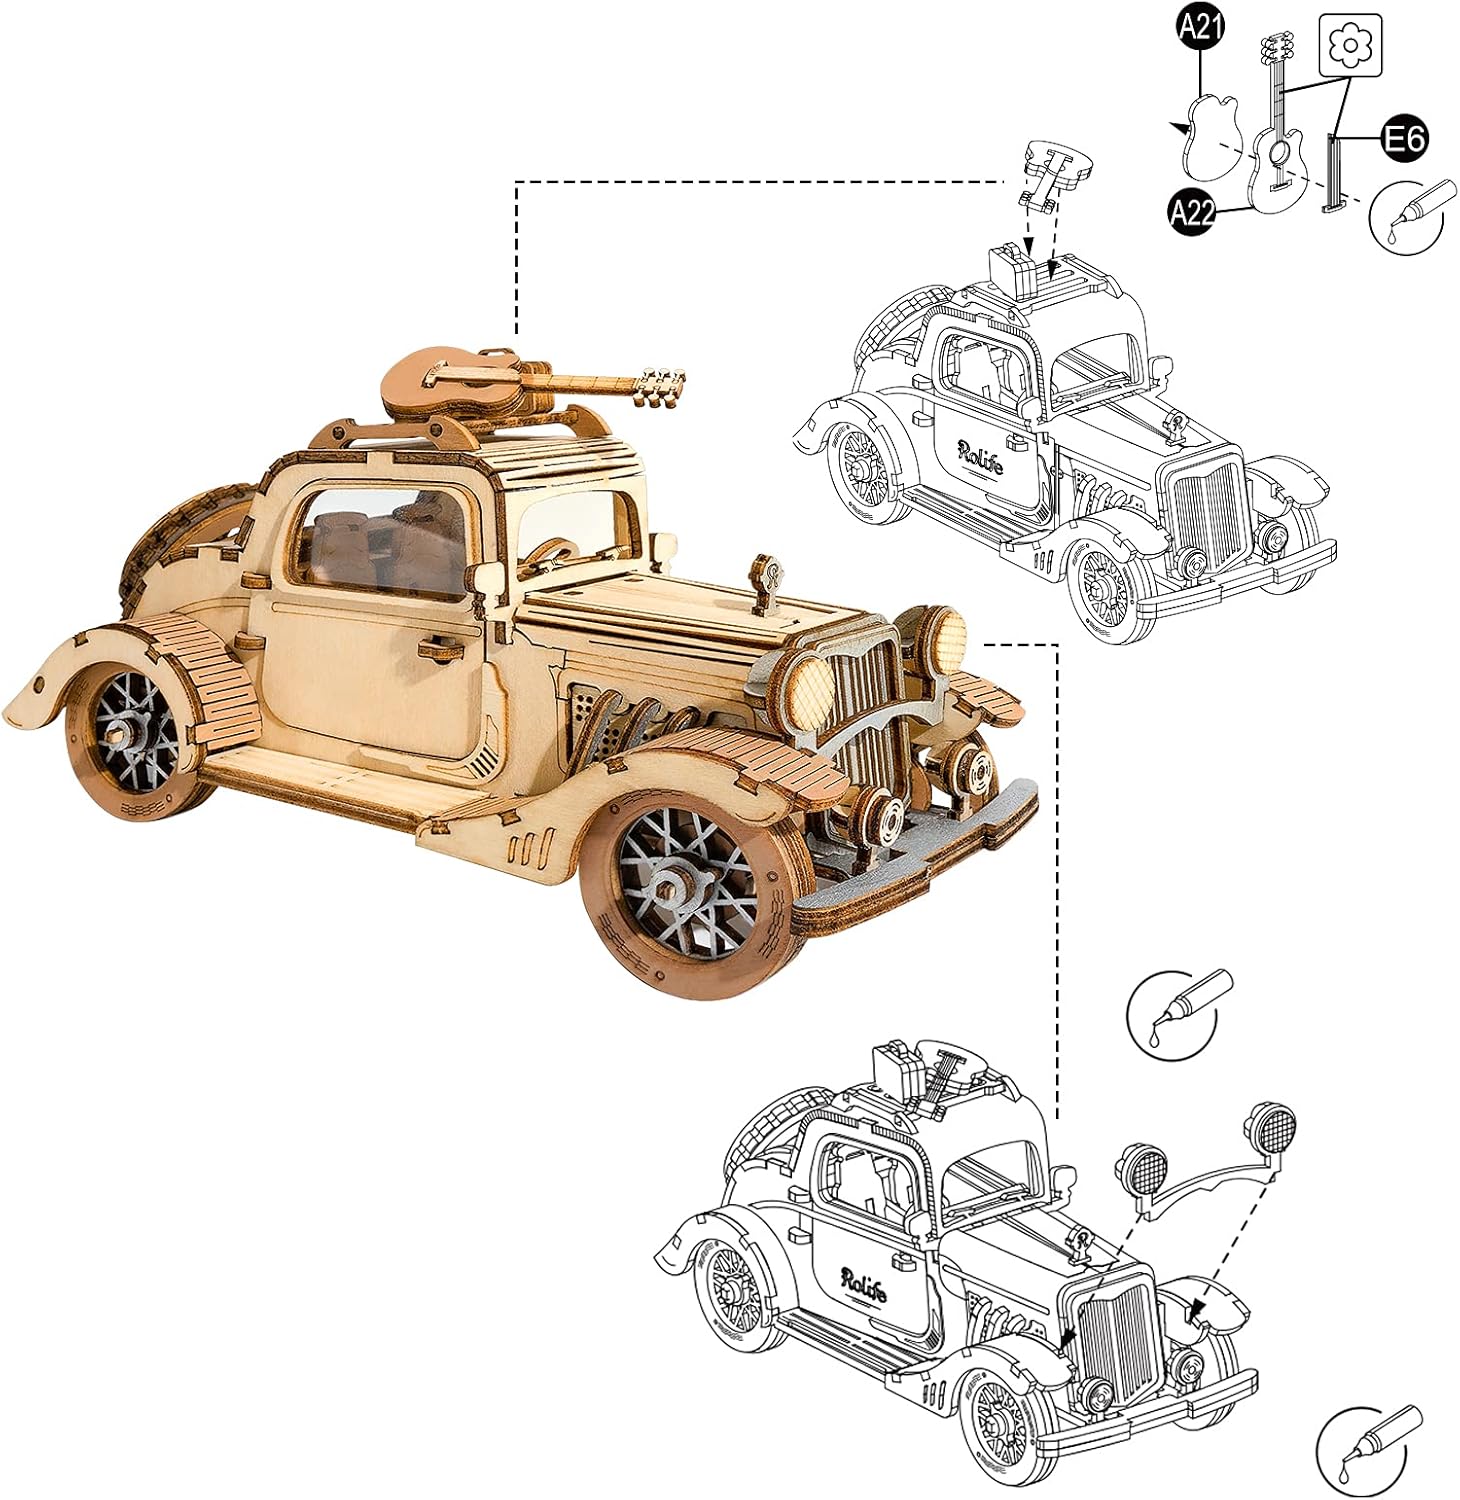
Abbildung 3.1: Bspample of assembly diagram from the instruction manual.
Video 3.1: Ein überview of the ROBOTIME 3D Wooden Puzzle series, demonstrating the intricate details and finished models, including the Vintage Car, Tramcar, and Carriage. This video provides a visual representation of the product's quality and complexity.
4. Darstellung und Interaktion
Once assembled, the ROBOTIME Vintage Car is a static display model. It is not designed for active play or rough handling. Its intricate details make it suitable for display on shelves, desks, or as part of a collection.
- Anzeigeort: Choose a stable, flat surface away from direct sunlight, excessive humidity, or extreme temperature changes to preserve the wood.
- Handhabung: Handle the model with care, especially delicate parts like the wheels, doors, and roof accessories.
- Interaktive Elemente: Some parts, like the doors and hood, may be designed to open, revealing interior details. Operate these gently.

Figure 4.1: The assembled Vintage Car model on display.
5. Wartung
Die richtige Pflege gewährleistet die Langlebigkeit und das Aussehen Ihres Holzpuzzlemodells.
- Reinigung: Reinigen Sie das Modell regelmäßig mit einem weichen, trockenen Tuch oder einer weichen Bürste. Vermeiden Sie die Verwendung von Wasser oder chemischen Reinigungsmitteln, da diese das Holz beschädigen können.
- Umgebungsbedingungen: Keep the model in a stable environment. Extreme fluctuations in temperature or humidity can cause the wood to warp or crack.
- Reparaturen: If any pieces become loose or detached, reattach them carefully using a small amount of wood glue.
6. Fehlerbehebung
While the ROBOTIME Vintage Car kit is designed for straightforward assembly, you might encounter minor issues. Here are some common concerns and their solutions:
| Problem | Mögliche Ursache | Lösung |
|---|---|---|
| Die Teile passen nicht ohne Weiteres zusammen. | Excess material on tabs; misalignment. | Gently sand the tabs of the wooden pieces. Ensure correct orientation and alignment before applying pressure. |
| Pieces break during assembly. | Excessive force; delicate parts. | Apply gentle, even pressure. If a piece breaks, use the provided glue to reattach it. Spare parts are often included for very delicate components. |
| Model is unstable or wobbly. | Loose connections; incomplete assembly. | Review the instruction manual to ensure all connections are fully engaged. Apply small amounts of glue to secure loose joints if necessary. |
7. Spezifikationen
Detailed specifications for the ROBOTIME Vintage Car 3D Wooden Puzzle (Model TG504):
- Produktname: Vintage Car
- Modellnummer: TG504
- Wood Pieces: 164 Stck.
- Baugruppengröße: 6.29 Zoll (L) x 2.75 Zoll (B) x 3.15 Zoll (H)
- Montagezeit: Ungefähr 2-3 Stunden
- Empfohlenes Alter: Ab 8 Jahren
- Material: Holz
- Artikelgewicht: 7.4 Unzen
- Hersteller: ROBOTIME
8. Garantie und Support
ROBOTIME is committed to providing high-quality products. While specific warranty details are not provided in this manual, if you encounter any issues with your product, please contact ROBOTIME customer service directly. They are dedicated to ensuring customer satisfaction and will assist with any concerns regarding missing parts, damaged components, or assembly difficulties.
For further assistance, you may visit the official ROBOTIME Store on Amazon: ROBOTIME Store.