1. Einleitung
This manual provides essential information for the installation, operation, and maintenance of your Apevia ATX-GX850W Galaxy 850W 80+ Gold Certified Semi-Modular Gaming Power Supply. Please read this manual thoroughly before installation and retain it for future reference.

Figure 1: Apevia ATX-GX850W Galaxy 850W Power Supply
The Apevia Galaxy 850W Power Supply is designed to deliver reliable and efficient power to your computer system. It features an 80+ Gold certification for high efficiency, a semi-modular cable design for improved cable management, and various protection mechanisms to safeguard your components.
2. Sicherheitshinweise
- Vor dem Einbau, Ausbau oder der Reinigung des Netzteils muss immer der Netzstecker aus der Steckdose gezogen werden.
- Dieses Netzteil ist ausschließlich für den Einsatz in PCs vorgesehen. Verwenden Sie es nicht für andere Zwecke.
- Öffnen Sie das Netzteil nicht. Hohe SpannungtagIm Inneren befinden sich Teile, und das Öffnen des Geräts führt zum Erlöschen der Garantie.
- Sorgen Sie für eine ordnungsgemäße Erdung, um Stromschläge zu vermeiden.
- Keep the power supply away from moisture, extreme temperatures, and direct sunlight.
- Installieren Sie das Netzteil in einem gut belüfteten Bereich, um eine Überhitzung zu vermeiden.
3. Packungsinhalt
Überprüfen Sie, ob alle Artikel im Paket vorhanden sind:
- Apevia ATX-GX850W Galaxy 850W Power Supply Unit
- Netzkabel
- Modular Cable Set (including 20/24pin Main Power, P8(4+4P) ESP 12V, 8(6+2)pin PCI-E, SATA, Peripheral, Floppy connectors)
- Befestigungsschrauben
- Benutzerhandbuch (dieses Dokument)
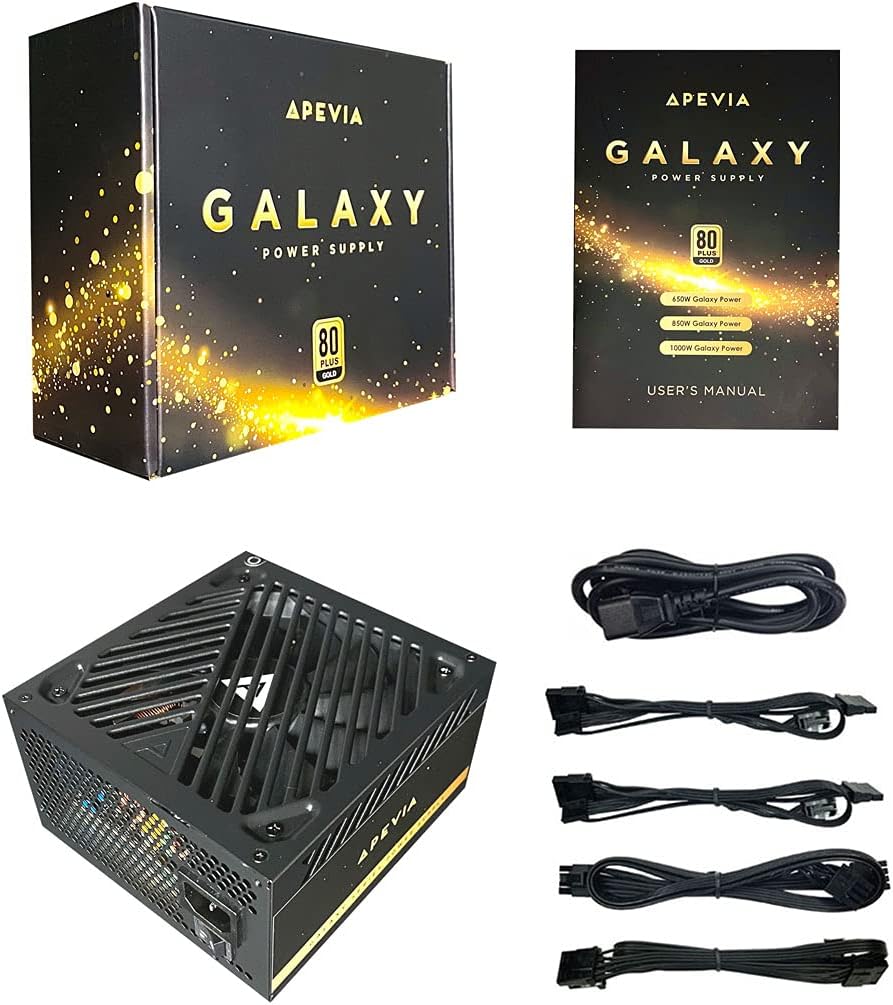
Figure 2: Power Supply Unit, Box, and Included Cables
4. Produktmerkmale
- 850W 80+ Gold Certified: Ensures high power efficiency (90%+ efficiency) at 20-100% load levels, reducing heat generation and electricity consumption.
- Active PFC: Power Factor Correction of 99% for stable power delivery.
- Semi-Modular Design: Allows connection of only necessary cables, improving airflow and cable management within the PC case.
- Auto-Thermally Controlled 135mm Fan: Features a quiet black fan that adjusts its speed based on the power supply's temperature, ensuring optimal cooling and reduced noise.
- Heavy Duty Protections: Includes Short-Circuit Protection (SCP), Over-Voltage Protection (OVP), Over-Power Protection (OPP), and Under-Voltage Protection (UVP) to safeguard your system components.
- Double Forward Converter Design: Enhances stability and efficiency.
- Breite Kompatibilität: Supports ATX 12V 2.3 Version, Dual/Quad Core CPUs, SLI/Crossfire configurations, and Haswell processors.
- Large Japanese Capacitor: Provides enhanced reliability and performance.
- Single +12V Output: Delivers strong, stable power for high-performance components.
- Automatische Lautstärketage Umschalten: Automatically switches between 110V and 230V depending on the power grid.
5. Installationsanleitung
5.1 Checkliste vor der Installation
- Stellen Sie sicher, dass Ihr Computergehäuse mit Netzteilen im ATX-Formfaktor kompatibel ist.
- Gather necessary tools: screwdriver, zip ties or cable management straps.
- Unplug your computer from the wall outlet and discharge any residual power by pressing the power button a few times.
5.2 Physische Installation
- Öffnen Sie das Gehäuse Ihres Computers.
- Locate the power supply mounting bay, typically at the top or bottom rear of the case.
- Carefully slide the Apevia ATX-GX850W into the bay, ensuring the fan is oriented correctly (usually facing downwards or inwards, depending on case design).
- Befestigen Sie das Netzteil mit den mitgelieferten Befestigungsschrauben am Gehäuse.
5.3 Kabelverbindungen
The Apevia ATX-GX850W is a semi-modular power supply. Connect only the cables required for your system components. Refer to your motherboard and component manuals for specific connection points.
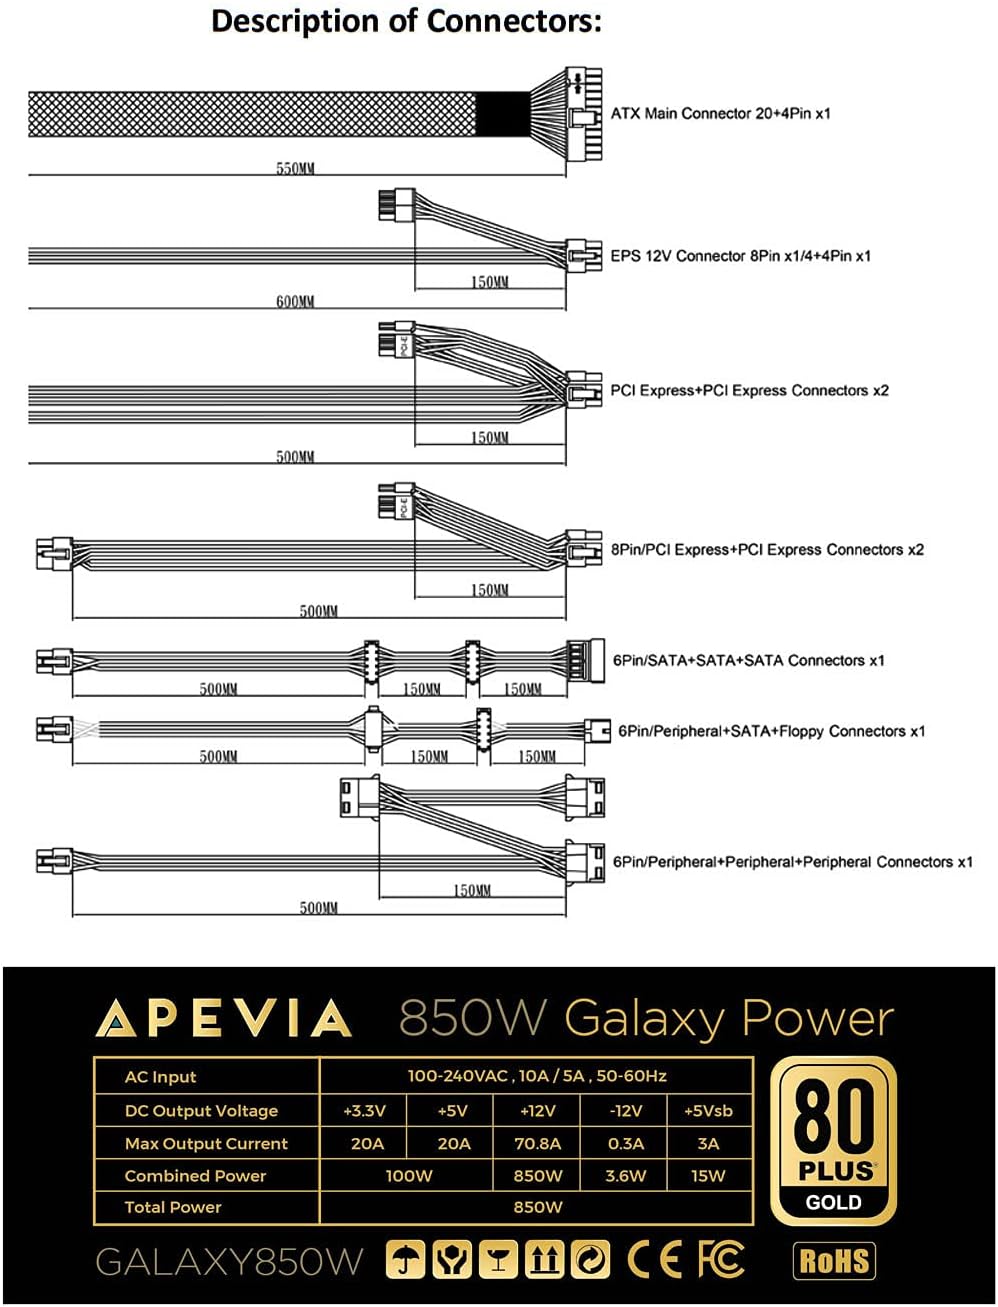
Figure 3: Description of Connectors

Abbildung 4: Modulare Kabelanschlüsse
- 20/24-pin Main Power Connector: Connect this to your motherboard. The 24-pin connector can be split into 20+4 pins for motherboards requiring a 20-pin connector.
- P8 (4+4P) EPS 12V Connector: Connect this to your motherboard's CPU power input. The 8-pin connector can be split into 4+4 pins for motherboards requiring a 4-pin connector.
- 8 (6+2)pin PCI-E Connectors: Connect these to your graphics card(s). The 8-pin connector can be split into 6+2 pins for graphics cards requiring a 6-pin connector.
- SATA-Anschlüsse: Connect these to SATA devices such as SSDs, HDDs, and optical drives.
- Periphere (Molex-)Steckverbinder: Used for older peripherals or case fans.
- Floppy Connector: Used for legacy floppy drives or some fan controllers.
IMPORTANT: The power supply will not power on simply by connecting the power cord to both the power supply and wall outlet. Ensure that all the power supply cables are properly connected to the PC for it to power on.
5.4 Stromanschluss
- Sobald alle internen Verbindungen hergestellt sind, schließen Sie das Computergehäuse.
- Connect the AC power cord to the power supply's input socket.
- Stecken Sie das andere Ende des Netzkabels in eine geerdete Wandsteckdose.
- Flip the power switch on the back of the power supply to the 'ON' position.

Figure 5: Power Supply Rear Panel with AC Input and Switch
6. Bedienungsanleitung
After successful installation, you can power on your computer. The power supply's 135mm fan will automatically adjust its speed based on the internal temperature, providing efficient cooling while minimizing noise.
To power off your computer, use the operating system's shutdown function. For a complete power cycle, you can also switch off the power supply using the switch on its rear panel after the system has shut down.
7. Wartung
Um eine optimale Leistung und Langlebigkeit Ihres Netzteils zu gewährleisten:
- Reinigung: Periodically clean the exterior of the power supply and the fan grille to prevent dust buildup. Use compressed air to gently clear dust from the fan and vents. Ensure the power supply is disconnected from the wall outlet before cleaning.
- Belüftung: Ensure your PC case has adequate airflow and that the power supply's fan is not obstructed.
- Kabelmanagement: Eine ordnungsgemäße Kabelführung verbessert nicht nur die Optik, sondern optimiert auch den Luftstrom und trägt so zu einer besseren Kühlung aller Komponenten, einschließlich des Netzteils, bei.
8. Fehlerbehebung
8.1 Netzteil schaltet sich nicht ein
- Netzkabel prüfen: Stellen Sie sicher, dass das Netzkabel fest mit dem Netzteil und einer funktionierenden Steckdose verbunden ist.
- Stromschalter: Verify that the power switch on the back of the power supply is in the 'ON' position.
- Interne Verbindungen: Double-check all modular cables are firmly connected to both the power supply and your computer components (motherboard, CPU, GPU, drives). A loose connection can prevent the system from powering on.
- Motherboard Stand-offs: Ensure your motherboard is correctly installed with stand-offs to prevent short circuits.
- Faulty Components: If the issue persists, try testing the power supply with a known working system or consult a qualified technician.
8.2 Übermäßige Lüftergeräusche
- Staubansammlung: Clean the power supply fan and vents as described in the Maintenance section.
- Überlast: Ensure your system's power requirements do not exceed the 850W capacity of the power supply. High loads can cause the fan to spin faster.
- Obstruktion: Check for any cables or objects obstructing the fan's rotation.
9. Spezifikationen
| Besonderheit | Spezifikation |
|---|---|
| Modellname | Galaxis |
| Marke | Apevia |
| Kompatible Geräte | Personalcomputer |
| Steckertyp | ATX, Floppy, PCI-E, SATA |
| Ausgang Wattage | 850 Watt |
| Formfaktor | ATX |
| Kühlmethode | Luft (135-mm-Lüfter) |
| Artikelabmessungen (L x B x H) | 6.2 x 5.9 x 3.4 Zoll |
| Artikelgewicht | 4.6 Pfund |
| Stromversorgungsdesign | Teilmodular |
| Anzahl der Lüfter | 1 |
| Maximale Eingangslautstärketage | 230 Volt |
| Mindesteingangslautstärketage | 110 Volt |
| System Bus Connector Type | 24 Stift |
| UPC | 810047130796 |
| Hersteller-Teilenummer | ATX-GX850W |
Output Table:
| Ausgabe | Aktuell |
|---|---|
| +3.3V | 20 A |
| +5V | 20 A |
| +12V | 66 A |
| -12 V | 0.3 A |
| +5Vsb | 3A |
10. Garantieinformationen
The Apevia ATX-GX850W Galaxy 850W 80+ Gold Certified Power Supply typically comes with a 3-year manufacturer's warranty. Please retain your proof of purchase for warranty claims. For detailed warranty terms and conditions, refer to the official Apevia webWebsite oder wenden Sie sich an den Kundendienst.
11. Unterstützung
Für weitere Unterstützung, technischen Support oder um view other Apevia products, please visit the official Apevia store: