Easyfone Prime-A1 Pro
Easyfone Prime-A1 Pro GSM Klapphandy – Benutzerhandbuch
Model: Prime-A1 Pro
1. Einleitung
This manual provides detailed instructions for the Easyfone Prime-A1 Pro GSM flip phone. It covers essential information for setting up, operating, maintaining, and troubleshooting your device. Please read this manual thoroughly to ensure proper use and to maximize the phone's features.

Image: The Easyfone Prime-A1 Pro flip phone shown in both open and closed configurations, highlighting its design.
2. Packungsinhalt
Überprüfen Sie, ob alle Artikel im Paket vorhanden sind:
- Handset (Easyfone Prime-A1 Pro)
- Battery (1 Lithium-ion)
- Bedienungsanleitung
- Schlüsselband
- Ladestation
- Ladegerät (Netzadapter)
- USB-Kabel

Image: An illustration of the Easyfone Prime-A1 Pro package contents, showing the phone, battery, user manual, lanyard, charging dock, charger, and USB cable.
3. Telefonierenview
The Easyfone Prime-A1 Pro features a classic flip design with large, easy-to-read buttons and dual screens for convenience.
3.1. Physikalische Merkmale
- Flip-Design: Open to answer calls, close to end them.
- Große Tasten: Clearly labeled, silicone keypad with large numbers for easy dialing.
- Duale Bildschirme:
- Main HD IPS Screen: 2.4 inches, located inside the flip.
- External HD IPS Screen: 1.44 inches, displays time, date, battery, and incoming call information when closed.
- SOS-Taste: Dedicated button for emergency calls and GPS location sharing.
- Blacklist Button: Dedicated button to block unwanted numbers.
- Photo Speed Dial Buttons: 8 programmable buttons for quick dialing with associated photos.
- Kamera: Integrated for basic photo capture.
- Loud Speaker & Receiver: Designed for clear audio, compatible with M4/T4 hearing aids.

Image: The Easyfone Prime-A1 Pro in its open position, displaying the internal screen and the large, clearly marked keypad.

Bild: Eine detaillierte view of the phone's dual screens, illustrating the main 2.4-inch HD IPS display and the 1.44-inch external HD IPS display.
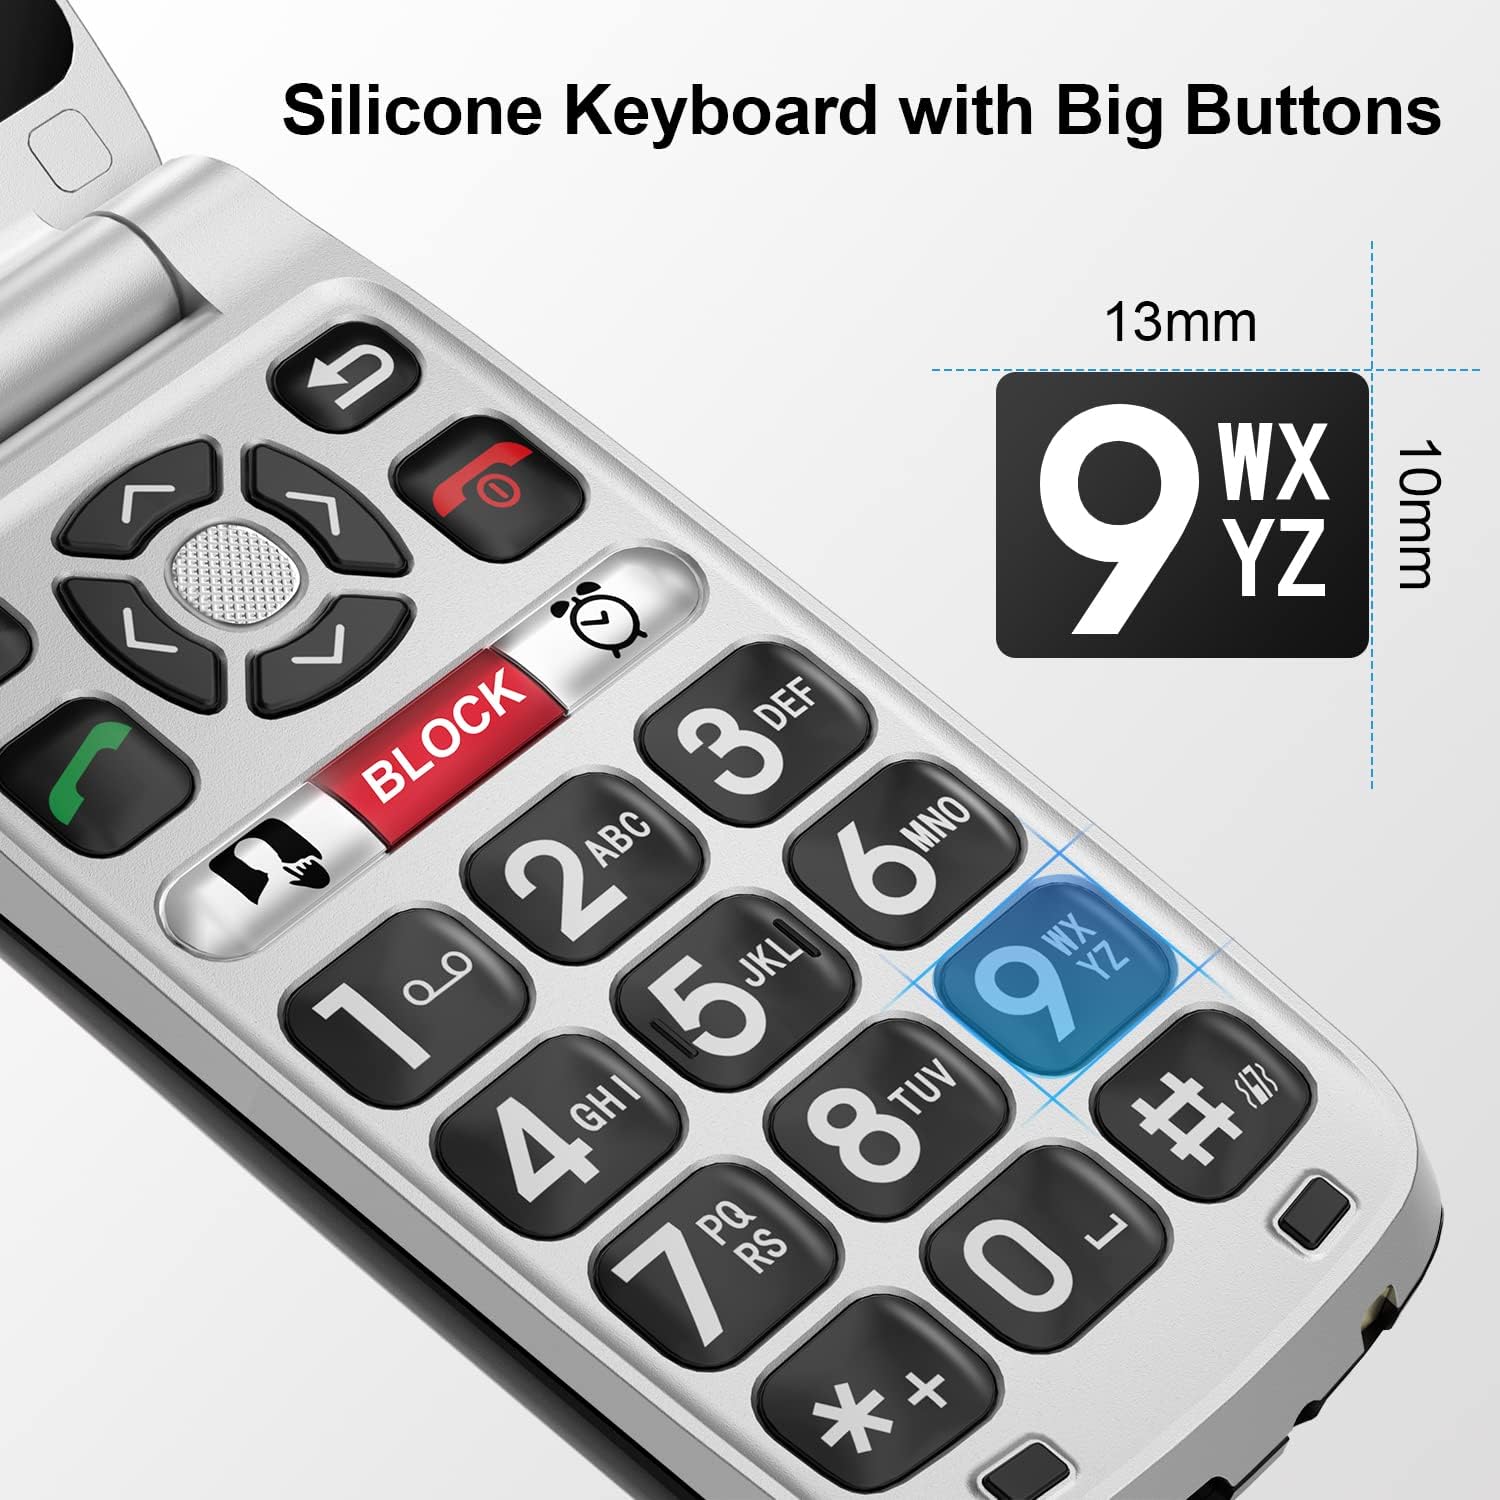
Image: A close-up of the phone's silicone keypad, emphasizing the large, tactile buttons designed for ease of use.

Image: A visual representation of the phone's enhanced audio features, including a loud receiver and powerful loudspeaker, designed for users with hearing difficulties and hearing aid compatibility.
4. Einrichtung
4.1. Einlegen der Batterie
- Entfernen Sie die hintere Abdeckung des Telefons.
- Insert the Lithium-ion battery into the battery compartment, ensuring the gold contacts align.
- Bringen Sie die Rückseite wieder an, bis sie sicher einrastet.
4.2. SIM-Karte einlegen
The Easyfone Prime-A1 Pro supports GSM 2G networks (850/900/1800/1900 MHz). Ensure your SIM card is compatible with these frequencies.
- Nachdem der Akku entfernt wurde, suchen Sie den SIM-Kartensteckplatz.
- Insert your SIM card into the designated slot, following the orientation indicated on the phone.
- Bauen Sie den Akku und die Rückabdeckung wieder ein.

Image: A three-step diagram showing how to select the device, activate a phone plan, and insert the SIM card to prepare the phone for use.
4.3. Aufladen des Telefons
Vor der ersten Benutzung muss der Akku des Telefons vollständig aufgeladen werden.
- Connect the USB cable to the charger (power adapter).
- Stecken Sie das Ladegerät in eine Wandsteckdose.
- Place the phone into the charging dock, ensuring it sits correctly. The phone will begin charging automatically. Alternatively, connect the USB cable directly to the phone's charging port.
- Das Batteriesymbol auf dem Bildschirm zeigt den Ladestatus an.

Image: The Easyfone Prime-A1 Pro resting in its dedicated charging dock, with the external screen showing the battery charging indicator.

Image: The Easyfone Prime-A1 Pro being charged in its dock, accompanied by text highlighting its 1500mAh battery and over 96 hours of standby time.
5. Bedienungsanleitung
5.1. Ein-/Ausschalten
- So schalten Sie das Gerät ein: Halten Sie die rote Taste „Anruf beenden/Ein/Aus“ gedrückt, bis der Bildschirm aufleuchtet.
- So schalten Sie das Gerät aus: Press and hold the red End Call/Power button. Select "Power Off" from the options.
5.2. Anrufe tätigen und entgegennehmen
- Einen Anruf tätigen: Open the flip, dial the number using the keypad, and press the green Call button.
- Empfangen eines Anrufs: Open the flip to answer. Alternatively, press the green Call button when the phone is open.
- Anruf beenden: Klappen Sie das Gerät zu oder drücken Sie die rote Taste „Anruf beenden“.
5.3. Senden und Empfangen von SMS-Nachrichten
- Navigieren Sie zum Menü „Nachrichten“.
- Select "New Message" to compose.
- Geben Sie die Nummer des Empfängers und Ihre Nachricht ein.
- Drücken Sie auf „Senden“.
5.4. SOS-Notfalltaste
The dedicated SOS button is located on the back of the phone. When activated, it will:
- Send an emergency SMS with your GPS location to pre-set emergency contacts.
- Automatically dial the emergency contacts in sequence until one answers.
To set up SOS contacts: Refer to the phone's settings menu under "SOS Settings".
5.5. Photo Speed Dial
The phone features 8 programmable photo speed dial buttons (1-8) for quick access to important contacts.
- Navigate to the "Contacts" or "Speed Dial" settings.
- Assign a contact and an associated photo to each speed dial number.
- To use, press and hold the assigned number button.

Image: An illustration demonstrating the photo speed dial function, where users can assign photos to 8 direct dial buttons for easy contact recognition and calling.
5.6. Blacklist Feature
The dedicated blacklist button allows you to block unwanted calls directly.
- During an incoming call from an unwanted number, press the "BLOCK" button.
- The number will be added to your blacklist, preventing future calls from that number.

Image: The Easyfone Prime-A1 Pro's keypad with the "BLOCK" button highlighted, illustrating its function to prevent unwanted calls.
5.7. Zusätzliche Funktionen
The Easyfone Prime-A1 Pro includes several practical tools:
- FM Radio: Hören Sie lokale Radiosender.
- Taschenlampe: A built-in light for convenience.
- MP3-Player: Audio wiedergeben files stored on the phone or an inserted memory card.
- Memo: Create and save short notes.
- Sprachrekorder: Audio aufnehmen.
- Taschenrechner: Führe einfache Rechenoperationen durch.
- Wecker: Stellen Sie Wecker ein.
- Kalender: View Termine und Veranstaltungsplan.
- Bluetooth: Verbinden Sie sich mit kompatiblem drahtlosem Zubehör.

Image: A collection of icons illustrating the various additional features available on the Easyfone Prime-A1 Pro, such as FM Radio, Flashlight, MP3 player, and more.
6. Wartung
- Reinigung: Reinigen Sie die Oberfläche des Telefons mit einem weichen, trockenen Tuch. Vermeiden Sie flüssige Reinigungsmittel.
- Batteriepflege:
- Vermeiden Sie extreme Temperaturen.
- Setzen Sie die Batterie keinem Wasser aus.
- Laden Sie den Akku regelmäßig auf, vermeiden Sie jedoch ein Überladen über längere Zeiträume.
- Lagerung: Bewahren Sie das Telefon an einem kühlen, trockenen Ort auf, wenn Sie es längere Zeit nicht benutzen.
7. Fehlerbehebung
| Problem | Mögliche Lösung |
|---|---|
| Das Telefon lässt sich nicht einschalten. | Stellen Sie sicher, dass der Akku korrekt eingesetzt und geladen ist. Schließen Sie ihn an das Ladegerät an und versuchen Sie es erneut. |
| Ich kann keine Anrufe tätigen oder empfangen. | Check if the SIM card is properly inserted. Verify that your SIM card is active and compatible with 2G GSM networks (850/900/1800/1900 MHz). Check network signal strength. |
| Schlechte Anrufqualität oder geringes Anrufvolumen. | Adjust the call volume. Ensure the speaker/receiver is not obstructed. If using a hearing aid, ensure it is properly configured with the phone's M4/T4 compatibility. |
| Der Akku entlädt sich schnell. | Reduzieren Sie die Bildschirmhelligkeit. Schließen Sie nicht benötigte Apps. Stellen Sie sicher, dass sich das Telefon nicht in einem Gebiet mit sehr schwachem Signal befindet, da dies den Akkuverbrauch erhöhen kann. |
| Das Telefon reagiert nicht. | Nehmen Sie den Akku heraus, warten Sie einige Sekunden, setzen Sie ihn dann wieder ein und schalten Sie das Telefon ein. |
8. Spezifikationen
| Besonderheit | Detail |
|---|---|
| Marke | Easyfone |
| Modellname | Prime-A1 Pro |
| Farbe | Schwarz |
| Formfaktor | Umdrehen |
| Betriebssystem | Easyfone OS |
| Hauptbildschirmgröße | 2.4 Zoll HD IPS |
| Externe Bildschirmgröße | 1.44 Zoll HD IPS |
| Zellulartechnologie | 2G GSM (850/900/1800/1900 MHz) |
| Mobilfunkanbieter | Unlocked (MVNO compatible) |
| Batterie | 1500 mAh Lithium-Ionen-Akku (im Lieferumfang enthalten) |
| Interne Speicherkapazität | 16 GB |
| Speicherkartensteckplatz | 1 slot (for MicroSD expansion) |
| Besondere Merkmale | SOS Emergency Button with GPS, Dedicated Blacklist Button, Photo Speed Dial, Hearing Aid Compatible (M4/T4), Dual Screen, Charging Dock, Camera, FM Radio, Flashlight, MP3 Player, Memo, Voice Recorder, Calculator, Alarm Clock, Calendar, Bluetooth. |
| Anzahl USB-Anschlüsse | 1 |
| Hersteller | Dongsen |
9. Garantie und Support
For warranty information and customer support, please refer to the documentation included with your purchase or contact Easyfone customer service directly. Keep your proof of purchase for warranty claims.
Ask a question about this manual
Ask about setup, troubleshooting, compatibility, parts, safety, or missing instructions. Manuals+ will review the question and use this page’s manual context to help answer it.