
1. Einleitung & Schlussview
The Jennov 5MP Dome Security Camera System provides comprehensive surveillance with high-resolution video, advanced AI human detection, and robust weather resistance. This system includes a 13-inch monitor with a 1TB HDD for continuous recording, supporting up to 10 channels for future expansion. Enjoy peace of mind with remote monitoring capabilities via the Eseecloud app, real-time alerts, and versatile night vision modes.

Image: Jennov 5MP Dome Security Camera System overview.
2. Packungsinhalt
Bitte überprüfen Sie, ob alle unten aufgeführten Artikel in Ihrem Paket enthalten sind:
- WiFi Recorder (NVR) x1
- WiFi Camera x4 (Dome Type)
- 1TB HDD x1 (Pre-installed in NVR)
- NVR Power Cord x1
- Power Adapter x4 (for cameras)
- Waterproof Cap x4
- Bedienungsanleitung x1
- Camera Screws x4 sets
- LAN-Kabel x1
- Positionierungsaufkleber x4
- HDMI-Kabel x1
- USB-Maus x1
- Alarm Sticker x1
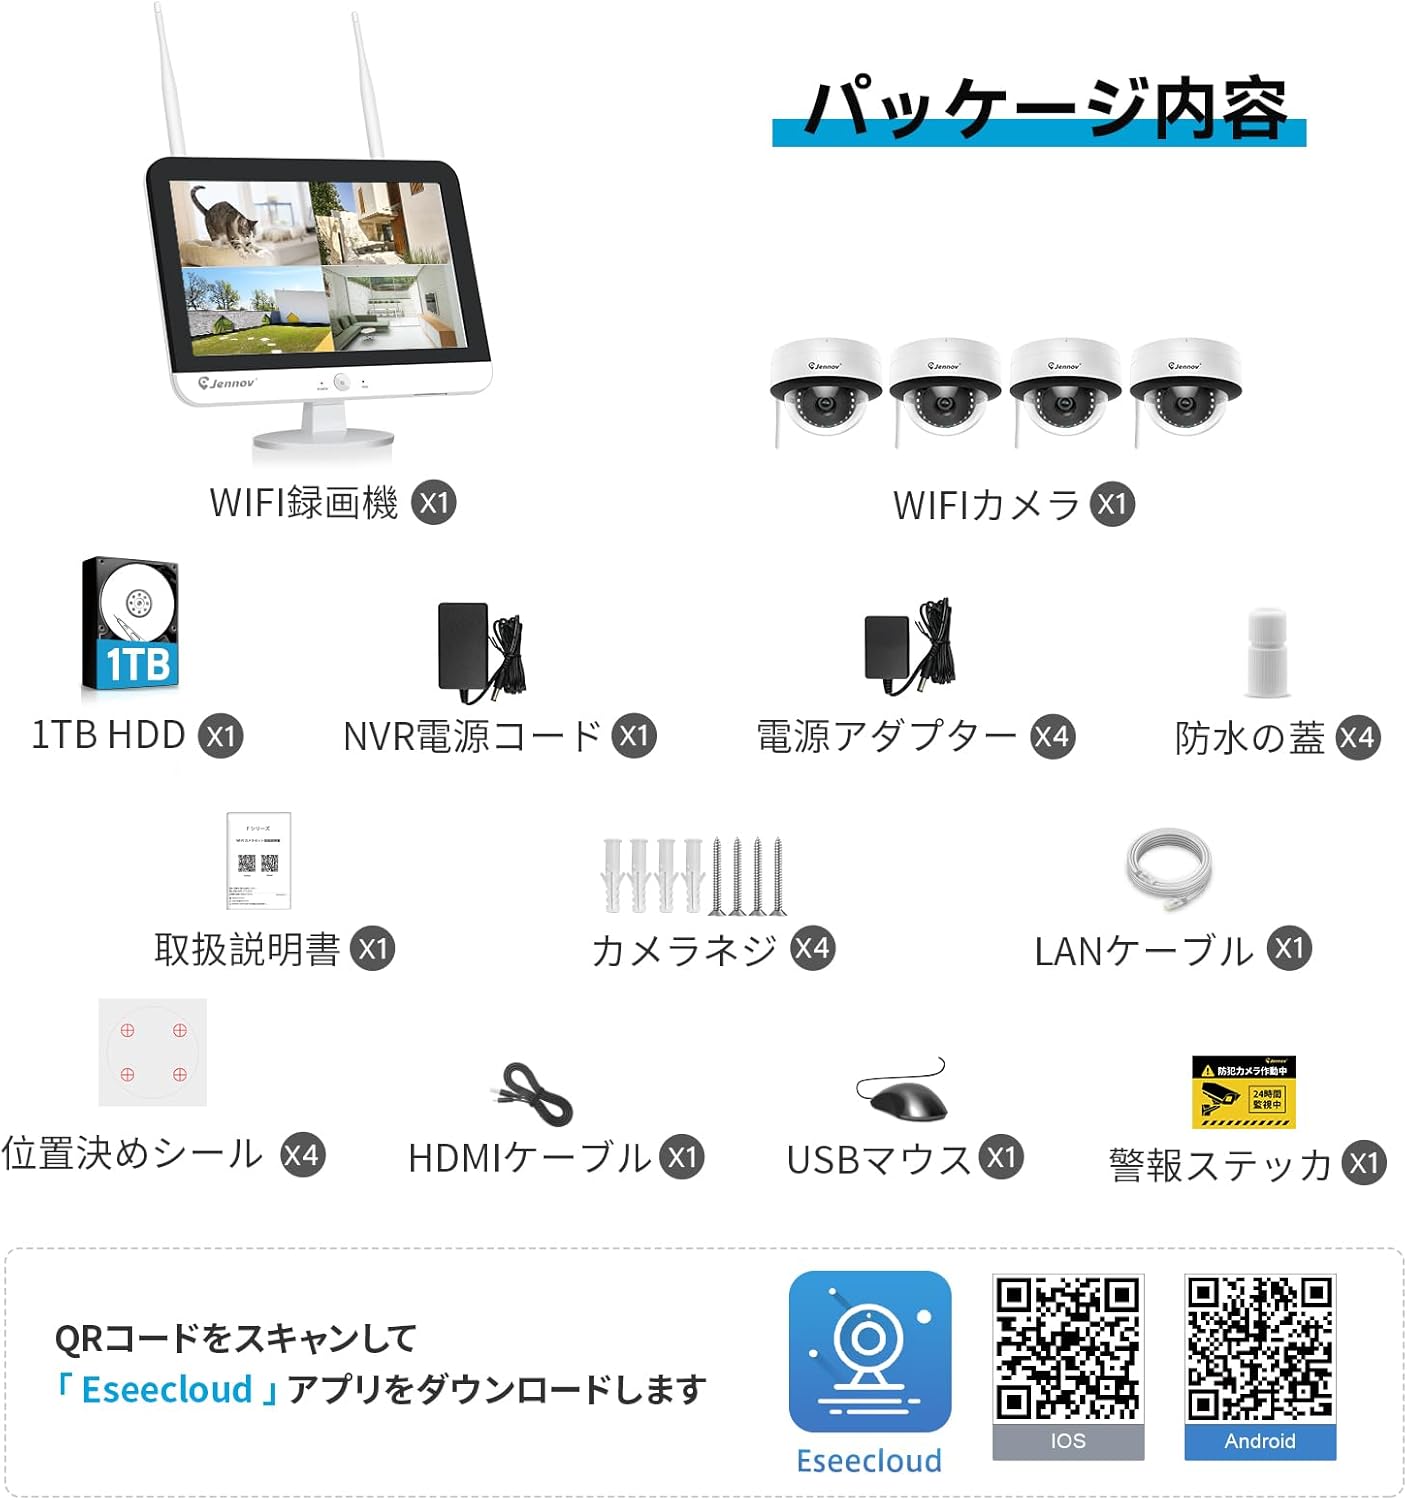
Image: All components of the Jennov 5MP Dome Security Camera System.
3. Installationsanleitung
3.1 Kamerainstallation
Follow these steps to install your dome cameras:
- Remove the outer ring of the camera by unsnapping it in three places.
- Loosen the two screws inside to adjust the camera lens to your desired monitoring direction.
- Mount the camera base to the wall or ceiling using the provided screws. Ensure it is securely fastened.
- Reattach the outer ring and tighten the three screws to secure the cover.
Video: This video demonstrates the installation process for a dome camera, including how to open the casing, adjust the lens, and mount it securely.
3.2 Systemanschluss
Connect the NVR (Network Video Recorder) and cameras as follows:
- Schließen Sie die USB-Maus an den USB-Anschluss des NVR an.
- Schließen Sie das Netzteil des NVR an den NVR und anschließend an eine Steckdose an.
- Verbinden Sie das Netzteil jeder Kamera mit der Kamera und anschließend mit einer Steckdose.
- The NVR will automatically detect and pair with the cameras once powered on.
- Für Fernbedienung viewing, connect the NVR to your router using the provided LAN cable.
- You can also connect the NVR to an external TV or monitor via HDMI or VGA for a larger display.

Image: Connecting the NVR to a television for display.

Image: Connecting the NVR to a smartphone for remote access.
4. Bedienungsanleitung
4.1 Eseecloud App Setup & Remote Monitoring
To set up remote monitoring on your smartphone:
- Download the Eseecloud app from the App Store (iOS) or Google Play Store (Android).
- Register a new account using your email address.
- Log in with your new account.
- Tap "Add Smart Device" and scan the QR code displayed on the NVR monitor (or enter the UID manually).
- Follow the on-screen prompts to name your device and complete the setup.
Nach der Einrichtung können Sie view Live-Feeds, Wiedergabe von Aufnahmen und Fernsteuerung der Kamerafunktionen.
Video: This video demonstrates how to add a device to the Eseecloud app using a QR code for remote access.
Video: This video demonstrates various operations within the Eseecloud app, including viewing live feeds and accessing settings.
4.2 Aufnahmemodi
The system supports multiple recording modes to suit your needs:
- Kontinuierliche Aufnahme: Records 24/7. The 1TB HDD allows for long-term storage. Older data is overwritten when the disk is full.
- KI-gestützte Personenerkennungsaufzeichnung: Records only when human motion is detected, reducing false alarms from pets or natural phenomena.
- Aufnahme mit Bewegungserkennung: Zeichnet auf, sobald eine Bewegung erkannt wird.
- Geplante Aufnahme: Customize recording times based on your specific requirements.

Bild: Überview of the four available recording modes.
4.3 KI-gestützte Personenerkennung und Warnmeldungen
The advanced AI human detection technology accurately identifies human figures, minimizing false alarms caused by rain, leaves, or pets. When an intruder is detected, you will receive instant notifications on your smartphone, allowing for timely action.
Video: This video demonstrates smart detection features, including AI human detection and smart night vision, though it features a PTZ camera model.
4.4 Zwei-Wege-Audio
Each camera is equipped with a built-in microphone, enabling real-time audio recording of the surveillance area. This feature is crucial for capturing conversations or sounds during incidents. Additionally, the system supports two-way audio communication, allowing you to speak to visitors or deter intruders directly through the app.

Image: The camera supports audio recording for enhanced surveillance.
Video: This video highlights product features including two-way audio communication and motion detection, though it features a PTZ camera model.
4.5 Nachtsichtmodi
The system offers advanced night vision capabilities to ensure clear monitoring even in complete darkness:
- Infrarot Nachtsicht: Liefert mithilfe von Infrarot-LEDs klare Schwarzweißbilder bei schwachen Lichtverhältnissen.
- Intelligente Nachtsicht: Automatically switches between color and monochrome images based on detected motion. White LED lights illuminate upon detection to deter intruders and capture color footage.

Image: High-quality video footage during both day and night.
5. Wartung
To ensure optimal performance and longevity of your Jennov Security Camera System, regular maintenance is recommended:
- Reinigung: Gently wipe camera lenses and housings with a soft, damp Mit einem Tuch Staub und Schmutz entfernen. Scheuermittel vermeiden.
- Firmware-Updates: Periodically check the Eseecloud app or Jennov website for firmware updates to ensure your system has the latest features and security patches.
- Kabelinspektion: Überprüfen Sie regelmäßig alle Kabel auf Anzeichen von Verschleiß, Beschädigungen oder lockeren Verbindungen.
- Festplattenzustand: The NVR's 1TB HDD is designed for continuous use. While durable, it's good practice to periodically check its health status through the NVR settings.
6. Fehlerbehebung
If you encounter issues with your Jennov Security Camera System, refer to the following common troubleshooting tips:
- Kein Videostream: Ensure all cameras and the NVR are powered on and connected correctly. Check network connectivity if viewFernzugriff.
- Schlechte Bildqualität: Clean camera lenses. Ensure cameras are within WiFi range or consider using the repeater function for extended coverage.
- Kein Ton: Verify microphone settings in the Eseecloud app or NVR interface. Ensure volume is not muted.
- Falscher Alarm: Adjust AI human detection sensitivity or define specific detection zones to minimize unwanted alerts.
- Probleme mit dem Fernzugriff: Confirm the NVR is connected to the internet via LAN cable. Check your router settings and ensure the Eseecloud app is updated.
7. Spezifikationen
| Besonderheit | Spezifikation |
|---|---|
| Marke | Jennov |
| Modellnummer | AJ1-K4-S18WJ55-V1608-1 |
| Konnektivitätstechnologie | Kabellos |
| Auflösung der Videoaufnahme | 1920p (5 Megapixel) |
| Besondere Merkmale | Waterproof (IP67), 24-hour continuous recording, Alarm notification |
| Anzahl der Kanäle | 8 (Erweiterbar auf bis zu 10) |
| Maximale Speicherkapazität | 1 TB (HDD included) |
| Leistungstyp | DC |
| Kompatible Geräte | Smartphones, Tablets, TVs, Desktop PCs, Laptops |
| Nachtsichtbereich | 15 m |
| Brennweite Beschreibung | 3.6 mm |
| USB-Anschlüsse | 2 |
| Hardware-Schnittstelle | 3.5 inch floppy, USB 2.0 Type B |
| Objektivtyp | Behoben |
| Videoeingang | HDMI, VGA |
| Fachgebiet View | 80 Grad |
| Signalformat | Digitales |
| Optische Sensorik | CMOS |
| Technische Daten | 34 x 20 x 18 cm |
| Artikelgewicht | 4 kg |
| Ursprungsland | China |
8. Garantie und Support
Your Jennov Security Camera System comes with a 12-month warranty from the date of purchase. For technical support, sales inquiries, or payment-related questions, please contact us using the information below:
- Telefon: 05050509046
- WebWebsite: www.jennov.com
- E-Mail: supportjp@jennov.com
The product also holds PSE and GITEKI certifications, ensuring compliance with safety and technical standards.

Image: Product certifications (PSE, GITEKI).