Einführung
This manual provides essential information for the installation, operation, and maintenance of your ASUS Prime A520M-A II/CSM microATX Commercial Motherboard. Designed for 3rd Gen AMD Ryzen processors, this motherboard offers a robust platform with enhanced features for stability and reliability.

Figure 1: ASUS Prime A520M-A II/CSM Motherboard and Retail Packaging.
Aufstellen
1. Physische Installation
Before beginning installation, ensure your workspace is static-free. Refer to your PC case manual for specific mounting instructions.
- CPU-Installation: Carefully align your AMD AM4 processor with the socket on the motherboard. Ensure the golden triangle on the CPU matches the triangle on the socket. Lower the CPU gently into the socket and secure it with the retention arm.
- RAM-Installation: This motherboard supports DDR4 memory. Open the clips on the DIMM slots, align the memory modules with the notches, and press firmly until the clips snap into place. This motherboard features four DDR4 RAM slots.
- M.2 SSD-Installation: Locate the M.2 slot. Insert your M.2 SSD at an angle and secure it with the provided screw. This motherboard includes one 32Gbps M.2 slot.
- Installation der Grafikkarte (GPU): Insert your graphics card into the primary PCIe x16 slot. Ensure it is seated firmly and secure it with the case latch or screw.
- Stromversorgungsanschluss: Connect the 24-pin ATX power connector and the 8-pin CPU power connector from your power supply to the corresponding ports on the motherboard. Connect SATA power cables to storage devices as needed.
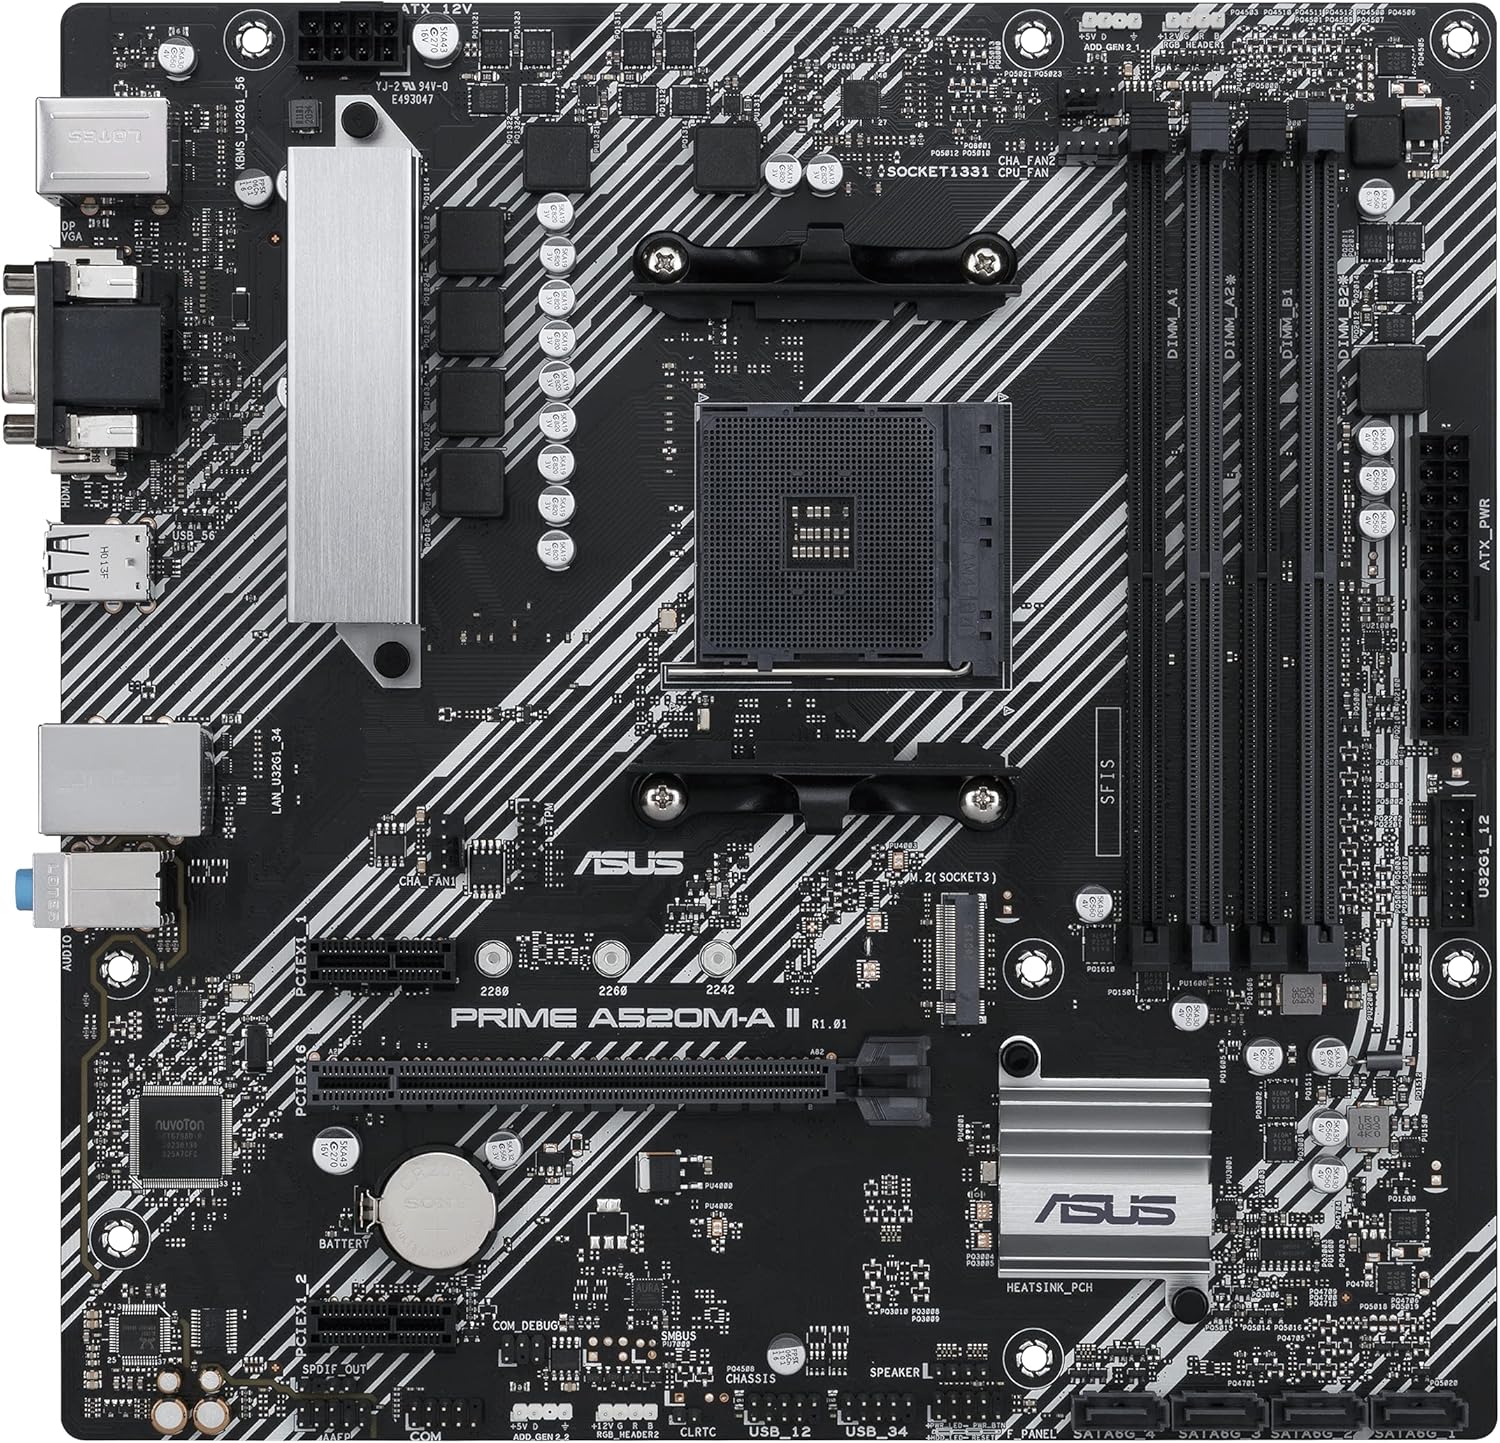
Abbildung 2: Draufsicht view highlighting CPU socket, RAM slots, and M.2 slot.
2. Initial Boot and BIOS Configuration
After all components are installed and connected, power on your system. Access the BIOS/UEFI setup by pressing the designated key (usually DEL or F2) during startup. Here you can:
- Verify detected components (CPU, RAM, storage).
- Configure boot order for your operating system installation media.
- Adjust memory profiles (XMP/DOCP) for optimal RAM performance.
Betrieb
1. Treiberinstallation
After installing your operating system, install the latest drivers for your motherboard's chipset, audio, LAN, and other integrated devices. These can typically be found on the ASUS support webWebsite für Ihr spezifisches Modell.
2. Software-Dienstprogramme
- ASUS Control Center Express (ACCE): This utility simplifies IT endpoint management, offering comprehensive system protection and monitoring for commercial environments.
- Aura-Synchronisierung: Utilize the onboard RGB headers and addressable Gen 2 headers to synchronize RGB LED strips and other Aura Sync-capable hardware for customized lighting effects.
3. Konnektivität
The rear I/O panel provides various ports for external devices:
- Videoausgänge: HDMI 2.1 (4K@60Hz), D-Sub, and DisplayPort for connecting monitors.
- USB-Anschlüsse: Multiple USB 3.2 Gen 1 Type-A ports for high-speed peripherals.
- Ethernet: 1Gb Ethernet port for network connectivity.
- Audiobuchsen: Standard audio jacks for speakers, headphones, and microphones.
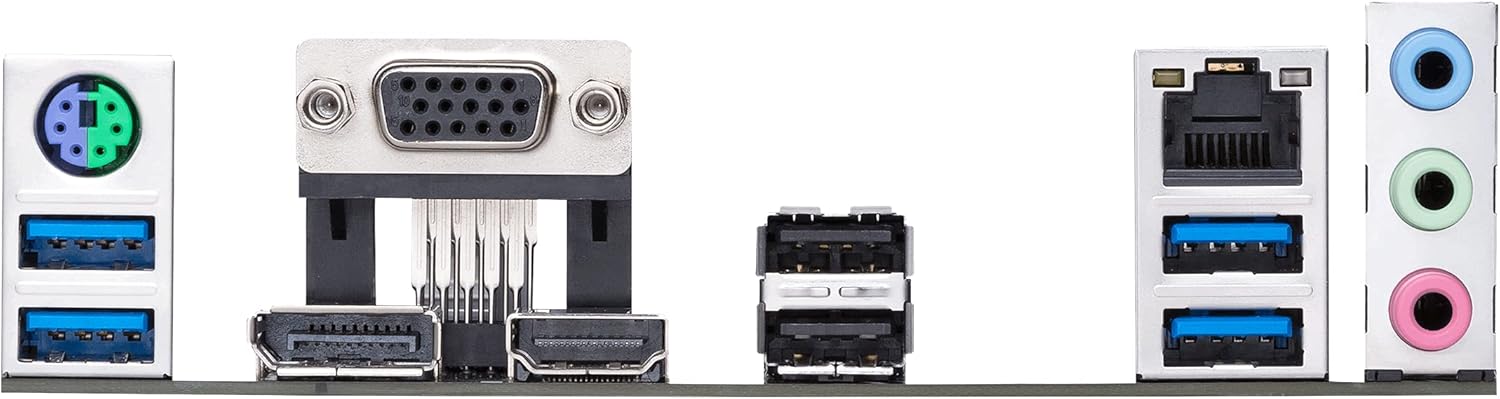
Abbildung 3: Ausführlich view of the motherboard's rear input/output panel.
Wartung
- Reinigung: Reinigen Sie das Motherboard und die Komponenten regelmäßig mit Druckluft von Staub. Stellen Sie sicher, dass das System vor der Reinigung ausgeschaltet und vom Stromnetz getrennt ist.
- BIOS-Updates: Überprüfen Sie regelmäßig den ASUS-Support. website for BIOS updates. Updates can improve compatibility, stability, and performance. Follow the provided instructions carefully when updating the BIOS.
- Komponentenprüfungen: Stellen Sie sicher, dass alle Kabel fest angeschlossen und die Komponenten korrekt positioniert sind. Prüfen Sie auf sichtbare Beschädigungen oder lose Verbindungen.
Fehlerbehebung
- Kein Strom/Kein POST:
- Verify all power connections (24-pin ATX, 8-pin CPU).
- Setzen Sie die RAM-Module neu ein. Versuchen Sie, den Computer mit jeweils einem RAM-Riegel zu starten.
- Ensure the CPU is correctly seated and the CPU cooler is properly installed.
- Check for any loose cables or short circuits within the case.
- Startfehler:
- Überprüfen Sie die Bootreihenfolge im BIOS/UEFI.
- Ensure storage devices (SSD/HDD) are properly connected and detected.
- If using a new M.2 SSD, ensure it is initialized and formatted in Disk Management.
- Peripheral Detection Issues:
- Ensure drivers for the motherboard and peripherals are up to date.
- Test peripherals in different USB ports.
- Prüfen Sie die BIOS-Einstellungen auf Aktivierung des USB-Anschlusses.
Technische Daten
| Besonderheit | Detail |
|---|---|
| CPU-Sockel | AMD AM4 (3rd Gen Ryzen with Radeon Graphics Processors) |
| Chipsatz | AMD A520 |
| Erinnerung | 4 x DDR4 DIMM slots, up to 4400 MHz (OC), ECC Memory Support |
| Lagerung | 1 x M.2 slot (32Gbps), 4 x SATA 6Gb/s ports |
| Erweiterungssteckplätze | 1 x PCIe 3.0 x16, 2 x PCIe 3.0 x1 |
| Videoausgänge | HDMI 2.1 (4K@60Hz), DisplayPort, D-Sub |
| USB-Anschlüsse | USB 3.2 Gen 1 Typ-A, USB 2.0 |
| LAN | 1-Gbit-Ethernet |
| Audio | High Definition Audio CODEC |
| Formfaktor | microATX (10.75 x 10.5 inches) |
| Besondere Merkmale | ASUS Corporate Stable Model (CSM), ASUS Control Center Express (ACCE), 5X Protection III, Aura Sync RGB headers |
Garantie und Support
The ASUS Prime A520M-A II/CSM motherboard is part of the ASUS Corporate Stable Model (CSM) program, offering a guaranteed long product life cycle and reliable sourcing. This includes up to a 36-month supply, End-of-Life (EOL) notices, and Engineering Change Notice (ECN) control.
For detailed warranty information, technical support, and driver downloads, please visit the official ASUS support webWebsite: www.asus.com/support/