1. Einleitung
The Antec NX260 is a mid-tower ATX gaming PC case designed to accommodate high-performance components. It features a fine mesh front panel for optimal airflow, a tempered glass side panel to showcase your build, and includes three 120mm ARGB fans for effective cooling and customizable lighting. This manual provides essential information for setting up, operating, and maintaining your NX260 case.

2. Packungsinhalt
Bitte überprüfen Sie, ob alle Artikel im Paket vorhanden sind:
- Antec NX260 ATX Mid-Tower PC Case
- 3 x 120mm ARGB Fans (pre-installed in the front)
- Accessory Box (containing screws, standoffs, and cable ties)
- Benutzerhandbuch (dieses Dokument)
3. Technische Daten
| Besonderheit | Spezifikation |
|---|---|
| Modellname | NX260 |
| Gehäusetyp | Mittelturm |
| Abmessungen (T x B x H) | 50.6 x 28.4 x 44.5 cm (19.9 x 11.2 x 17.5 Zoll) |
| Gewicht | 4.3 kg |
| Material | Stahl, gehärtetes Glas |
| Motherboard-Unterstützung | ATX, Micro ATX |
| Erweiterungssteckplätze | 7 |
| Laufwerksschächte | 2 x 3.5" HDD / 2.5" SSD (convertible), 2 x 2.5" SSD |
| Front I / O Ports | Power, LED Control Button, 1 x USB 3.0, 2 x USB 2.0, HD-AUDIO |
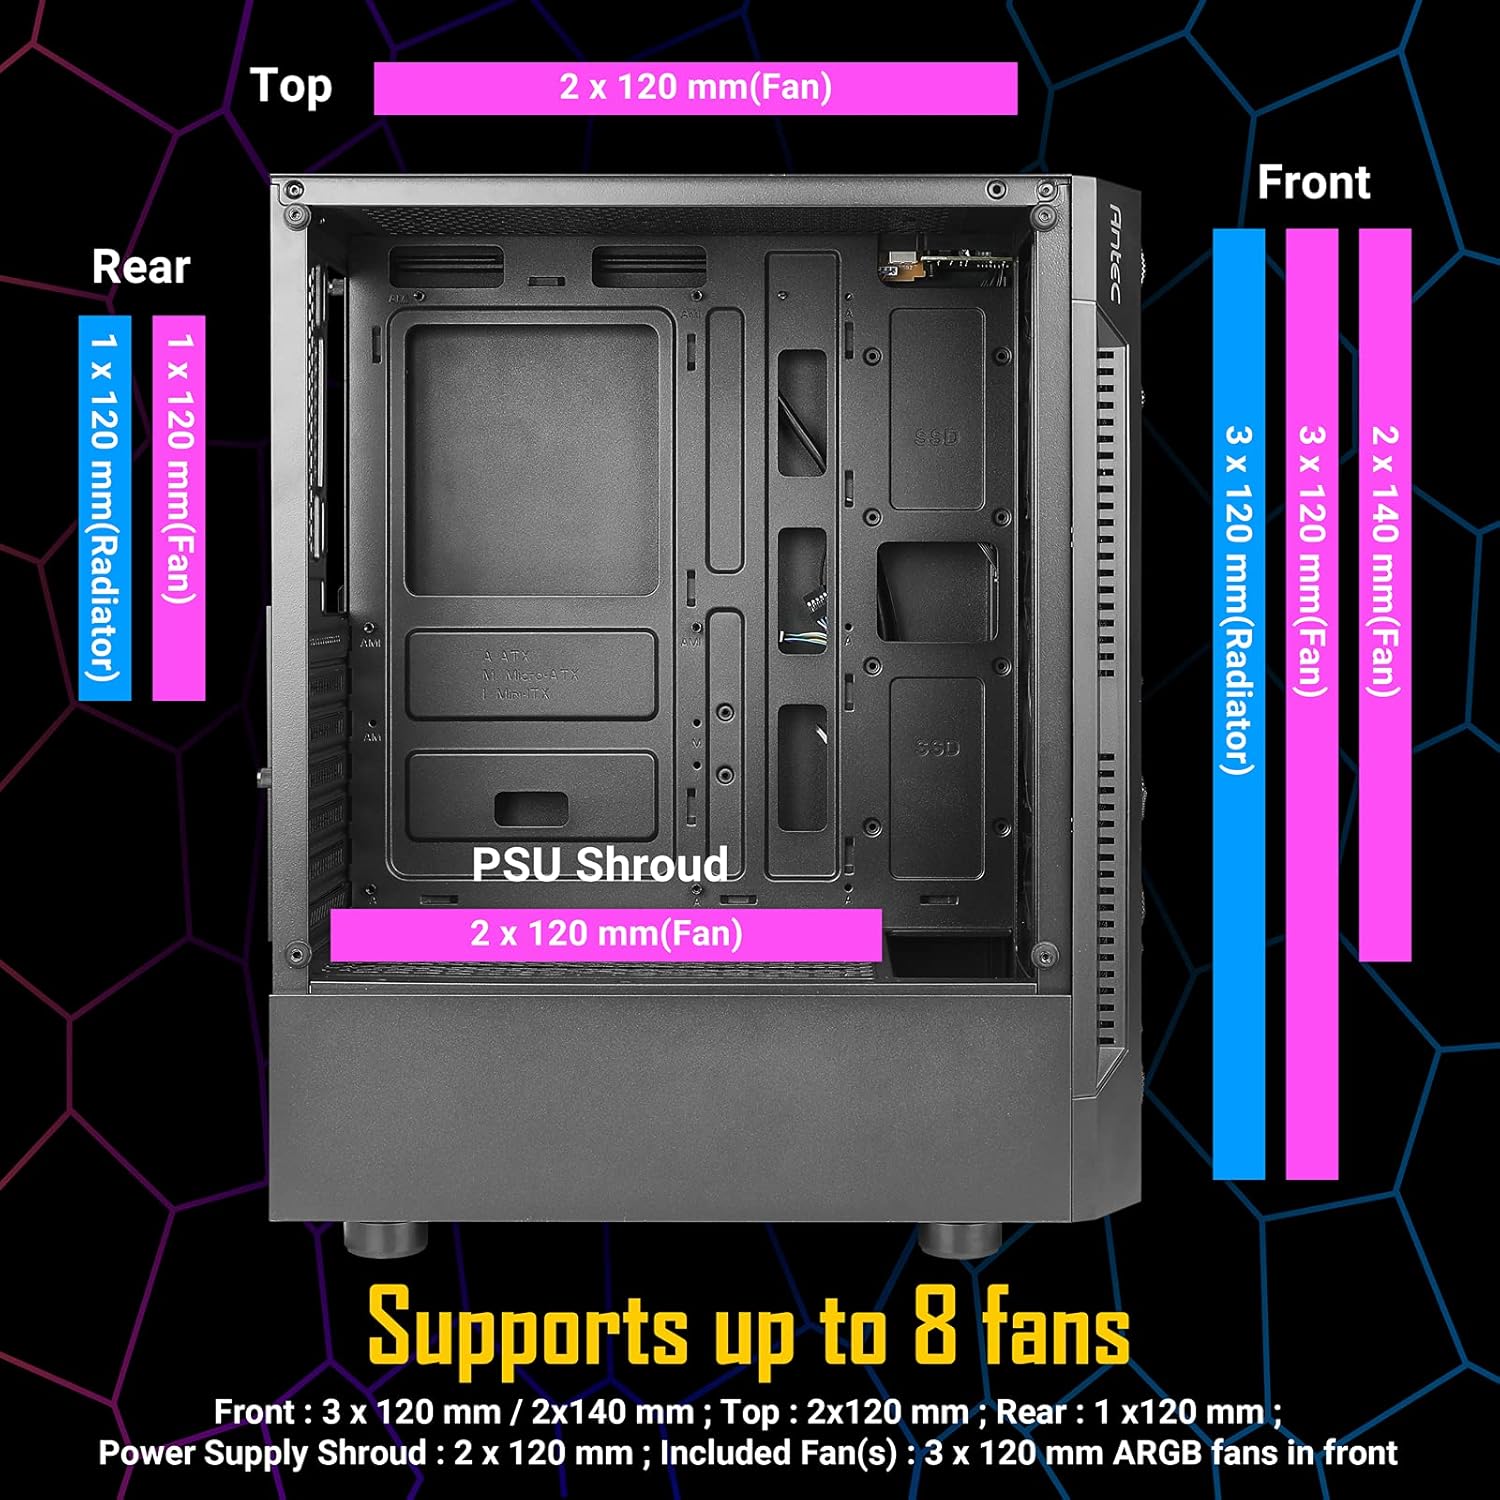
| Mitgelieferte Lüfter | 3 x 120mm ARGB fans (Front) |
| Lüfterunterstützung (Max.) | Front: 3 x 120mm / 2 x 140mm; Top: 2 x 120mm; Rear: 1 x 120mm; PSU Shroud: 2 x 120mm |
| Kühlerhalterung | Vorne: Bis zu 360 mm; Hinten: 120 mm |
| Maximale GPU-Länge | 310 mm |
| Maximale Höhe des CPU-Kühlers | 160 mm |
| Maximale Netzteillänge | 185mm (with HDD), 310mm (without HDD) |


4. Einrichtung und Installation
4.1. Checkliste vor der Installation
- Ensure you have all necessary components (motherboard, CPU, GPU, PSU, storage, RAM).
- Gather essential tools: Phillips head screwdriver, cable ties (some included).
- Arbeiten Sie auf einer sauberen, antistatischen Oberfläche.
4.2. Component Installation Guide
- Seitenteile entfernen: Carefully unscrew the tempered glass side panel and the solid steel side panel. Place them aside on a soft, flat surface to prevent scratches.
- Motherboard installieren: Align your ATX or Micro ATX motherboard with the standoffs inside the case. Secure it with the provided screws.
- CPU-Kühler installieren: If using an air cooler, install it according to its manufacturer's instructions, ensuring it does not exceed the 160mm height limit. For liquid cooling, install the radiator (up to 360mm in front, 120mm in rear) and then the CPU block.
- Grafikkarte (GPU) installieren: Insert your graphics card into the appropriate PCIe slot on your motherboard. Ensure it is securely seated and fastened with the expansion slot screws. The case supports GPUs up to 310mm in length.
- Speicherlaufwerke installieren:
- For 3.5" HDDs or 2.5" SSDs: Use the convertible drive bays located in the PSU shroud area.
- For 2.5" SSDs: Mount them on the dedicated SSD trays behind the motherboard tray.
- Netzteil (PSU) installieren: Mount your PSU in the bottom rear compartment of the case. Ensure the fan faces downwards (if the case has bottom ventilation) or upwards. Secure it with screws. The case supports PSUs up to 185mm in length with HDDs installed, or 310mm without HDDs.
- Frontpanel-Kabel anschließen: Connect the front panel I/O cables (Power, Reset, USB 3.0, USB 2.0, HD-AUDIO, LED) to their corresponding headers on your motherboard. Refer to your motherboard manual for correct pin assignments.
- Kabelmanagement: Utilize the space behind the motherboard tray and the cable routing cutouts to neatly organize your cables. Use the included cable ties to secure them, improving airflow and aesthetics.
- Seitenverkleidungen wieder einbauen: Once all components are installed and cables are managed, carefully reattach both side panels.

5. Bedienungsanleitung
5.1. Einschalten Ihres Systems
After completing the installation and connecting all external peripherals (monitor, keyboard, mouse, power cable), press the power button located on the front I/O panel to start your computer.
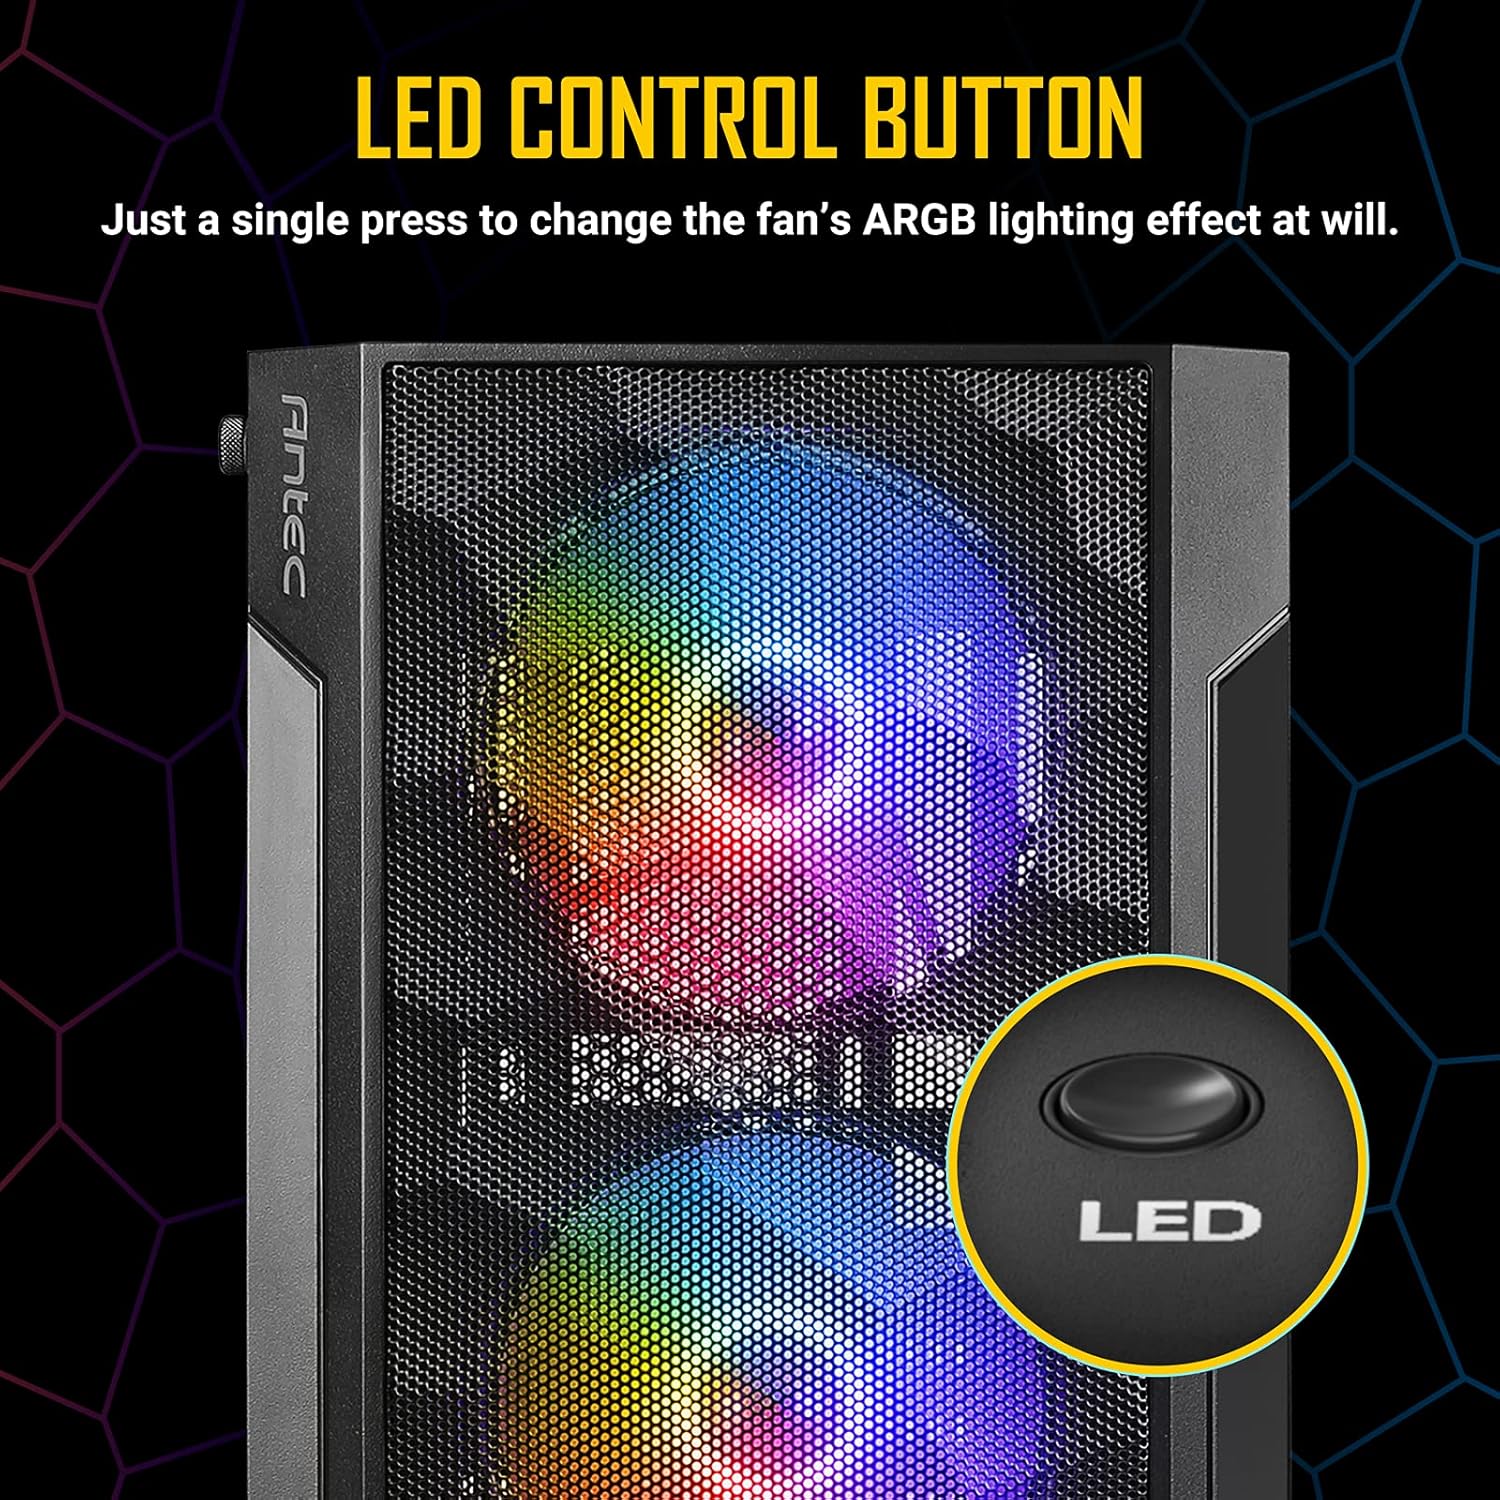
5.2. ARGB-Lüftersteuerung
The Antec NX260 includes three pre-installed 120mm ARGB fans in the front. These fans are controlled via a dedicated LED button on the front I/O panel.
- Lichteffekt ändern: Press the LED button briefly to cycle through various pre-set ARGB lighting modes and colors.
- Lichter ausschalten: Press and hold the LED button for a few seconds to turn off the ARGB lighting. Repeat the action to turn them back on.
Notiz: The included ARGB fans use a proprietary connection and are controlled directly by the case's integrated controller. They may not be compatible with motherboard ARGB software synchronization without an additional adapter (not included).
6. Wartung
Regelmäßige Wartung trägt dazu bei, eine optimale Leistung und Langlebigkeit Ihres PC-Gehäuses zu gewährleisten.
- Staubreinigung: Periodically clean the mesh front panel and any dust filters (if present) to maintain good airflow. Use compressed air or a soft brush to remove accumulated dust.
- Gehärtetes Glaspaneel: Clean the tempered glass side panel with a soft, lint-free cloth and a non-abrasive glass cleaner. Avoid harsh chemicals that could damage the glass or coating.
- Innenreinigung: With the system powered off and unplugged, use compressed air to clear dust from internal components and fan blades.
7. Fehlerbehebung
If you encounter issues with your Antec NX260 case, consider the following:
- Lüfter drehen sich nicht/leuchten nicht auf:
- Check if the fan power cables are securely connected to the case's fan controller or motherboard headers.
- Ensure the SATA power connector for the fan controller is connected to your PSU.
- Verify that the LED button is not in the 'off' state (press it briefly or hold to cycle modes).
- USB-Anschlüsse an der Vorderseite funktionieren nicht:
- Ensure the USB 3.0 and USB 2.0 headers from the front panel are correctly connected to your motherboard. Refer to your motherboard manual for correct pin orientation.
- Die vorderen Audiobuchsen funktionieren nicht:
- Verify that the HD-AUDIO cable from the front panel is correctly connected to the audio header on your motherboard.
- Check your operating system's audio settings and drivers.
- Netzschalter reagiert nicht:
- Ensure the power switch cable from the front panel is correctly connected to the power header on your motherboard.
8. Garantie und Support
8.1. Garantieinformationen
The Antec NX260 PC case comes with a manufacturer's warranty. For specific details regarding warranty duration and coverage in your region, please refer to the warranty card included with your product or visit the official Antec website. Spare parts availability in the EU is guaranteed for 2 years from the date of purchase.
8.2. Technischer Support
For technical assistance, troubleshooting beyond this manual, or inquiries about replacement parts, please contact Antec customer support through their official website. Have your product model (NX260) and proof of purchase ready when contacting support.