1. Einleitung
Thank you for choosing the SYTUNG Digital Portable Tire Inflator. This manual provides essential information for the safe and efficient operation, maintenance, and troubleshooting of your device. Please read it thoroughly before first use and retain it for future reference.
2. Sicherheitshinweise
- Das Aufblasgerät sollte immer in einem gut belüfteten Bereich betrieben werden.
- Lassen Sie den Aufblaser während des Betriebs nicht unbeaufsichtigt.
- Außerhalb der Reichweite von Kindern aufbewahren.
- Vermeiden Sie längeren Dauerbetrieb. Lassen Sie das Gerät nach 10–15 Minuten Gebrauch abkühlen, um eine Überhitzung zu verhindern.
- Stellen Sie sicher, dass der Fahrzeugmotor läuft, wenn Sie den Kompressor verwenden, um ein Entladen der Autobatterie zu vermeiden.
- Setzen Sie den Aufblaser keinem Regen oder Nässe aus.
- Always check the recommended tire pressure for your vehicle in the owner's manual or on the driver's side door jamb.
- Disconnect the power cable from the 12V socket when not in use.
3. Packungsinhalt
Überprüfen Sie, ob alle Artikel in Ihrem Paket vorhanden sind:
- SYTUNG Digital Portable Tire Inflator (Model ST-5002)
- 3 x Additional Nozzle Adapters (for various inflatables)
- 1 x Ersatzsicherung
- Bedienungsanleitung

Image: Included nozzle adapters and spare fuse.
4. Produktüberschreitungview
The SYTUNG Digital Portable Tire Inflator is designed for quick and convenient inflation of various items. It features a digital display, automatic shut-off, and an integrated LED light for ease of use.

Bild: Vorderseite view of the SYTUNG Digital Portable Tire Inflator with accessories.
Hauptmerkmale:
- Digitaler Bildschirm: Provides accurate pressure readings and allows for precise pressure setting. Supports PSI, BAR, KPA, and KG/CM² units.
- Automatische Abschaltung: Die Aufblasvorrichtung stoppt automatisch, sobald der voreingestellte Druck erreicht ist, um ein Überpumpen zu verhindern.
- Integriertes LED-Licht: Illuminates your work area for convenient use during nighttime or in low-light conditions.
- Kompaktes Design: Lightweight and easy to store in your vehicle.
- Langes Netzkabel: A 3.5-meter (11.5 feet) power cord ensures easy reach to all tires of most vehicles.
- Langlebige Konstruktion: Features a metal permanent magnet motor for efficient performance.

Image: Product dimensions (14.5cm x 6cm x 20.5cm) and icons representing digital display, quick inflation, TPMS, LED light, and auto shut-off.
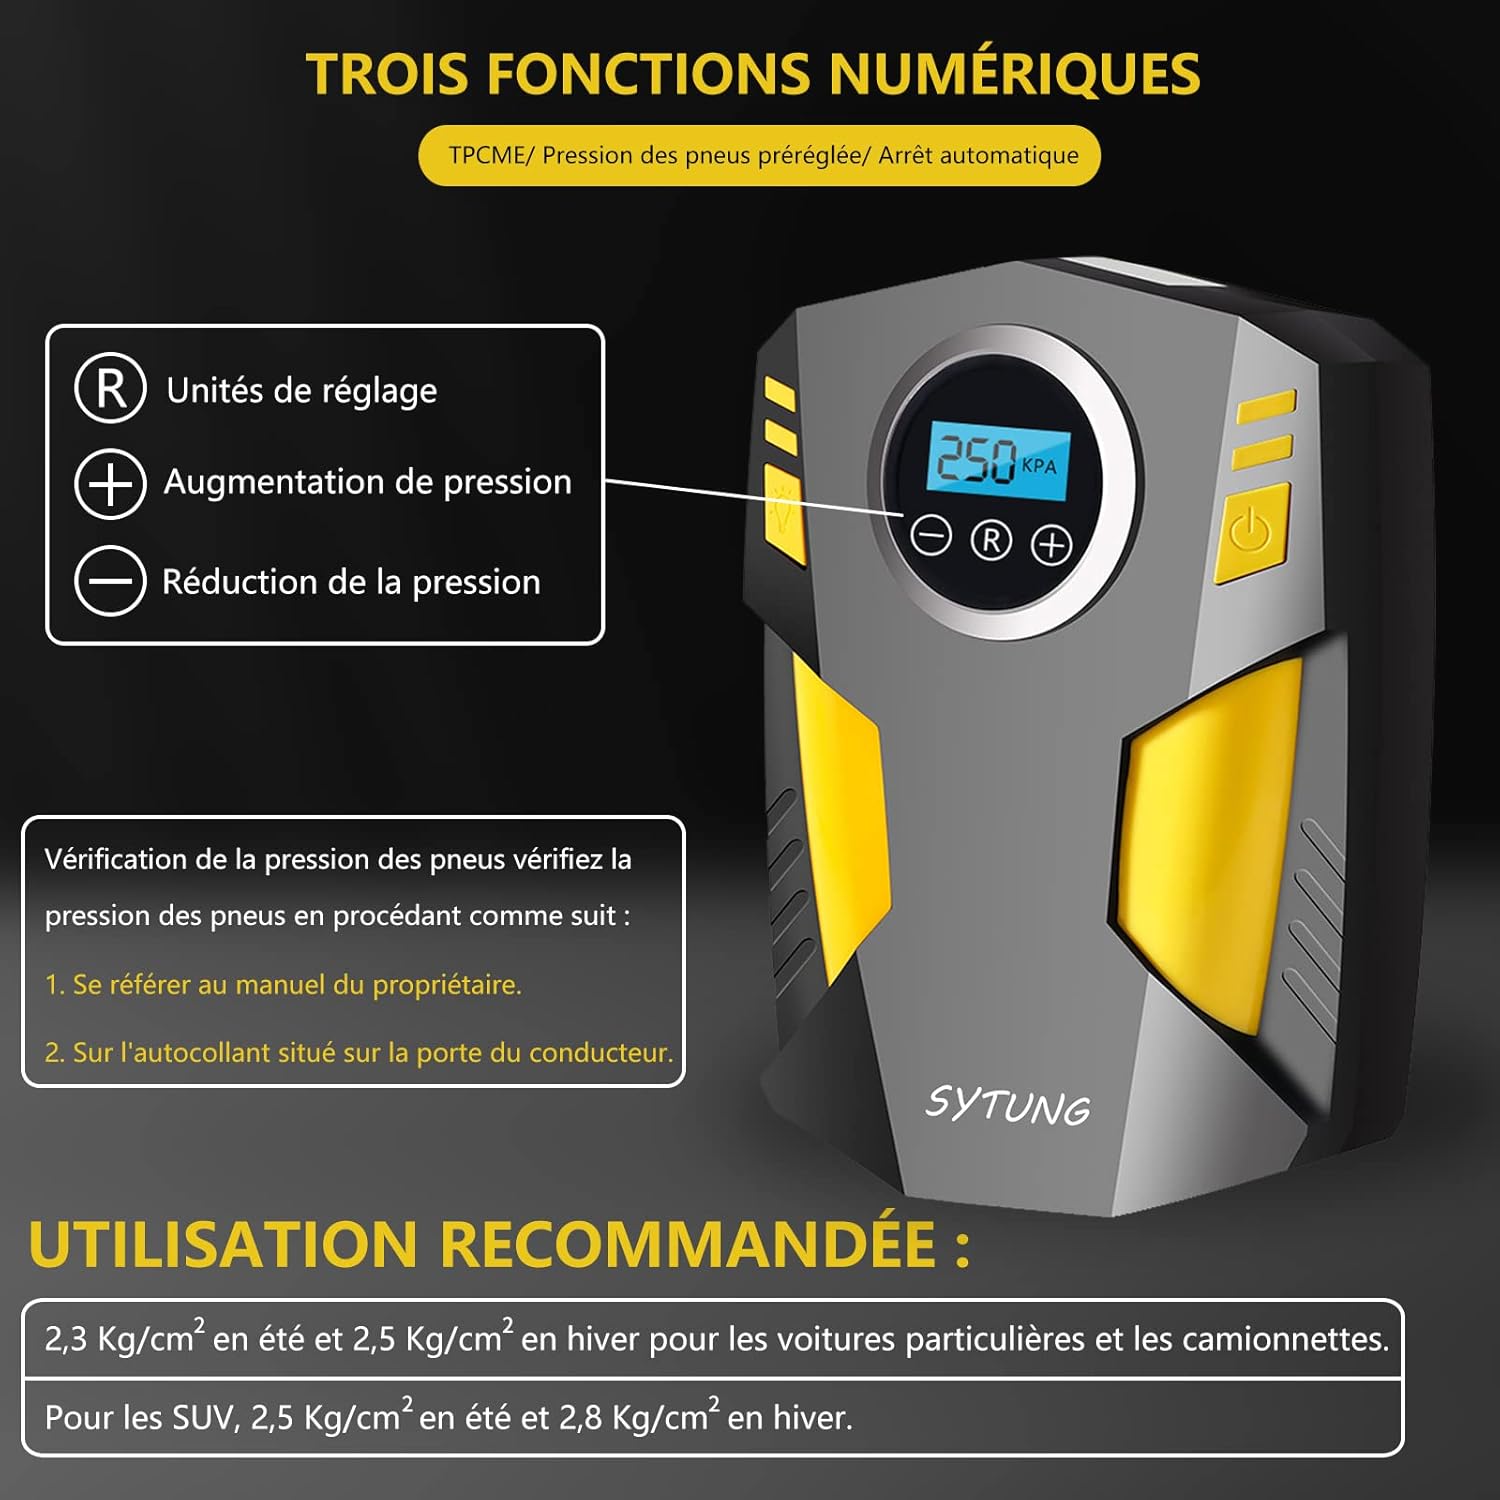
Image: Close-up of the digital display showing unit selection (R), pressure increase (+), and pressure decrease (-) buttons. Also shows recommended tire pressures for cars (2.3 kg/cm² summer, 2.5 kg/cm² winter) and SUVs (2.5 kg/cm² summer, 2.8 kg/cm² winter).
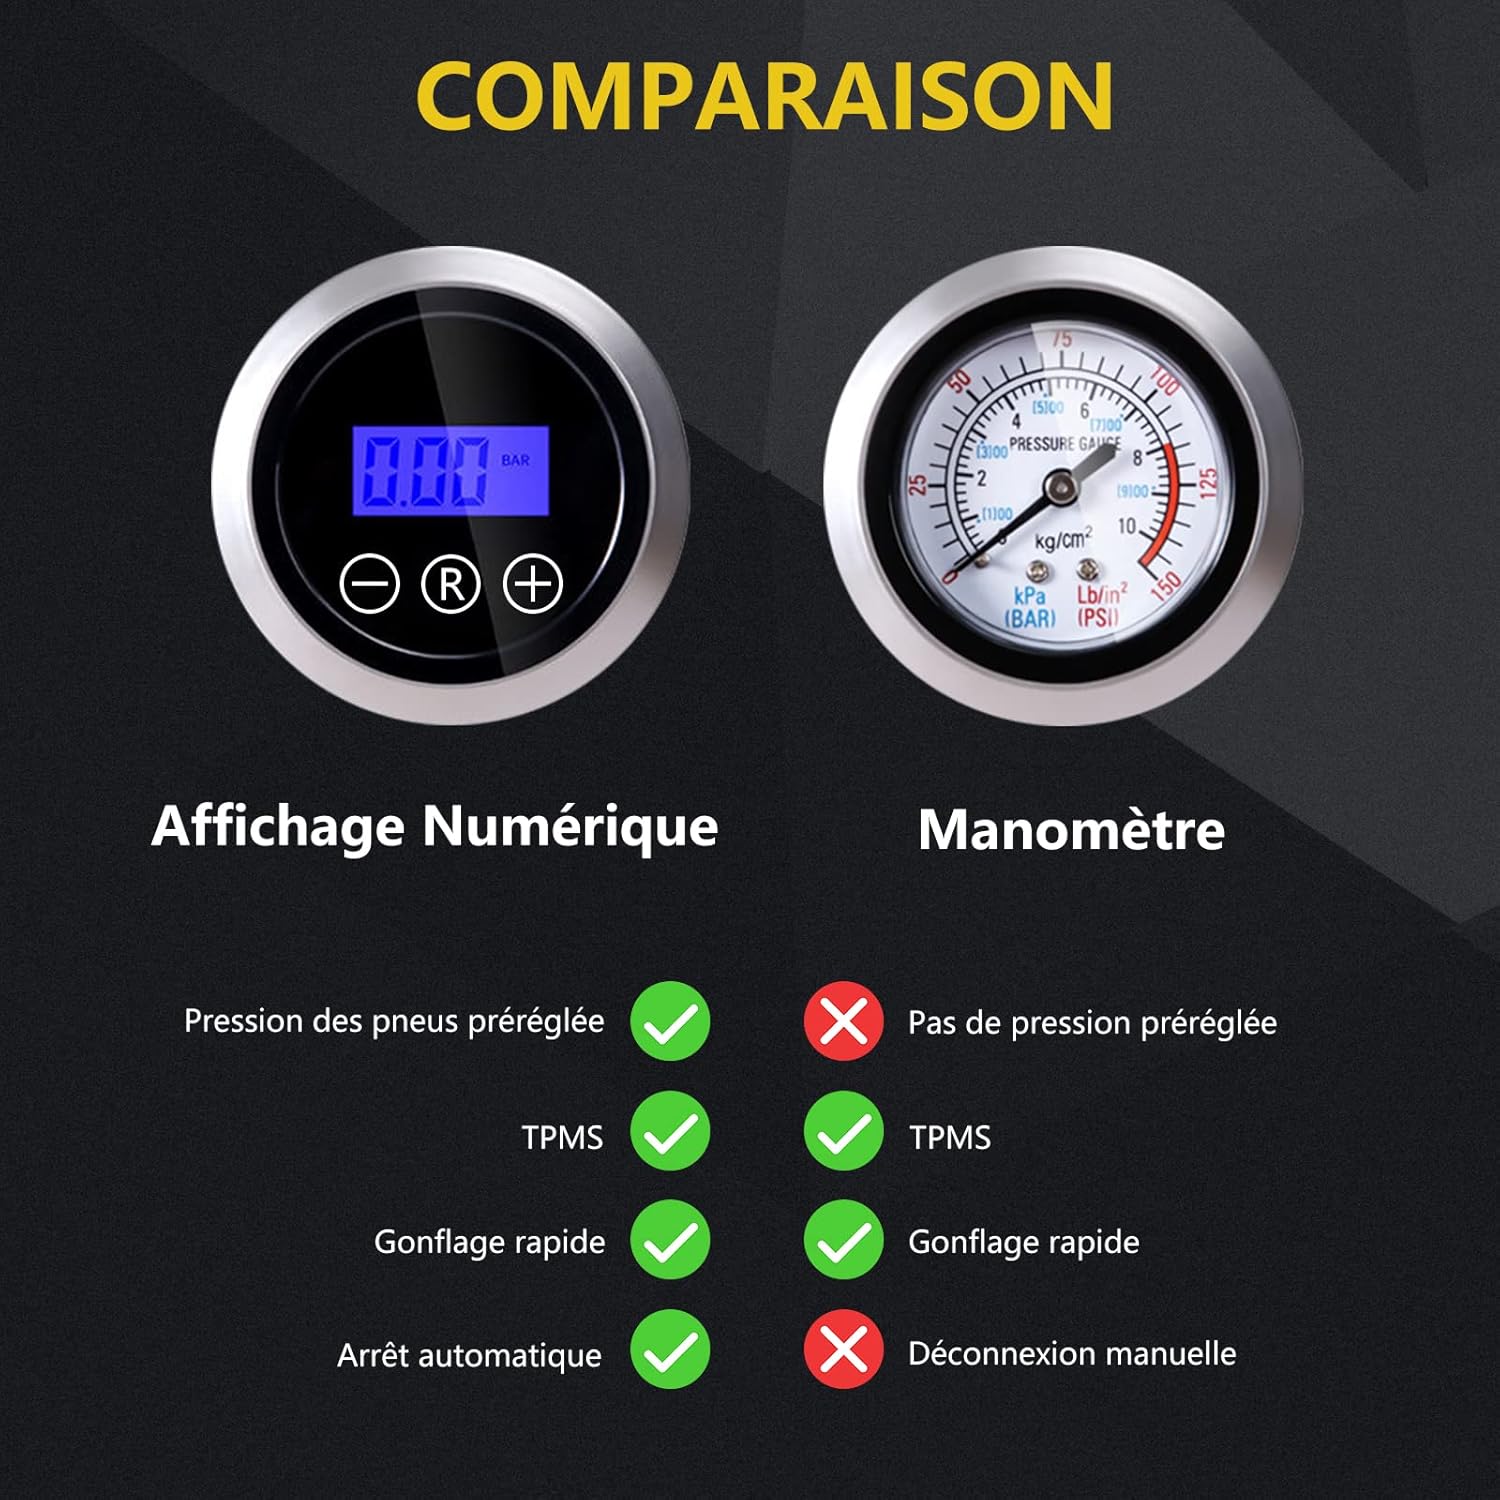
Image: Comparison highlighting advantages of digital display: preset tire pressure, TPMS compatibility, quick inflation, and automatic shut-off, compared to an analog gauge.

Image: The bright LED light in action, illuminating a tire valve area.

Image: Close-up of the durable metal connector for tire valves.

Image: The compact size of the inflator, easily held in one hand.

Image: Diagram illustrating the internal 22-cylinder metal permanent magnet motor.

Image: The 3-meter connection cable easily reaching a car tire for inflation.
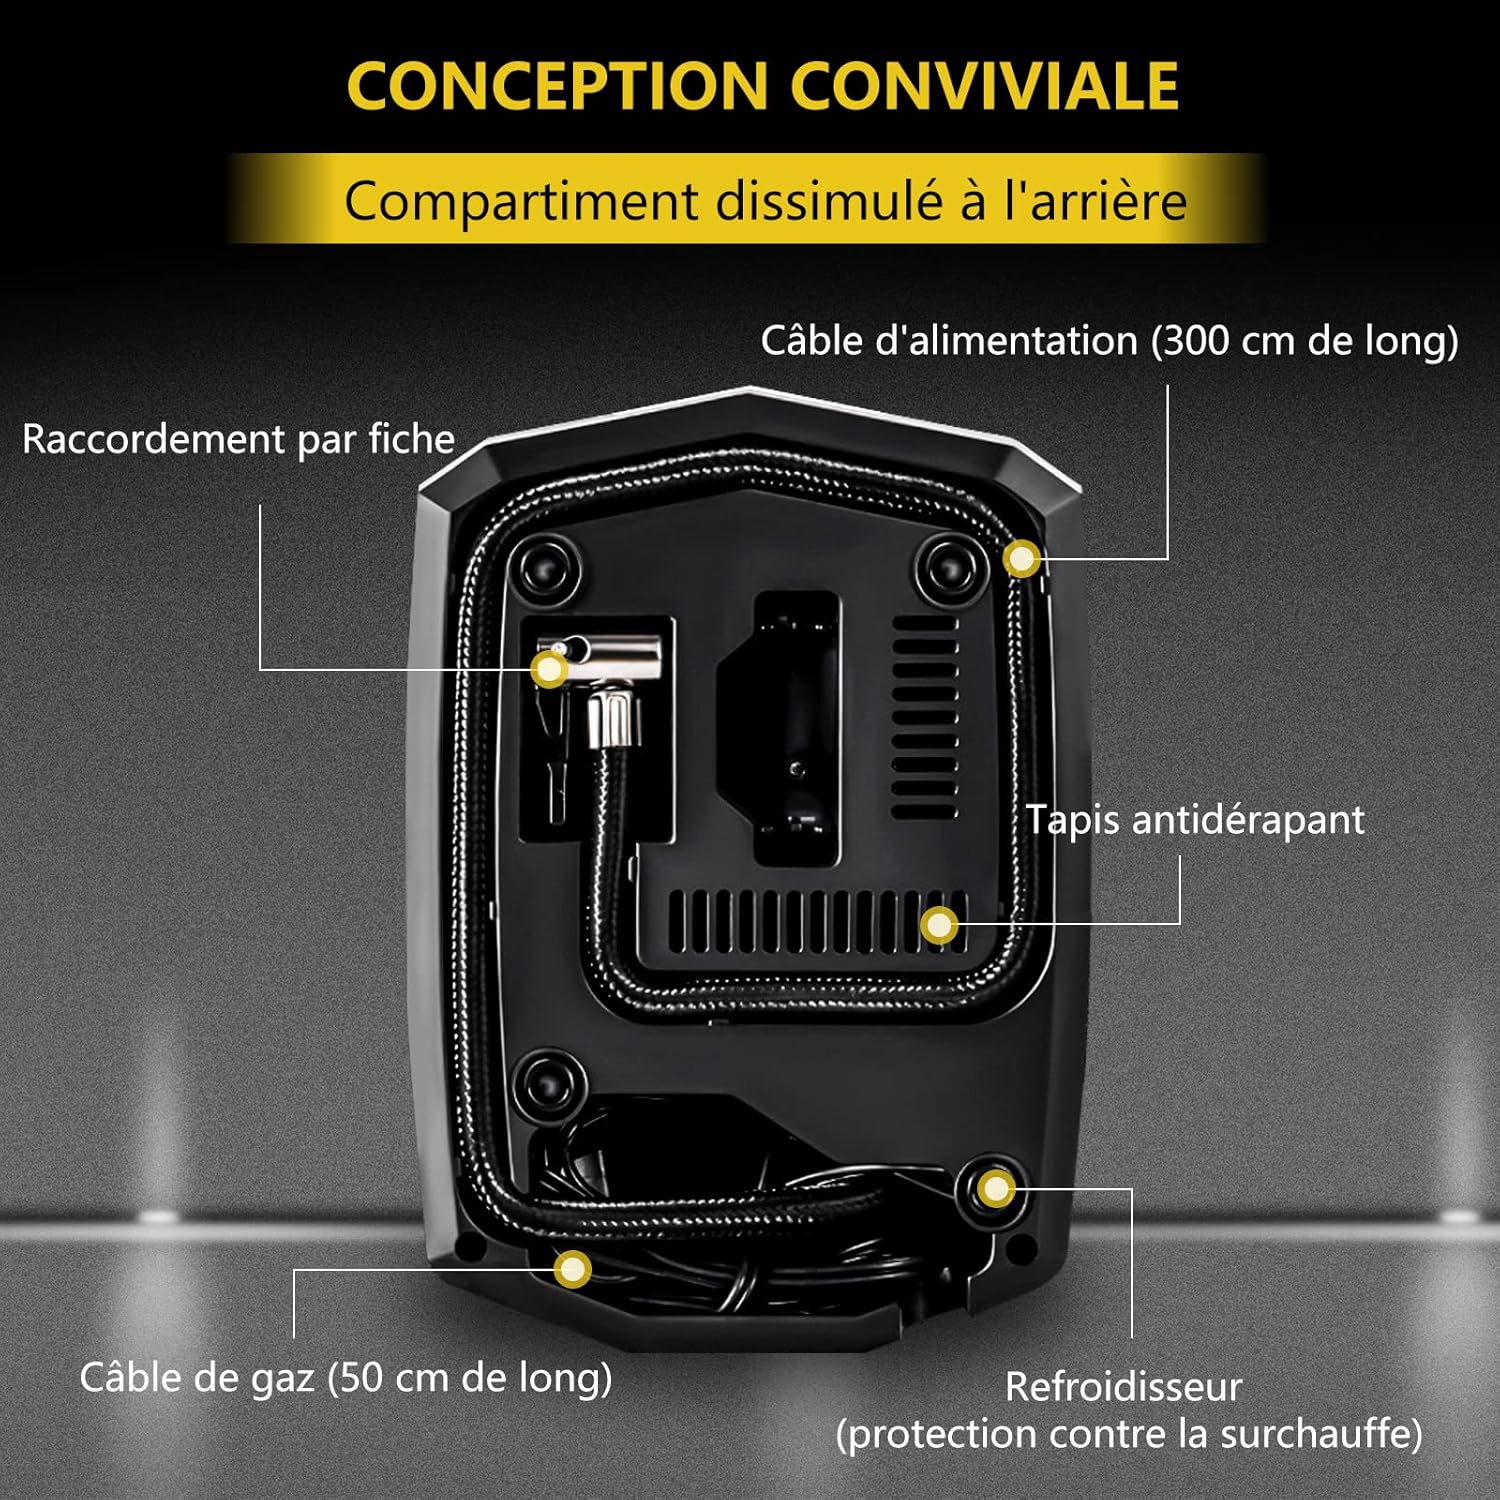
Bild: Rückseite view of the inflator, highlighting the integrated cable storage compartment and non-slip pads.
5. Einrichtung
- Stellen Sie sicher, dass der Motor Ihres Fahrzeugs läuft, um eine stabile Stromversorgung des Kompressors zu gewährleisten.
- Plug the 12V power cable into your car's cigarette lighter socket.
- Uncoil the air hose and power cable from their storage compartments on the inflator.
6. Bedienungsanleitung
Befolgen Sie diese Schritte, um Ihre Reifen oder andere Gegenstände aufzupumpen:
- Starte den Motor: Stellen Sie sicher, dass Ihr Automotor läuft.
- Strom anschließen: Plug the inflator's 12V adapter into your car's cigarette lighter socket.
- Gewünschten Druck einstellen: The digital display will show the current pressure. Use the '+' and '-' buttons to set your desired pressure. Press the 'R' button to cycle through pressure units (PSI, BAR, KPA, KG/CM²).
- Am Ventil befestigen: Screw the air hose connector onto the tire valve stem. Ensure a tight seal to prevent air leakage. For other inflatables, select and attach the appropriate nozzle adapter before connecting.
- Inflation starten: Press the power button on the inflator to begin inflation.
- Automatischer Stopp: Der Aufblaser schaltet sich automatisch ab, sobald der voreingestellte Druck erreicht ist.
- Trennen: Unscrew the air hose connector from the valve stem and unplug the 12V power adapter. Store the cables and hose neatly in their compartments.
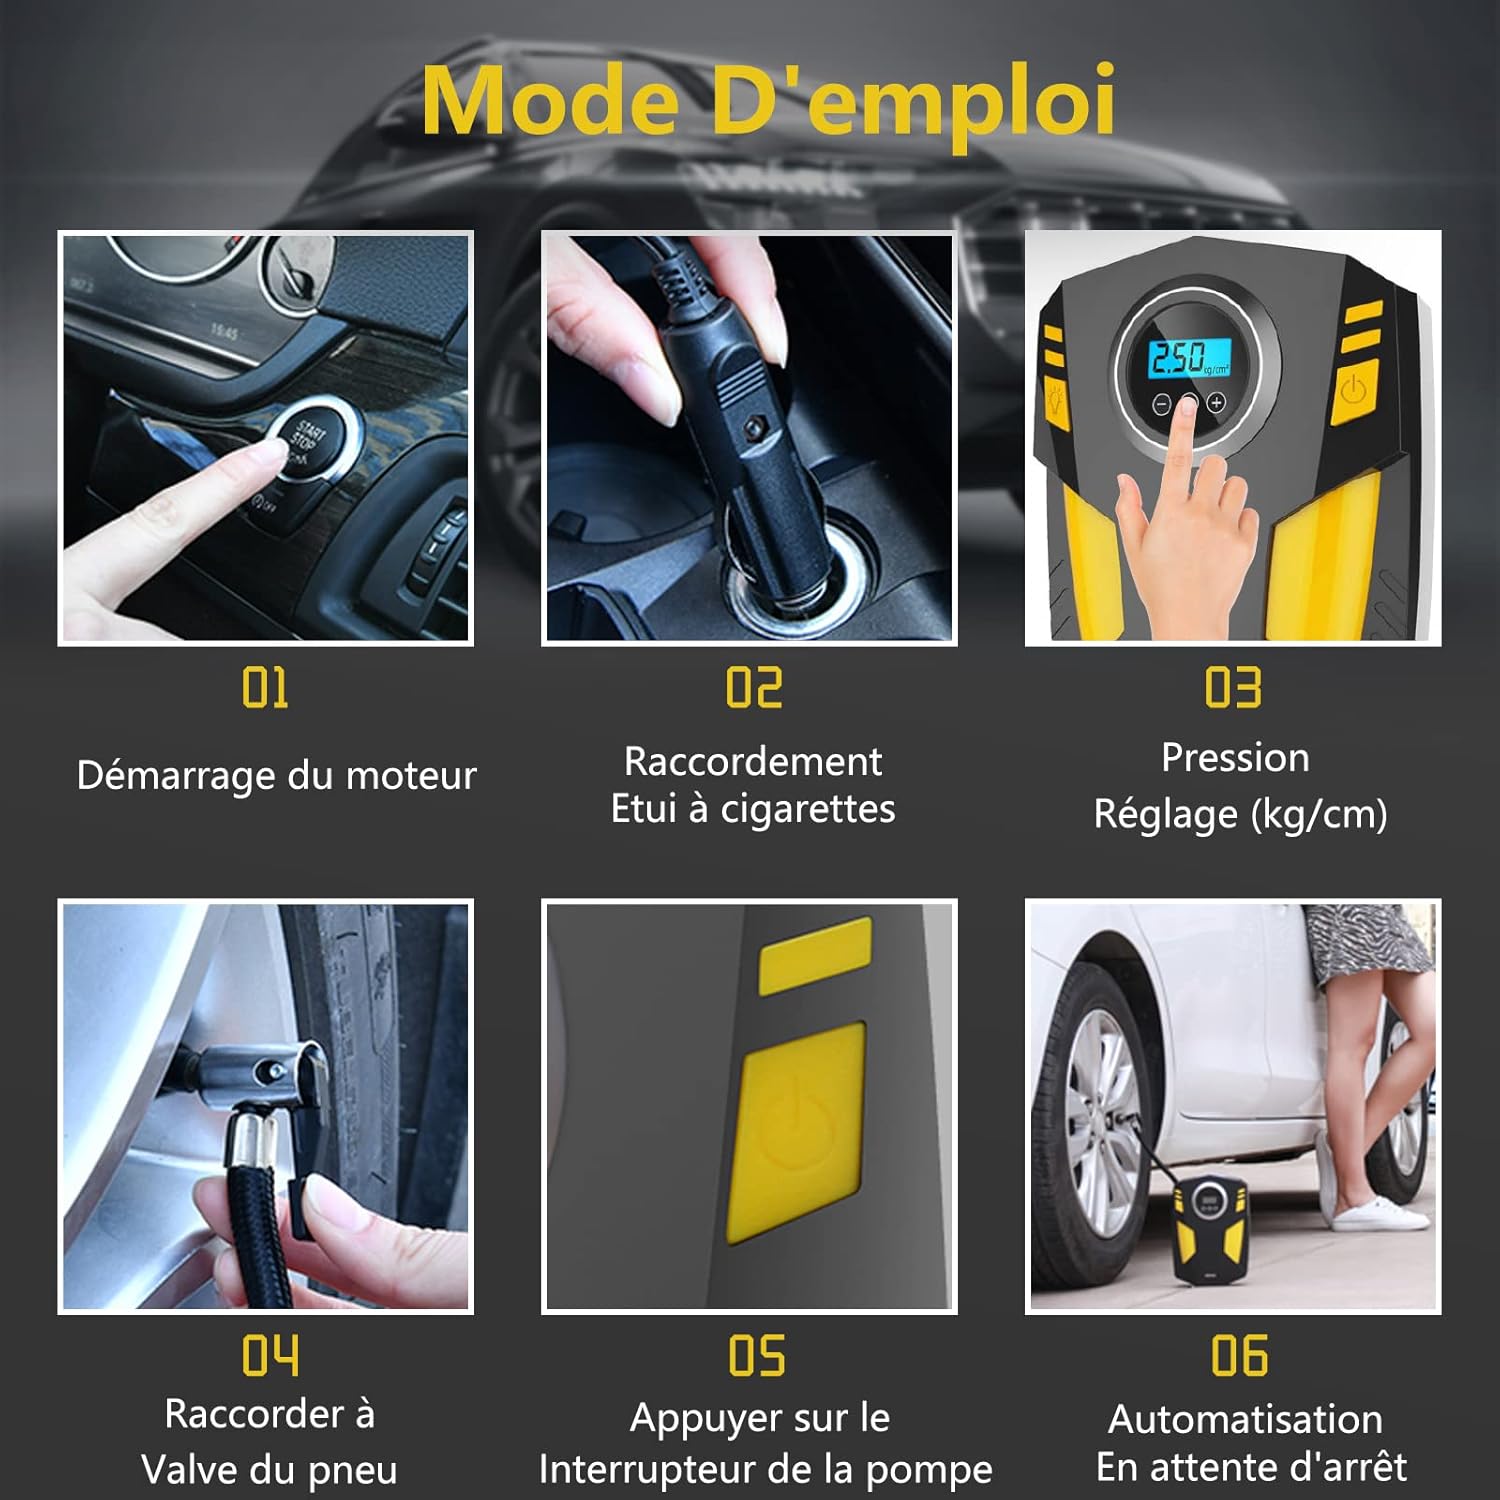
Image: Visual guide showing the six steps of operation: 1. Start engine, 2. Connect to cigarette lighter, 3. Set pressure, 4. Connect to tire valve, 5. Press pump switch, 6. Automatic stop.
7. Vielseitige Anwendungsmöglichkeiten
The SYTUNG Digital Portable Tire Inflator comes with multiple nozzle adapters, making it suitable for a wide range of inflation tasks:
- Automotive Tires: Suitable for compact cars, sedans, SUVs, and off-road vehicles.
- Motorradreifen: Inflate motorcycle tires quickly and efficiently.
- Fahrradreifen: Compatible with various bicycle tire types.
- Sportausrüstung: Inflate basketballs, footballs, and other sports balls.
- Schlauchboote: Perfect for air mattresses, inflatable boats, kayaks, and other recreational inflatables.

Image: Collage showing the inflator's versatility for bicycles, cars, motorcycles, sports balls, kayaks, and air mattresses.

Image: Illustration showing compatibility with various car types including sedans, SUVs, and MPVs, highlighting quick inflation time.
8. Wartung
Sicherungswechsel:
If the inflator stops working, the fuse may need to be replaced. The fuse is located within the tip of the 12V power adapter.
- Unplug the 12V power adapter from the car socket.
- Unscrew the tip of the 12V power adapter by rotating it counter-clockwise.
- Carefully remove the old fuse and replace it with the spare fuse provided (or a compatible 15A fuse).
- Screw the tip back on clockwise until secure.

Image: Diagram illustrating the process of unscrewing the adapter tip, removing the old fuse, and inserting a new one.
9. Fehlerbehebung
If you encounter issues with your SYTUNG Digital Portable Tire Inflator, refer to the following common problems and solutions:
| Problem | Mögliche Ursache | Lösung |
|---|---|---|
| Der Kompressor lässt sich nicht einschalten. | No power from 12V socket, blown fuse, loose connection. | Ensure car engine is running. Check 12V socket for power. Replace fuse in the adapter (see Maintenance). Ensure connection is secure. |
| Niedrige oder keine Inflation. | Air leak from connection, hose kinked, incorrect pressure setting. | Ensure the air hose is tightly screwed onto the valve. Check hose for kinks. Verify the preset pressure is higher than the current pressure. |
| Der Airbag-Generator überhitzt und schaltet sich ab. | Längerer, kontinuierlicher Gebrauch. | Allow the inflator to cool down for at least 10-15 minutes before resuming operation. Avoid continuous use for more than 10-15 minutes. |
| Ungenaue Druckanzeige. | Wackelkontakt, Sensorproblem. | Ensure the hose is securely connected to the valve. If issues persist, contact customer support. |

Image: A car parked on the side of a road, illustrating the inflator's utility in roadside emergencies.
10. Spezifikationen
| Besonderheit | Spezifikation |
|---|---|
| Marke | SYTUNG |
| Modell | ST-5002 |
| Stromquelle | 12V Gleichstrom (Zigarettenanzünder im Auto) |
| Maximaler Druck | 250 KPA (approximately 36 PSI) |
| Produktabmessungen (L x B x H) | 14.5 x 6 x 20.5 cm |
| Artikelgewicht | 740 g |
| Länge des Netzkabels | 3.5 Meter (11.5 Fuß) |
| Material | Acrylnitril-Butadien-Styrol |
| Betriebsart | Halbautomatisch |
11. Garantie und Support
SYTUNG products are manufactured to high-quality standards. For warranty information or technical support, please refer to the contact details provided with your purchase or visit the official SYTUNG website. Please have your model number (ST-5002) and purchase date available when contacting support.