
1. Einleitung
Vielen Dank für Ihren Einkauf.asing the Cook's Essentials Electric Mandoline Slicer and Dicer. This appliance is designed to simplify food preparation by quickly and efficiently slicing, shredding, and dicing various fruits, vegetables, and cheeses. This manual provides essential information for the safe and effective operation, maintenance, and care of your new electric mandoline slicer.
2. Wichtige Sicherheitshinweise
Bei der Verwendung von Elektrogeräten sollten immer grundlegende Sicherheitsvorkehrungen getroffen werden, um das Risiko von Bränden, Stromschlägen und/oder Verletzungen von Personen zu verringern. Dazu gehören die folgenden:
- Lesen Sie alle Anweisungen, bevor Sie das Gerät in Betrieb nehmen.
- Do not touch moving parts. Keep hands, hair, and clothing, as well as spatulas and other utensils, away from blades during operation to prevent injury and/or damage to the appliance.
- Always use the food pusher when feeding food into the chute. Never use fingers or other utensils.
- Ziehen Sie den Stecker aus der Steckdose, wenn Sie das Gerät nicht verwenden, bevor Sie Teile anbringen oder abnehmen und bevor Sie es reinigen.
- Tauchen Sie die Motorbasis nicht in Wasser oder andere Flüssigkeiten.
- Avoid contact with sharp blades. Handle blades with extreme care.
- Betreiben Sie kein Gerät mit beschädigtem Kabel oder Stecker oder nachdem das Gerät nicht richtig funktioniert oder fallen gelassen oder in irgendeiner Weise beschädigt wurde.
- Die Verwendung von Zubehör, das vom Hersteller nicht empfohlen oder verkauft wird, kann zu Bränden, Stromschlägen oder Verletzungen führen.
- Nicht im Freien verwenden.
- Lassen Sie das Kabel nicht über die Tisch- oder Thekenkante hängen oder heiße Oberflächen berühren.
- Dieses Gerät ist nur für den Hausgebrauch bestimmt.
3. Stückliste
The Cook's Essentials Electric Mandoline Slicer and Dicer includes the following components:
- Electric Mandoline Slicer Base
- Food Chute with Food Pusher
- 2-Quart Storage Container
- Seven (7) Interchangeable Blades:
- Thick Slice Blade
- Extra-Thick Slice Blade
- Thin Slice Blade
- Shred/Grate Blade
- Cube Blade
- Julienne Klinge
- Fine-Julienne Blade
- Reinigungsbürste
- Cube Insert Cleaner

Bild 3.1: Überview of the Cook's Essentials Electric Mandoline Slicer and Dicer with its various components, including the main unit, collection container, and several blades.
4. Einrichtung
- Komponenten auspacken: Nehmen Sie alle Teile vorsichtig aus der Verpackung. Bewahren Sie die Verpackung für die spätere Lagerung oder den Transport auf.
- Vor dem ersten Gebrauch reinigen: Wash all removable parts (blades, food pusher, chute, storage container) in warm, soapy water. Rinse thoroughly and dry completely. Wipe the motor base with a damp Tuch.
- Positionieren Sie die Basis: Place the electric mandoline slicer base on a clean, dry, and stable surface. Ensure the suction feet are firmly attached to the countertop for stability during operation.
- Attach Storage Container: Slide the 2-quart storage container into position beneath the slicing mechanism until it clicks securely into place. This container will collect the processed food.
- Gewünschte Klinge einsetzen: Select the appropriate blade for your desired cut. Carefully insert the blade into the designated slot on the top of the unit. Ensure it is seated firmly and correctly. Refer to Section 5 for blade selection.
- Attach Food Chute: Place the food chute onto the top of the unit, aligning it with the blade and securing it in place.
- Strom anschließen: Stecken Sie das Netzkabel in eine normale Steckdose. Das Gerät ist nun betriebsbereit.
5. Bedienungsanleitung
5.1 Blade Selection and Insertion
The mandoline slicer comes with seven distinct blades, each designed for a specific type of cut. Always handle blades by their plastic edges to avoid injury.
- Thick Slice Blade: For thicker slices of vegetables like potatoes or onions.
- Extra-Thick Slice Blade: For very thick slices, suitable for hearty vegetables.
- Thin Slice Blade: For delicate, thin slices of cucumbers, carrots, or radishes.
- Shred/Grate Blade: For shredding cheese, cabbage, or grating carrots.
- Cube Blade: For uniform cubes of vegetables like potatoes, onions, or bell peppers.
- Julienne Blade: For thin, matchstick-like strips of vegetables.
- Fine-Julienne Blade: For very fine, delicate matchstick strips.
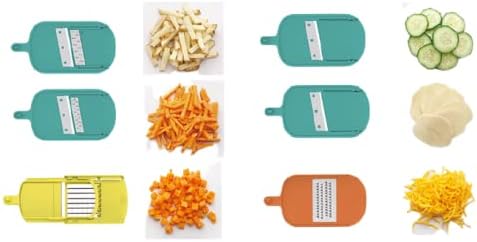
Image 5.1: Illustration of the different blade types and the resulting cuts, including slices, shreds, and cubes.
5.2 Lebensmittelzubereitung
- Wash and peel fruits or vegetables as required.
- Cut food items into pieces that fit comfortably into the feeding chute. Do not force large pieces into the chute.
- For best results, ensure food items are firm. Softer items may require chilling.
5.3 Slicing and Dicing Process
- With the desired blade and food chute in place, and the appliance plugged in, place the prepared food item into the feeding chute.
- Place the food pusher on top of the food item in the chute.
- Press and hold the power button located on the side of the unit. The powerful 150W motor will activate, moving the sliding carriage back and forth.
- Gently apply downward pressure on the food pusher to guide the food through the blade. Do not apply excessive force.
- Continue until all food is processed. The sliced or diced food will collect in the 2-quart storage container below.
- Zum Ausschalten des Geräts den Netzschalter loslassen.
- Unplug the appliance from the power outlet before removing the container or changing blades.
6. Reinigung und Wartung
Proper cleaning and maintenance will ensure the longevity and optimal performance of your electric mandoline slicer.
- Stecker ziehen: Vor der Reinigung muss das Gerät unbedingt vom Stromnetz getrennt werden.
- Zerlegen: Carefully remove the food pusher, food chute, blade, and storage container from the motor base.
- Abnehmbare Teile reinigen: Wash the food pusher, food chute, blades, and storage container in warm, soapy water. Use the provided cleaning brush to remove any food residue from the blades and crevices. For the cube blade, use the cube insert cleaner to dislodge trapped food. Rinse thoroughly and dry immediately to prevent rust on metal blades.
- Motorsockel reinigen: Wischen Sie die Außenseite des Motorgehäuses mit einem Tuch ab.amp Tuch. Tauchen Sie den Motorsockel niemals in Wasser oder andere Flüssigkeiten.
- Lagerung: Once all parts are clean and dry, reassemble the unit or store the blades safely in their protective covers. Store the appliance in a dry, safe place away from children.
7. Fehlerbehebung
| Problem | Mögliche Ursache | Lösung |
|---|---|---|
| Gerät lässt sich nicht einschalten. | Nicht angeschlossen; Problem mit der Steckdose; Kabel/Stecker beschädigt. | Ensure appliance is securely plugged in. Check power outlet with another device. Inspect cord and plug for damage; do not use if damaged. |
| Food is not slicing/dicing evenly. | Incorrect blade selection; food not properly prepared; dull blade. | Ensure the correct blade is used for the desired cut. Cut food to fit chute and apply even pressure. Blades are sharp, but if performance degrades, contact customer support. |
| Food gets stuck in the chute or blade. | Overfilling chute; food too soft; residue buildup. | Do not overfill the chute. Chill softer foods before processing. Clean blades and chute thoroughly after each use. |
| Das Gerät vibriert übermäßig. | Unstable surface; suction feet not engaged. | Ensure the appliance is on a flat, stable surface. Press down on the unit to engage the suction feet firmly to the countertop. |
8. Spezifikationen
- Modellnummer: K-45550
- Motorleistung: 150 W
- Dimensions (Mandoline): Approximately 13" (H) x 14.5" (L) x 6.25" (W)
- Gewicht: Approximately 5 lbs, 4 oz
- Kabellänge: 41 Zoll
- Storage Container Capacity: 2 Liter
- Klingenmaterial: Metall
- Betriebsmodus: Electric, Push-button
9. Garantie und Support
For warranty information or product support, please refer to the documentation included with your purchase or contact Cook's Essentials customer service directly. Keep your purchase receipt as proof of purchase for any warranty claims.


