1. Einführung und Endeview
The Godox V860III-S is an advanced TTL 2.4G GN60 HSS camera flash designed for Sony cameras. This speedlite features a powerful lithium battery, a 10-speed adjustable modeling light, and a quick switch for TTL and manual modes. It is engineered to provide reliable and versatile lighting solutions for various photographic needs.
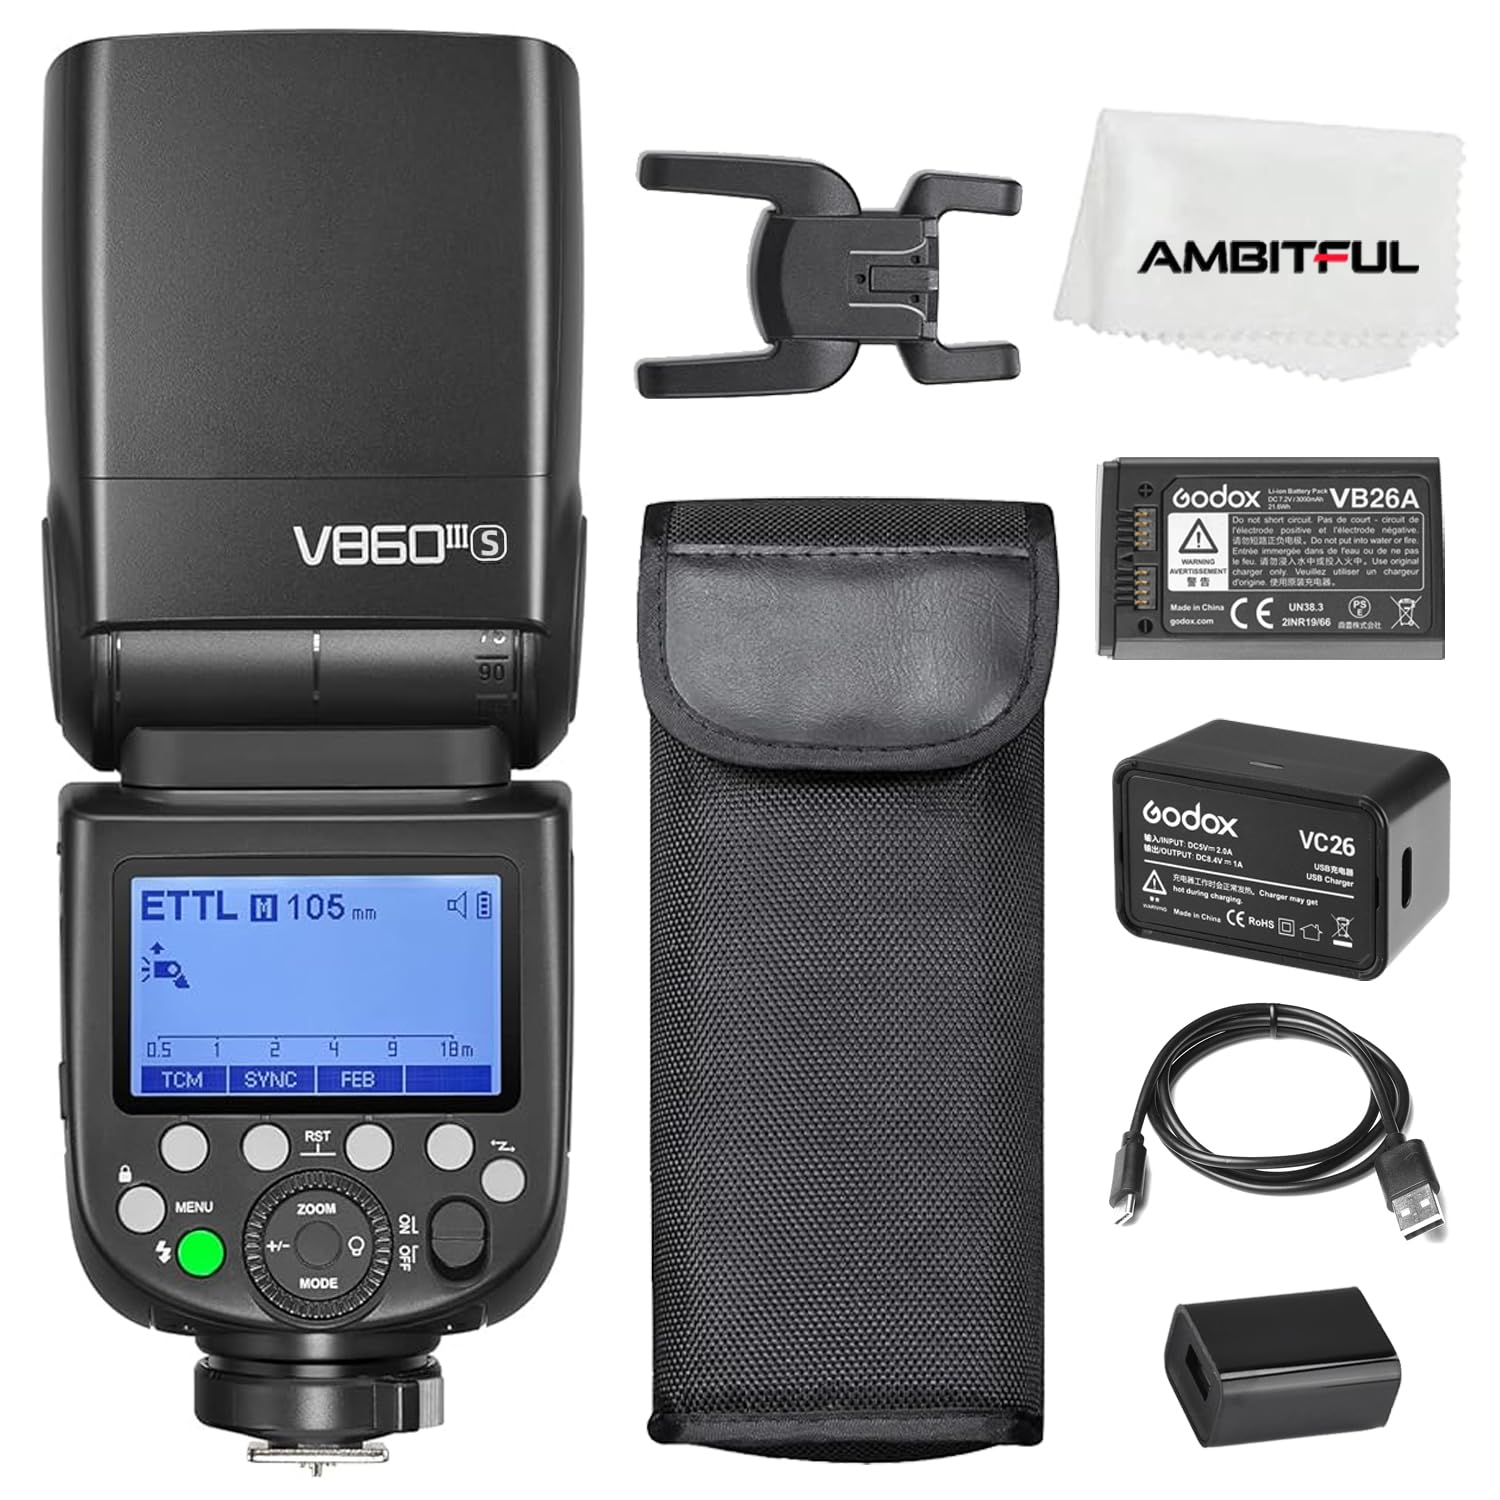
Figure 1: Godox V860III-S TTL 2.4G GN60 HSS Camera Flash for Sony.
2. Packungsinhalt
Prüfen Sie, ob alle Artikel in Ihrem Paket enthalten sind:
- Blitzgerät ×1
- Lithiumbatterie ×1
- Ladegerät ×1
- USB-Kabel ×1
- Bedienungsanleitung ×1
- Mini-Ständer ×1
- USB-Akkuladegerät ×1
- Schutzhülle ×1

Figure 2: All components included in the Godox V860III-S package.
3. Hauptmerkmale
- Integriertes Modellierlicht: Ein nach vorn gerichtetes Einstelllicht mit 10 Helligkeitsstufen zur Vorvisualisierung und zum Mischen mit Umgebungslicht.
- Schneller TTL/Manuell-Umschalter: A dedicated button on the side allows for rapid switching between TTL automatic mode and manual flash mode.
- Verbesserte Akkuleistung: Features a 7.2V / 2600mAh lithium battery, offering a 1.5s recycling time and approximately 450 full-power flashes. The battery is interchangeable with the Godox V1.
- Schnellverschluss: An updated quick lever mechanism for secure and swift attachment/detachment of the flash unit to your camera's hot shoe.
- Godox 2.4G Wireless X System: Built-in transmitter and receiver functions for flexible wireless control across various scenarios.
- TCM Conversion Feature: Enables instant conversion from TTL mode to manual mode, retaining flash output settings for efficient lighting setup.
- Multi-angle Flexible Adjustment: The flash head can rotate vertically from -7° to 120° and horizontally from 0° to 330° for versatile lighting techniques.

Figure 3: The built-in 2W LED modeling light with adjustable brightness.

Figure 4: Detail of the one-click TTL/M switchover and the quick release hot shoe lock.

Figure 5: High-capacity lithium battery provides fast recycle times and numerous full-power flashes.
4. Einrichtung
4.1 Einlegen der Batterie
- Stellen Sie sicher, dass das Blitzgerät ausgeschaltet ist.
- Locate the battery compartment on the side of the flash.
- Insert the VB26 Lithium Battery, ensuring correct polarity.
- Verschließen Sie das Batteriefach fest.
4.2 Montage an der Kamera
- Schieben Sie das Blitzgerät auf den Blitzschuh Ihrer Kamera.
- Engage the quick release lock lever to secure the flash in place.
- Ensure the flash is firmly attached before operation.

Figure 6: The Godox V860III-S flash unit securely mounted on a camera.
5. Bedienung
This section details the various operational aspects of your Godox V860III-S flash unit. For a visual guide, please refer to the embedded video below.
Video 1: Godox V860III Flash Operation Tutorial. This video provides a comprehensive guide to the flash's functions and settings.
5.1 Grundlegende Bedienelemente
- Ein-/Ausschalten: Press and hold the power button to turn the flash on or off. The flash defaults to TTL mode upon startup.
- Modusauswahl: Press the 'MODE' button to cycle through TTL, Manual (M), and Multi-flash modes.
- Belichtungsausgleich: In TTL mode, press the '+/-' button and turn the dial to adjust the exposure compensation value. Confirm with the setting button.
- Zoomeinstellung: Press the 'ZOOM' button and turn the dial to adjust the focal distance of the light head. Confirm with the setting button.
5.2 Einstelllicht
To activate the modeling light:
- Press the modeling light button.
- Press the setting button in the middle to turn the modeling light on/off.
- Turn the dial to adjust the brightness from 1 to 10 levels.

Figure 7: Visual representation of the 10-level adjustable modeling light.
5.3 Erweiterte Funktionen
- TCM Conversion: Press the 'TCM' button to switch between TTL and Manual mode while retaining the flash output from TTL.
- Synchronisierungsmodi: Press the 'SYNC' button to activate high-speed sync and rear-curtain sync modes.
- FEB Mode: Press the 'FEB' button to enable Flash Exposure Bracketing, allowing you to shoot three images with correct, under, and over exposure.
- S1/S2 Flash Mode: In manual mode, press the 'S1/S2' button to select S1 or S2 optical slave flash modes.
- Mehrfachblitzmodus: In MULTI mode, press the 'Times' button to adjust flash times and the 'Hz' button to adjust flash frequency. Use the '+/-' dial to adjust flash output.
5.4 Wireless Connectivity (Godox 2.4G X System)
The V860III-S features a built-in Godox 2.4G Wireless X System for remote control. To set up wireless communication:
- Turn on the V860III-S.
- Press the 'MENU' button and turn the dial to select 'CH' (Channel) or 'ID'.
- Set the channel to '18' and ID to '01' (or desired values) and confirm with the setting button.
- Set one flash as a transmitter unit (e.g., Group A) and another as a receiver unit (e.g., Group B).
- Ensure both units have matching channel and ID settings.
- Adjust the settings of the receiver flash from the transmitter flash.

Figure 8: Wireless lighting control using the Godox 2.4G X System.
6. Wartung
- Das Gerät trocken halten. Nicht mit nassen Händen anfassen oder in Wasser tauchen.
- Vermeiden Sie starke Stöße und das Fallenlassen des Geräts.
- Außerhalb der Reichweite von Kindern aufbewahren.
- Clean the flash head and body with a soft, dry cloth. Do not use solvents or harsh chemicals.
- Store the flash in a cool, dry place when not in use. Remove the battery if storing for extended periods.
7. Fehlerbehebung
- Blitz zündet nicht: Check battery level, ensure flash is securely mounted, and verify camera settings (e.g., flash enabled, shutter speed within sync limits).
- Falsche Belichtung: Adjust flash output or exposure compensation. Ensure flash mode (TTL/M) is appropriate for the shooting conditions.
- Probleme mit der drahtlosen Verbindung: Verify that both transmitter and receiver units are on the same channel and ID. Check for obstructions or interference.
- Blitzartige Überhitzung: Allow the flash to cool down if it has been used for rapid consecutive flashes. Reduce flash power or increase recycle time.
7.1 Resetting Settings
Um die Blitzparameter auf die Standardeinstellungen zurückzusetzen, halten Sie die zweite und dritte Taste gleichzeitig gedrückt, bis „RESET“ auf dem Display erscheint.
7.2 Locking the Control Panel
To lock or unlock the control panel, long-press the 'MENU' button. "LOCKED" will appear on the display when activated.
7.3 Clearing Menu Settings
To clear the menu settings, long-press the 'CLEAR' button (indicated on the display) until "OK" appears.
8. Spezifikationen
| Besonderheit | Detail |
|---|---|
| Marke | GODOX |
| Modellnummer | V860III-S |
| Kompatible Halterungen | Sony |
| Leitzahl | 60 |
| Blitzsynchronisationsgeschwindigkeit | 1/250 Sekunden |
| Art der Expositionskontrolle | Automatic, Manual, High-Speed Sync |
| Wireless-Technologie | RF (2.4G Godox X System) |
| Anzahl Batterien | 1 Lithium-Ionen-Akku erforderlich |
| Artikelgewicht | 500 Gramm |
| Hardware-Schnittstelle | USB Typ C |
| Lichtempfindlichkeit | ISO 100-25600 |
| ViewSuchtyp | LCD Bildschirm |
| Wasserbeständigkeit | Nicht wasserfest |
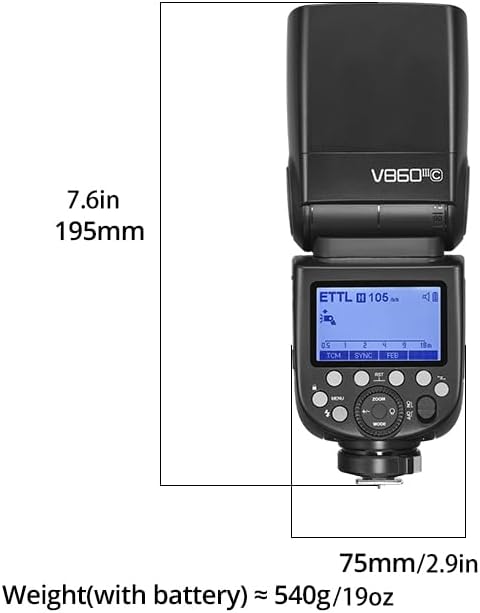
Figure 9: Product dimensions and weight for the Godox V860III-S.
9. Garantie und Support
The Godox V860III-S comes with a one-year warranty. For warranty claims, technical support, or further assistance, please contact your retailer or visit the official GODOX webWebsite. Weitere Informationen und Produkte finden Sie auch auf der Website. GODOX Store auf Amazon.