1. Einleitung
The BENNING CM 2-1 is a True RMS current clamp multimeter designed for precise electrical measurements in various applications. This device offers accurate current measurement up to 400 A AC/DC and voltage measurement up to 600 V AC/DC. Key features include an AutoV function with low input impedance (LoZ) to suppress reactive voltage and a low pass filter (HFR high frequency suppression) for measurements on clocked motor drives. It is rated for measurement categories CAT IV 300 V and CAT III 600 V, ensuring safety and reliability.
2. Sicherheitshinweise
WARNING: Read and understand all safety information and operating instructions before using this instrument. Failure to follow these instructions could result in severe injury or death.
- Beachten Sie stets die lokalen und nationalen Sicherheitsvorschriften.
- Verwenden Sie das Multimeter nicht, wenn es beschädigt erscheint oder die Isolierung der Messleitungen beschädigt ist.
- Stellen Sie sicher, dass die richtige Funktion und der richtige Messbereich ausgewählt sind, bevor Sie Messungen durchführen.
- Die maximalen Eingangsgrenzen für keine Funktion dürfen überschritten werden.
- Seien Sie vorsichtig im Umgang mit Vol.tages above 30 V AC RMS, 42 V AC peak, or 60 V DC, as these pose a shock hazard.
- Always disconnect the test leads from the circuit before changing the function switch.
- Tauschen Sie die Batterien aus, sobald die Anzeige für niedrigen Batteriestand erscheint, um genaue Messwerte zu gewährleisten.
- The device is rated CAT IV 300 V and CAT III 600 V. Understand these categories and use the meter only in appropriate environments.
3. Packungsinhalt
Prüfen Sie beim Auspacken, ob alle Artikel vorhanden und unbeschädigt sind:
- BENNING CM 2-1 True RMS Current Clamp Multimeter
- Protective carrying bag
- Satz Messleitungen (rot und schwarz)
- 2 AAA batteries (pre-installed or included separately)

Image 3.1: The BENNING CM 2-1 multimeter shown with its protective carrying bag and test leads.
4. Produktüberschreitungview
The BENNING CM 2-1 features a compact design with a clear digital display, a rotary function switch, and control buttons for various measurement modes.
4.1. Bedienelemente und Anzeige
- Clamp Kiefer: Zur berührungslosen Messung von Wechsel- und Gleichstrom.
- Drehschalter: Selects measurement functions (OFF, LoZ, AutoV, V~, V-, Hz, Ω, A~, A-).
- HOLD/MIN MAX Button: Freezes the current reading or displays minimum/maximum values.
- AC/DC HFR/ZERO Button: Toggles between AC/DC current, activates the low pass filter (HFR), or zeros the DC current reading.
- Anzeige: Digital readout for measurement values, units, and indicators.
- Input Jacks (COM, VΩ): Zum Anschließen von Messleitungen für Voltage, resistance, and other measurements.
5. Einrichtung
5.1. Einlegen der Batterie
The BENNING CM 2-1 requires 2 AAA batteries. These are typically included with the device.
- Stellen Sie sicher, dass das Multimeter ausgeschaltet ist.
- Suchen Sie das Batteriefach auf der Rückseite des Geräts.
- Verwenden Sie einen Schraubendreher, um die Abdeckung des Batteriefachs zu öffnen.
- Legen Sie die 2 AAA-Batterien ein und achten Sie dabei auf die richtige Polarität (+/-), wie im Batteriefach angegeben.
- Bringen Sie die Batteriefachabdeckung wieder an und sichern Sie sie mit der Schraube.
6. Bedienungsanleitung
6.1. Wechsel-/Gleichstrommessung (Clamp)
To measure AC or DC current without breaking the circuit:
- Turn the rotary switch to the “A~” or “A-” position.
- Press the AC/DC HFR/ZERO button to select AC or DC current if necessary. For DC current, press and hold to zero the display before measurement.
- Öffne dieamp Die Backe umschließt einen einzelnen Leiter. Stellen Sie sicher, dass die Backe vollständig geschlossen ist.
- Lesen Sie den aktuellen Wert auf dem Display ab.
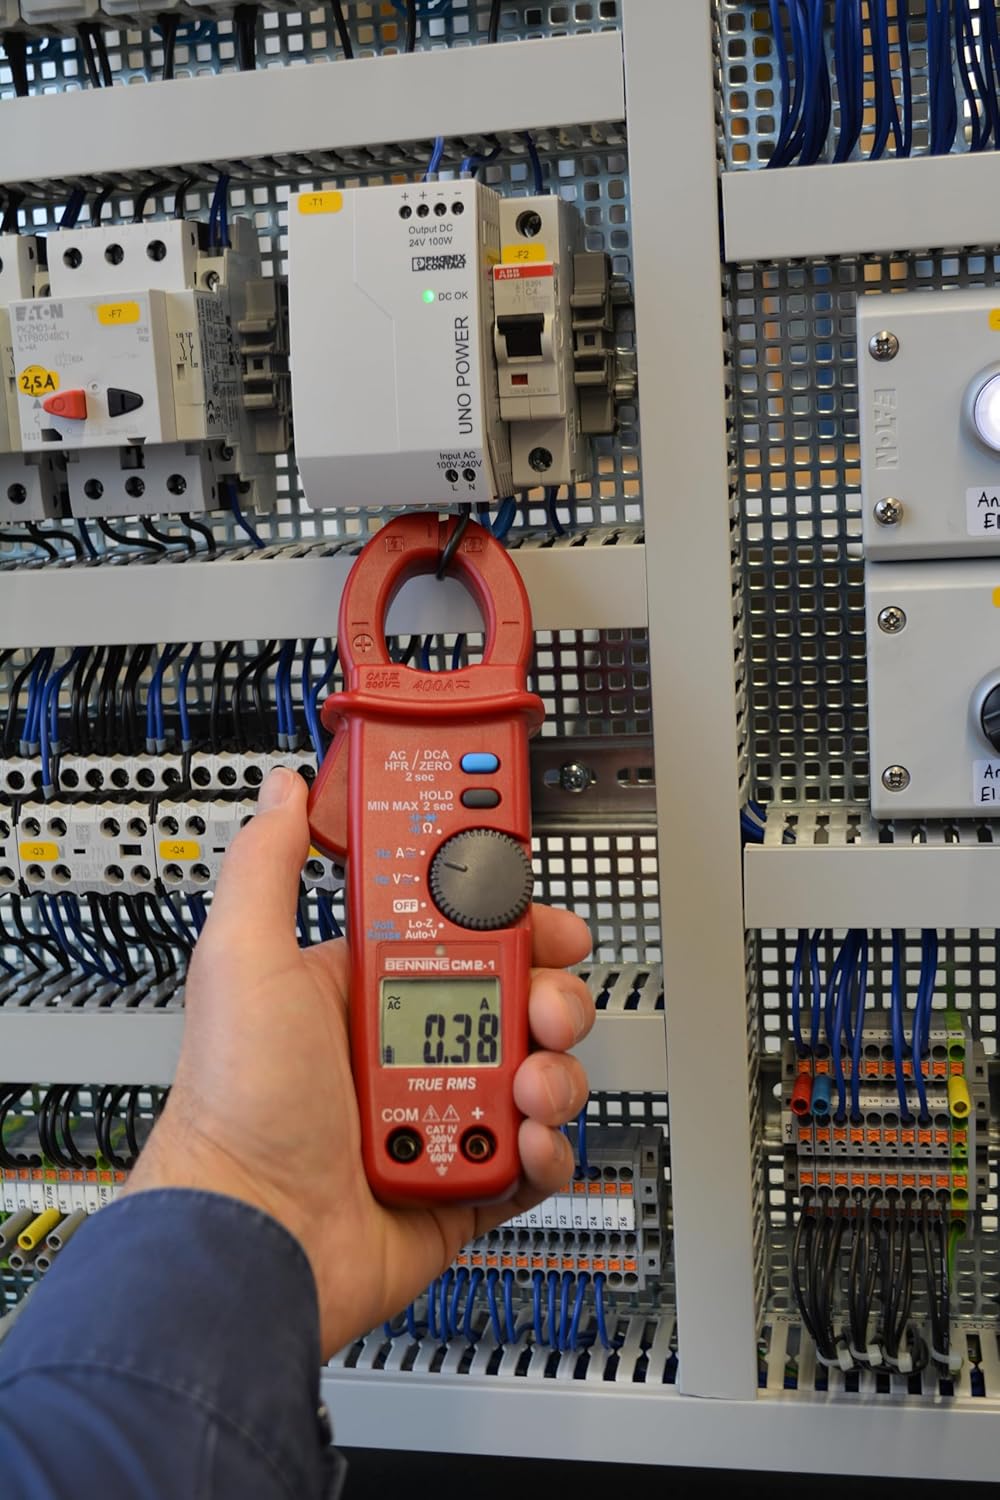
Image 6.1: The multimeter measuring current by clamping around a single conductor in an electrical panel.
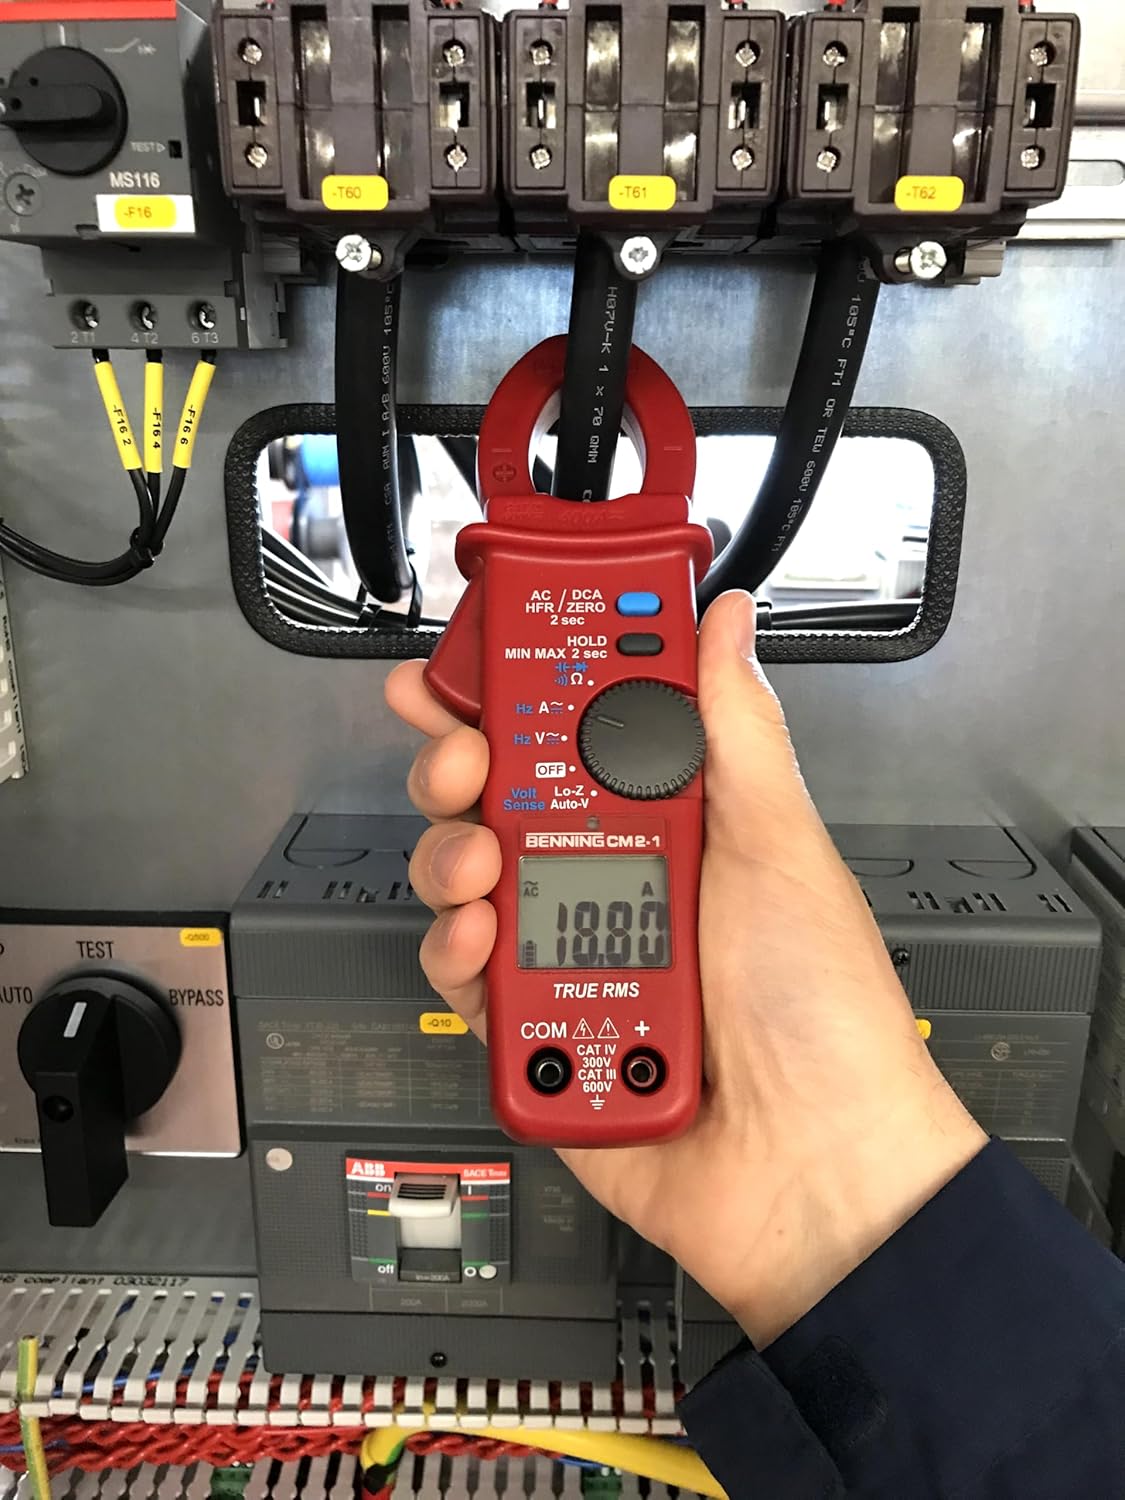
Image 6.2: A close-up of the BENNING CM 2-1 displaying a current measurement of 10.07 A.
6.2. AC/DC-Voltage Messung
Zur Messung von AC- oder DC-Voltage:
- Insert the red test lead into the VΩ jack and the black test lead into the COM jack.
- Turn the rotary switch to the “V~” for AC voltage or “V-” for DC voltage.
- Schließen Sie die Messspitzen an den zu messenden Stromkreis oder das zu messende Bauteil an.
- Lesen Sie den Bandtage-Wert auf dem Display.

Image 6.3: The multimeter measuring voltage using test leads connected to terminals within an electrical cabinet.

Image 6.4: A close-up of the BENNING CM 2-1 displaying a voltage measurement of 124.00 V.
6.3. AutoV Function (LoZ)
The AutoV function with low input impedance (LoZ) helps to suppress 'ghost voltages' or 'reactive voltages' that can appear on unused wires or open circuits due to capacitive coupling. To use:
- Insert the red test lead into the VΩ jack and the black test lead into the COM jack.
- Turn the rotary switch to the “LoZ” position. The meter will automatically detect AC or DC voltage.
- Connect the test probes across the circuit.
- Lesen Sie den Bandtage-Wert auf dem Display.
6.4. Low Pass Filter (HFR)
The HFR (High Frequency Rejection) low pass filter is used for stable and accurate measurements on variable frequency drives (VFDs) or other noisy electrical environments. To activate:
- Select the desired AC current (A~) or AC voltage (V~) function.
- Press and hold the AC/DC HFR/ZERO button until “HFR” appears on the display.
- Proceed with your measurement as usual. The filter will suppress high-frequency noise components.
7. Wartung
7.1. Reinigung
Löschen Sie den Fall mit Anzeigeamp Mit einem Tuch und mildem Reinigungsmittel reinigen. Keine Scheuermittel oder Lösungsmittel verwenden. Das Gerät vor Gebrauch vollständig trocknen.
7.2. Batteriewechsel
Wenn die Anzeige für niedrigen Batteriestand erscheint, tauschen Sie die Batterien umgehend aus, um einen weiterhin präzisen Betrieb zu gewährleisten. Hinweise zum Einlegen der Batterien finden Sie in Abschnitt 5.1.
8. Fehlerbehebung
- Kein Bildschirm: Überprüfen Sie den Einbau und den Ladezustand der Batterie. Tauschen Sie die Batterien gegebenenfalls aus.
- Falsche Messwerte: Ensure correct function and range are selected. Check test lead connections. Verify the clamp jaw is fully closed for current measurements.
- “OL” on Display: Indicates an overload (measurement exceeds the selected range). Select a higher range or ensure the input is within the device's specifications.
- Instabile Messwerte: Ensure good contact with test probes. For current measurements, ensure only one conductor is within the clamp jaw. Consider using the HFR function in noisy environments.
9. Spezifikationen
| Spezifikation | Wert |
|---|---|
| Hersteller | BENNING |
| Modellnummer | 044689 |
| Artikelgewicht | 480 g |
| Produktabmessungen (L x B x H) | 17 x 5 x 13 cm |
| Batterien | 2 AAA-Batterien (im Lieferumfang enthalten) |
| Batteriezellentyp | Alkalisch |
| Farbe | Rot |
| Stil | Digitales |
| Stromquellentyp | Batteriebetrieben |
| Messtyp | Multimeter (True RMS) |
| Max. AC/DC Current | 400 A |
| Max. AC/DC Voltage | 600 V |
| Messkategorie | CAT IV 300 V, CAT III 600 V |
| Sicherheitsstandard | EN 61010-1 |
| Im Lieferumfang enthaltene Komponenten | Benning CM 2-1, bag, test leads, batteries |
10. Garantie und Support
BENNING products are manufactured to high-quality standards. For specific warranty information, please refer to the documentation provided with your purchase or visit the official BENNING website. For technical support, service, or inquiries, please contact your local BENNING distributor or customer service department.