Einführung
The Keychron Q2 is a fully customizable wired mechanical keyboard featuring a compact 65% layout. Constructed with a solid full aluminum frame, the Q2 is designed for easy assembly and offers a premium typing experience. It supports full QMK and VIA programming for extensive customization and features hot-swappable switches for personalized tactile feedback.

Image: The Keychron Q2 Wired Custom Mechanical Keyboard, showcasing its compact 65% layout and blue color scheme.
Installationshandbuch
1. Packungsinhalt
Vor Beginn der Arbeiten sicherstellen, dass alle Komponenten vorhanden sind:
- Keychron Q2 Keyboard Kit (Aluminum Case, PCB, Steel Plate, Sound Absorbing Foam, Case Foam, Gaskets)
- USB-Typ-C-auf-Typ-C-Kabel
- USB-Typ-A-zu-Typ-C-Adapter
- Abzieher wechseln
- Tastenkappenabzieher
- Schraubendreher
- Inbusschlüssel
- Stabilizers (4 sets)
Note: All tools are typically located at the bottom of the packaging.

Image: Diagram illustrating the contents of the Keychron Q2 package, including the keyboard, cables, and tools.
2. Anschließen der Tastatur
- Locate the USB Type-C port on the back of the Keychron Q2 keyboard.
- Connect one end of the provided USB Type-C to Type-C cable to the keyboard.
- Connect the other end of the cable to your computer's USB Type-C port. If your computer only has USB Type-A ports, use the included USB Type-A to Type-C adapter.
- Ensure the operating system switch (located on the back edge of the keyboard) is set to the correct position for your system (Mac or Windows).
- Die Tastatur wird von Ihrem Betriebssystem automatisch erkannt.

Bild: Eine Nahaufnahme view of the Keychron Q2 keyboard with a USB-C cable connected, showing the Mac/Win switch.
Bedienungsanleitung
1. QMK/VIA-Anpassung
The Keychron Q2 supports full QMK and VIA programming, allowing you to remap keys, create macros, and customize lighting effects. To use VIA software:
- Download the VIA software from the official Keychron webSeite? ˅ (keychron.com/pages/qmk-via).
- Connect your Q2 keyboard to your computer via the USB cable.
- Launch the VIA software. The software should automatically detect your Q2 keyboard. If not, you may need to import the Q2 keymap JSON file, also available on the Keychron webWebsite.
- Use the graphical interface to drag and drop functions, assign macros, and configure lighting for each key. Changes are applied in real-time.

Image: Screenshot of the VIA software interface, demonstrating how to remap keys on the Keychron Q2 keyboard.
2. Hot-Swap-fähige Schalter
The Q2's PCB supports both 3-pin and 5-pin MX style mechanical switches, allowing for easy switch replacement without soldering.
- Entfernen Sie mithilfe des mitgelieferten Tastenkappenabziehers vorsichtig die Tastenkappe von dem Schalter, den Sie ersetzen möchten.
- Use the provided switch puller to gently grip the top and bottom clips of the switch. Pull the switch straight up to remove it from the PCB.
- Richten Sie die Pins des neuen Schalters an den Löchern auf der Leiterplatte aus. Achten Sie darauf, dass die Pins gerade sind, um ein Verbiegen zu vermeiden.
- Drücken Sie den neuen Schalter fest ein, bis er einrastet.
- Bringen Sie die Tastenkappe wieder an.

Bild: Eine Nahaufnahme view of the Keychron Q2's PCB with several switches removed, demonstrating the hot-swappable feature.
3. Keycaps and RGB Lighting
The Q2 comes with premium non-shine-through PBT keycaps, known for their durability and oil resistance. The keyboard features south-facing RGB LEDs, designed to provide better illumination of the backlight from the typist's perspective.
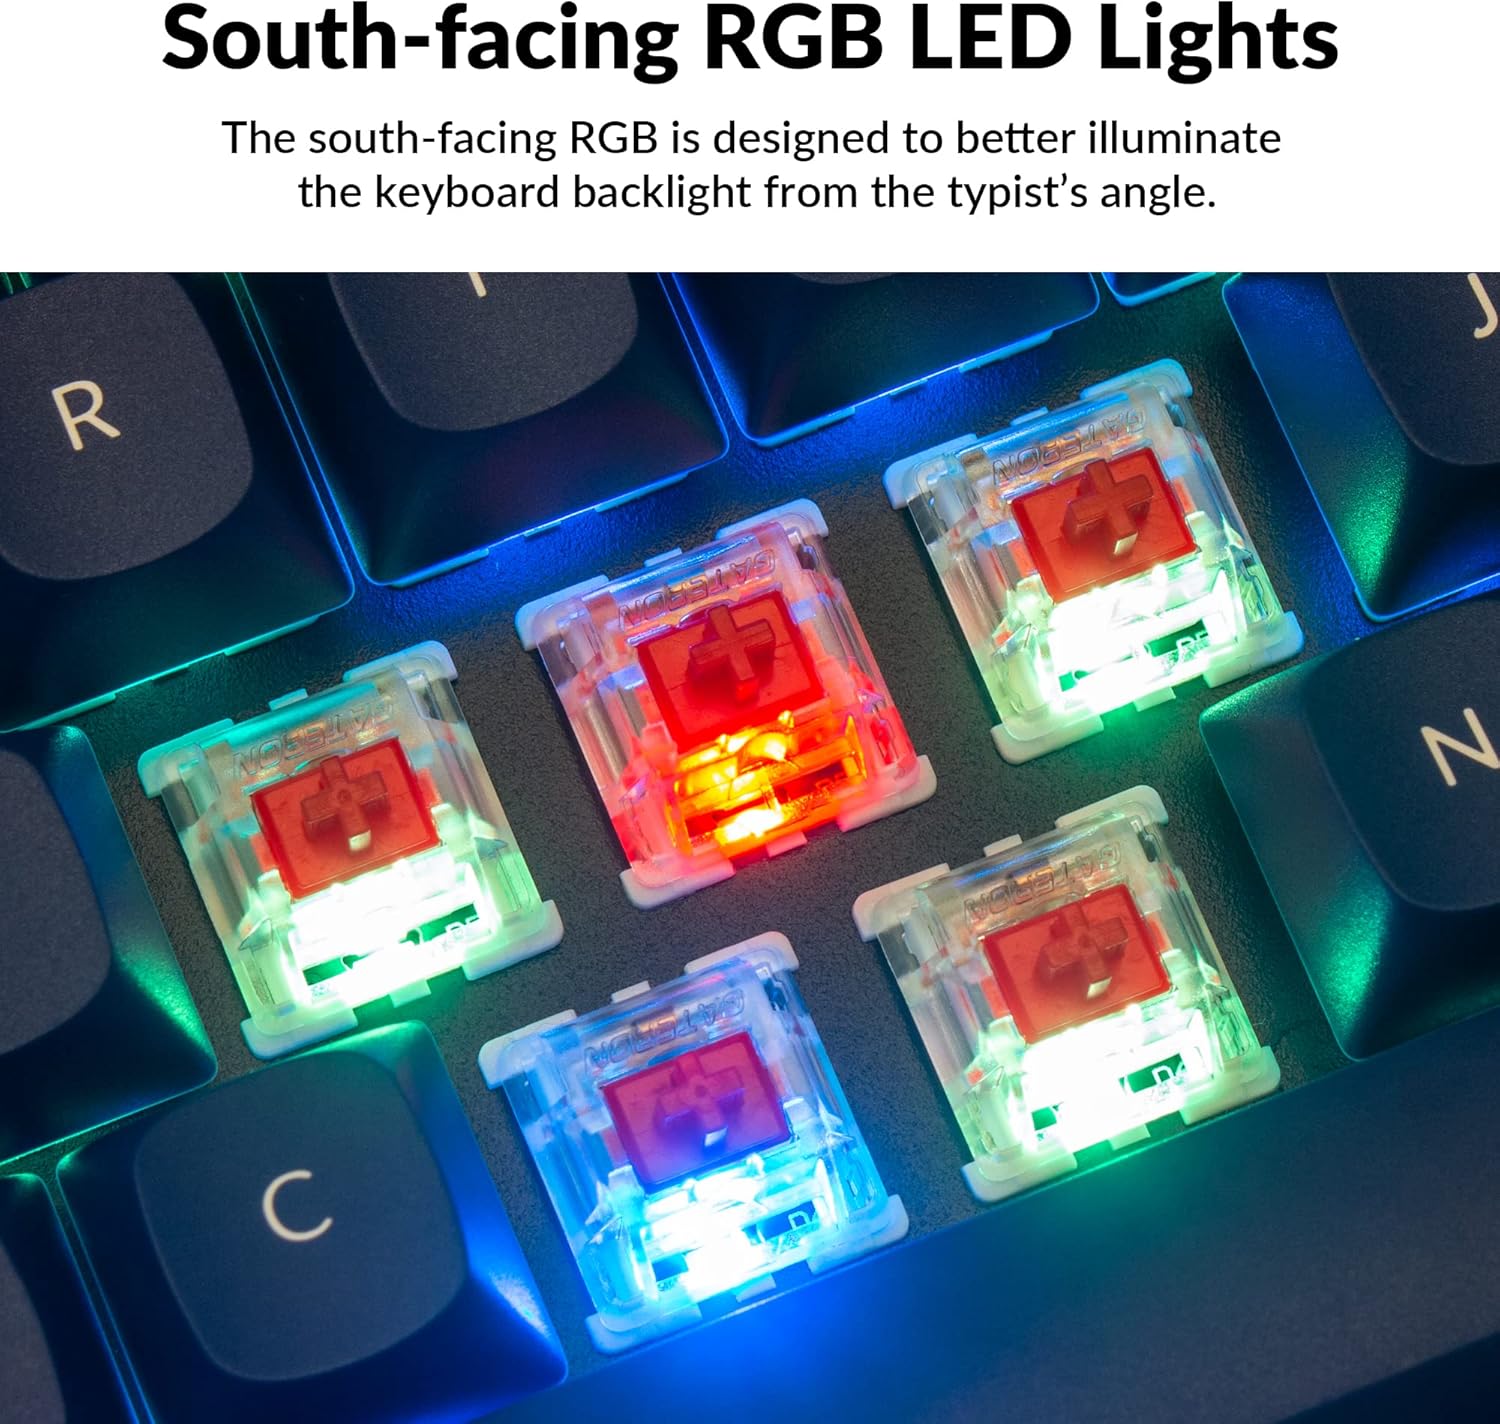
Bild: Eine detaillierte view of the Keychron Q2's double-shot PBT keycaps, highlighting their texture and legends.

Image: A close-up of the Keychron Q2's south-facing RGB LEDs illuminating the switches from below.
Wartung
1. Reinigung der Tastatur
Regelmäßige Reinigung trägt dazu bei, die Leistungsfähigkeit und das Aussehen der Tastatur zu erhalten.
- Staubentfernung: Verwenden Sie eine Dose Druckluft, um Staub und Schmutz zwischen den Tastenkappen wegzublasen.
- Tastenkappenreinigung: For deeper cleaning, remove the keycaps using the provided keycap puller. Wash them with mild soap and water, then ensure they are completely dry before reattaching.
- Gehäusereinigung: Wischen Sie das Aluminiumgehäuse mit einem weichen, fusselfreien Tuch ab.amp Tuch. Vermeiden Sie aggressive Chemikalien, die die Oberfläche beschädigen könnten.
2. Switch and Stabilizer Maintenance
The hot-swappable design allows for easy maintenance of switches and stabilizers.
- Schalteraustausch: If a switch becomes faulty, replace it using the hot-swapping procedure described in the Operating Instructions.
- Stabilisatorschmierung: For optimal performance and reduced wobbliness on larger keys (space bar, shift, enter), the PCB-mounted screw-in stabilizers can be lubricated. This typically involves disassembling the keyboard to access the stabilizers.

Image: An exploded diagram of the Keychron Q2, showing its various components like keycaps, switches, top case, gaskets, plate, PCB, sound absorbing foam, case foam, bottom case, and silicone gaskets, illustrating ease of disassembly.
Fehlerbehebung
Häufige Probleme und Lösungen:
- Tastatur reagiert nicht:
- Stellen Sie sicher, dass das USB-Kabel sowohl mit der Tastatur als auch mit dem Computer fest verbunden ist.
- Verify the Mac/Windows switch on the back of the keyboard is set to the correct operating system.
- Try connecting the keyboard to a different USB port or a different computer to rule out port issues.
- Starten Sie Ihren Computer neu.
- Bestimmte Tasten funktionieren nicht:
- Remove the keycap and switch for the non-functional key. Inspect the switch pins for bends or damage. Straighten bent pins carefully or replace the switch if damaged.
- Stellen Sie sicher, dass der Schalter vollständig in der Leiterplatte eingerastet ist.
- Check VIA software to ensure the key has not been accidentally remapped or disabled.
- RGB-Beleuchtungsprobleme:
- Stellen Sie sicher, dass die Tastatur ordnungsgemäß angeschlossen ist.
- Use the VIA software to check and adjust lighting settings.
- Perform a factory reset if lighting issues persist (refer to Keychron's official support for specific reset procedures).
- Keyboard Disconnecting Randomly:
- Versuchen Sie es mit einem anderen USB-Kabel.
- Ensure the USB port on your computer is stable and providing sufficient power.
- Aktualisieren Sie die USB-Treiber Ihres Computers.
If you encounter issues not covered here, please refer to the official Keychron support resources.
Technische Daten
| Besonderheit | Detail |
|---|---|
| Marke | Schlüsselchron |
| Modellname | Q2 |
| Modellnummer | Q2-J1 |
| Tastaturlayout | 65% (68 Keys), QWERTY |
| Konnektivitätstechnologie | Kabelgebunden (USB-A, USB-C) |
| Kompatible Geräte | PC (Linux, MacOS, Windows) |
| Schaltertyp | Gateron G Pro Red (Linear), Hot-swappable |
| Hintergrundbeleuchtung | RGB (Südausrichtung) |
| Material | Full Aluminum Frame, PBT Keycaps |
| Technische Daten | 12.89 Zoll L x 4.76 Zoll B x 1.33 Zoll H |
| Besondere Merkmale | QMK/VIA Programmable, Double Gasket Design |
Garantieinformationen
Keychron products typically come with a standard manufacturer's warranty. For detailed information regarding the warranty period, coverage, and terms and conditions for your Keychron Q2 keyboard, please refer to the official Keychron webDie Website oder die Ihrem Produkt beiliegende Garantiekarte finden Sie hier. Bewahren Sie Ihren Kaufbeleg für Garantieansprüche auf.
Support und Ressourcen
For further assistance, software downloads (VIA), firmware updates, and frequently asked questions, please visit the official Keychron support page:
- Keychron Offiziell WebWebsite: www.keychron.com
- QMK/VIA Software & Firmware: www.keychron.com/pages/qmk-via
- Keychron Store: Visit the Keychron Store on Amazon
You can also find community forums and additional user guides online for advanced customization and troubleshooting tips.