
1. Einleitung
Thank you for choosing the AstroAI Digital Tire Inflator and 12V Extension Cord. This manual provides important information regarding the safe operation, maintenance, and troubleshooting of your new device. Please read this manual thoroughly before use and retain it for future reference.

Image: AstroAI Digital Tire Inflator and 12V Extension Cord.
2. Produktmerkmale
- Efficient and Durable Design: Features a metal gear and cylinder structure for enhanced performance and extended service life compared to plastic alternatives. Capable of continuous operation for up to 20 minutes, allowing inflation of four 195/55/R15 car tires (0-35 PSI) without requiring a cooling period.
- Clear LCD Screen and LED Light: The LCD screen displays air pressure in KPA, PSI, and BAR units for easy reading. An integrated LED light assists in inflating or checking tires in low-light conditions.
- Benutzerfreundliche Bedienung: Simple to use by plugging into a vehicle's 12V cigarette lighter and connecting the hose to the tire valve. Suitable for vehicles, SUVs, motorcycles, and bicycles. Note: Not compatible with high-pressure or large-flow inflatables.
- Robust 12V Extension Cord: The included 12-foot heavy-duty 16 AWG wire extension cord is designed for durability and everyday use. Its highly efficient wire ensures low impedance and flexibility.
- Universal Compatibility (Extension Cord): The extension cord integrates with various 12V car accessories, including tire inflators, air compressors, heated blankets, AC to DC converters, car fans, portable refrigerators, dash cams, inverters, and vacuum cleaners.
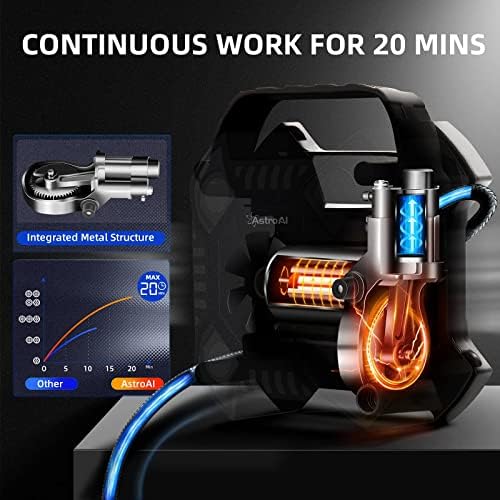
Bild: Intern view of the inflator highlighting the integrated metal structure for durability and continuous operation.

Image: The inflator's compact design and integrated storage for accessories, demonstrating portability.

Image: The inflator's high-quality construction, indicating heat resistance up to 158°F and freezing tolerance down to -4°F.
3. Produktkomponenten
Familiarize yourself with the parts of your AstroAI Digital Tire Inflator:

Image: Labeled diagram of the AstroAI Digital Tire Inflator components.
- Air Pressure Gauge: Digital display for current tire pressure.
- Tragegriff: Für einen einfachen Transport des Geräts.
- LED-Licht: Illuminates the work area in low light.
- Inflation Tube: Connects to the tire valve for inflation.
- Multifunktionstaste: Used for setting pressure units and adjusting target pressure.
- Netzkabel: Connects the inflator to the 12V power source.
- 12V Zigarettenanzünderstecker: Power connector for vehicle's 12V outlet.
- Schnellverbinder: Attaches the inflation tube to the tire valve.
12V Cigarette Lighter Extension Cord Components:
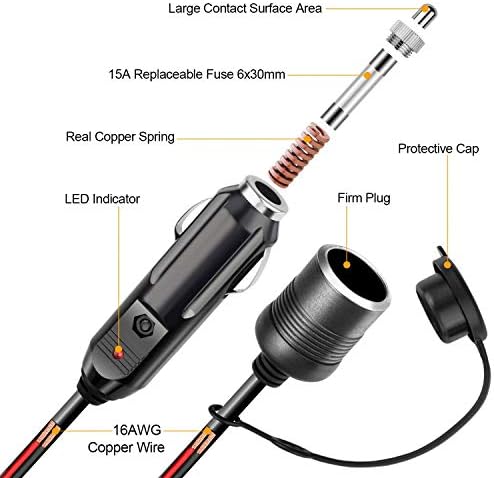
Bild: Detailliert view of the 12V Cigarette Lighter Extension Cord's internal components, including the 15A replaceable fuse, copper spring, and 16AWG copper wire.
- Large Contact Surface Area: Ensures stable power connection.
- 15A Replaceable Fuse (6x30mm): Bietet Überstromschutz.
- Real Copper Spring: Enhances conductivity and durability.
- 16AWG Copper Wire: Heavy-duty wire for efficient power transmission.
- LED-Anzeige: Zeigt den Stromstatus an.
- Schutzkappe: Covers the female socket when not in use.
- Firm Plug: Ensures a secure connection to the vehicle's 12V outlet.
4. Einrichtung
Before operating the tire inflator, ensure your vehicle is parked safely and the engine is running to provide stable power.
- An die Stromversorgung anschließen: Insert the 12V cigarette lighter plug of the inflator directly into your vehicle's 12V accessory outlet. If additional reach is needed, connect the inflator's plug to the female end of the provided 12V extension cord, then plug the extension cord's male end into the vehicle's 12V outlet.
- Prepare the Tire: Entfernen Sie die Ventilkappe von dem Reifen, den Sie aufpumpen möchten.
5. Bedienungsanleitung
Befolgen Sie diese Schritte, um Ihre Reifen aufzupumpen:
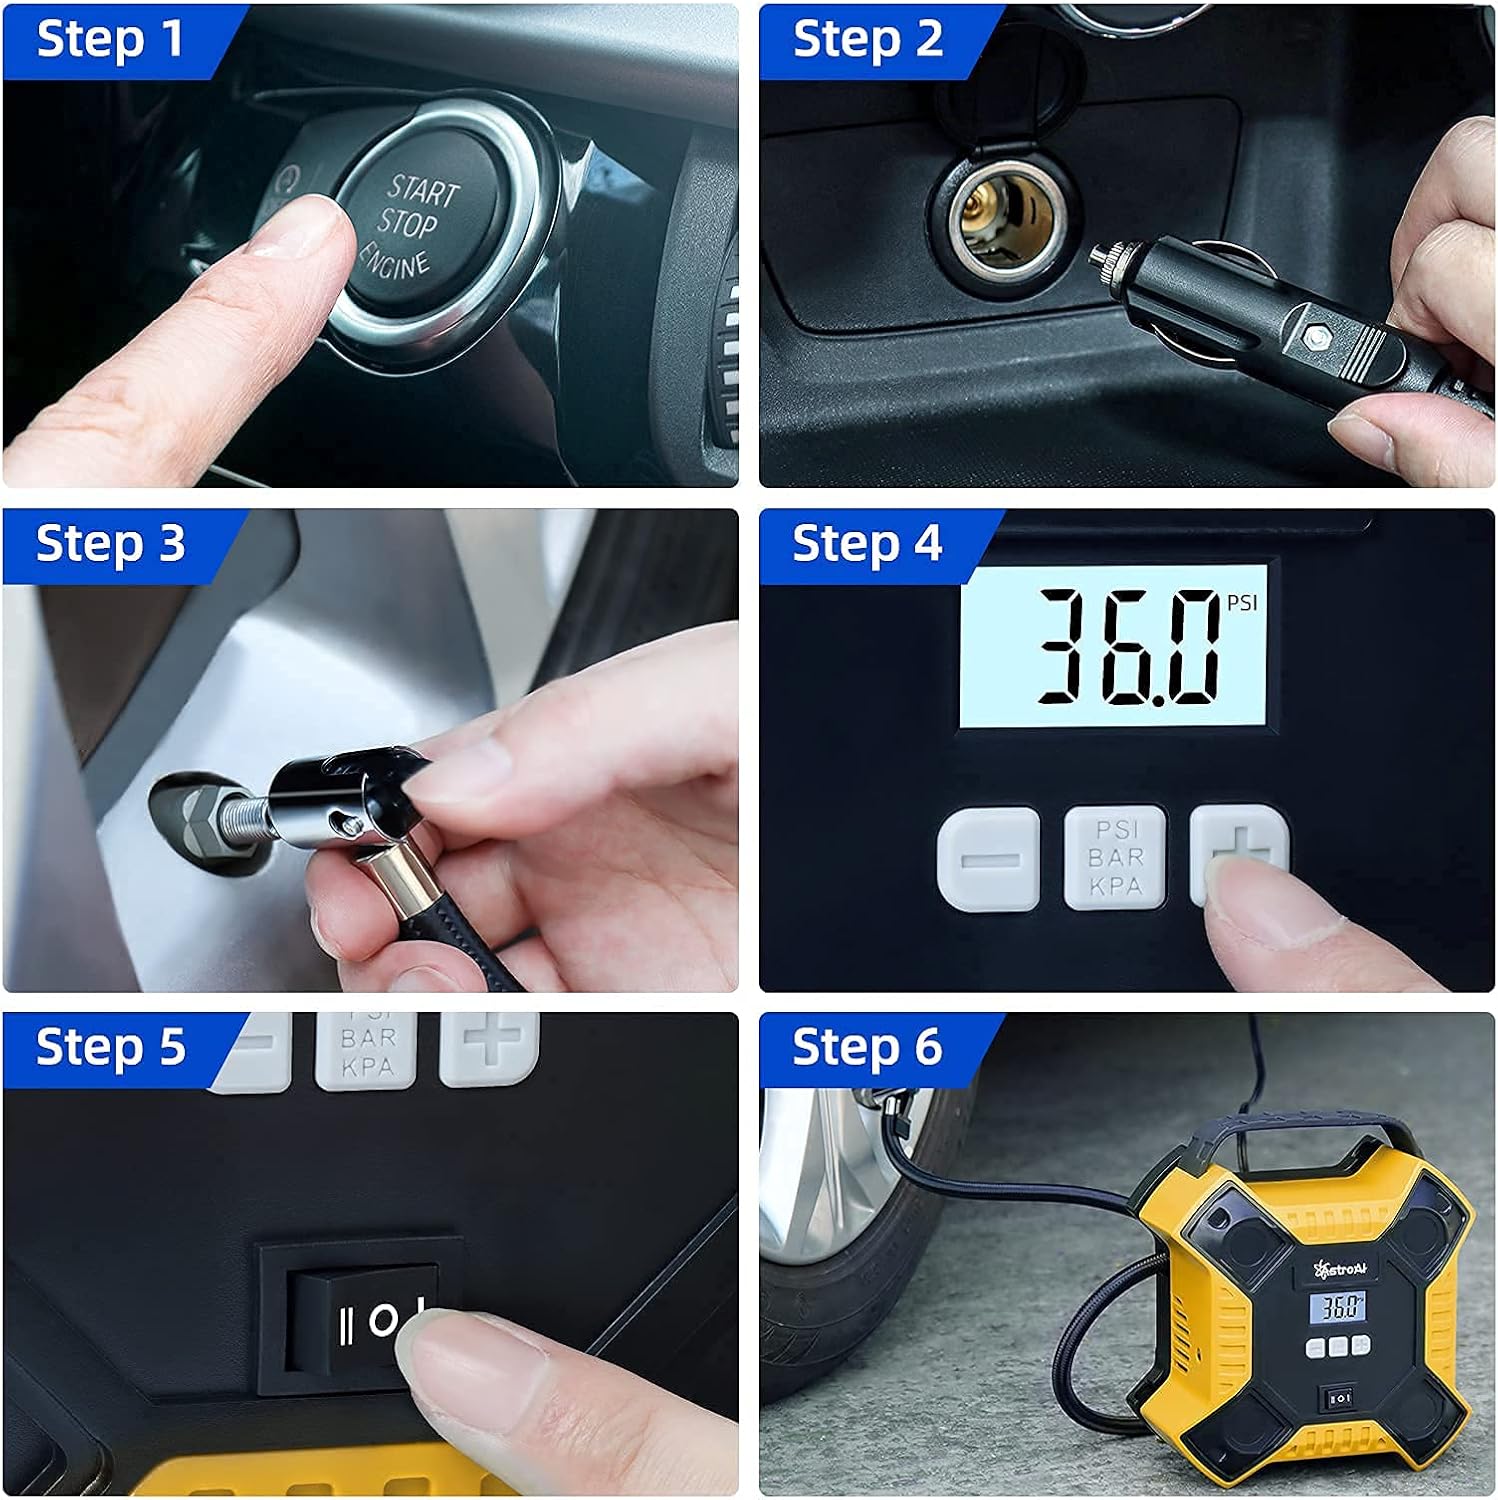
Image: Visual step-by-step instructions for operating the tire inflator.
- Fahrzeugmotor starten: Ensure your car engine is running to provide sufficient power (Step 1).
- Strom anschließen: Plug the 12V cigarette lighter plug into your vehicle's 12V power outlet (Step 2).
- Anbringen am Reifenventil: Securely screw the quick connector of the inflation tube onto the tire valve stem (Step 3). The digital display will show the current tire pressure.
- Gewünschten Druck einstellen: Use the multi-function buttons (+ Und -) to set your desired tire pressure. Press the unit button (PSI/BAR/KPA) to cycle through the pressure units (Step 4). Refer to your vehicle's owner's manual or door jamb sticker for recommended tire pressure.
- Inflation starten: Flip the power switch to the "ON" position to begin inflation (Step 5). The inflator will automatically stop once the preset pressure is reached.
- Trennen: Once inflation is complete and the unit has stopped, turn off the power switch, then unscrew the quick connector from the tire valve. Replace the tire valve cap. (Step 6 shows the inflator in use).
Wichtige Hinweise:
- Do not exceed the maximum continuous operating time of 20 minutes. Allow the unit to cool down for at least 10 minutes after 20 minutes of continuous use.
- Always ensure the vehicle engine is running during operation to prevent draining the car battery.
- Check tire pressure regularly, especially before long trips.
6. Wartung
Eine ordnungsgemäße Wartung gewährleistet die Langlebigkeit und optimale Leistung Ihres Reifenfüllers:
- Reinigung: Wischen Sie das Gerät mitamp Mit einem Tuch abwischen. Keine scharfen Chemikalien oder Scheuermittel verwenden. Vor der Lagerung sicherstellen, dass das Gerät vollständig trocken ist.
- Lagerung: Store the inflator in a cool, dry place, away from direct sunlight and extreme temperatures. Ensure the power cord and inflation tube are neatly coiled to prevent damage. Utilize the integrated accessories storage for nozzles.
- Fuse Replacement (Extension Cord): If the 12V extension cord stops working, check the 15A fuse located within the male plug. To replace, unscrew the tip of the plug, remove the old fuse, and insert a new 15A (6x30mm) fuse.
7. Fehlerbehebung
| Problem | Mögliche Ursache | Lösung |
|---|---|---|
| Der Kompressor lässt sich nicht einschalten. |
|
|
| Der Inflator läuft, bläst aber nicht auf. |
|
|
| Der Airbag-Generator schaltet sich vorzeitig ab. |
|
|
8. Spezifikationen
| Besonderheit | Detail |
|---|---|
| Marke | Astro-KI |
| Modellname | Digital-Gummireifen |
| ASIN | B09LMBMPSD |
| Farbe | Gelb |
| Material | Metall |
| Stromquelle | Kabelgebunden (12V Gleichstrom) |
| Maximaler Druck | 35 PSI (Pfund pro Quadratzoll) |
| Bandtage | 12 Volt |
| Steckertyp | 12V Zigarettenanzünderstecker |
| Schlauchlänge | 12 Feet (Power Cord) |
| Kontinuierliche Arbeitszeit | Bis zu 20 Minuten |
9. Garantieinformationen
AstroAI products are designed and manufactured to high-quality standards. For specific warranty details regarding your Digital Tire Inflator, please refer to the warranty card included with your purchase or visit the official AstroAI webBewahren Sie Ihren Kaufbeleg als Kaufnachweis für Garantieansprüche auf.
10. Kundendienst
If you have any questions, concerns, or require assistance with your AstroAI Digital Tire Inflator, please contact AstroAI customer support. Contact information can typically be found on the product packaging or on the official AstroAI webBitte halten Sie Ihre Produktmodellnummer bereit. ASIN (B09LMBMPSD) ready when contacting support.