OBSBOT OBS-200002
OBSBOT Tiny 2 Fernbedienung – Benutzerhandbuch
Modell: OBS-200002
Einführung
Die OBSBOT Tiny 2 Fernbedienung wurde entwickelt, um Ihr Erlebnis mit der OBSBOT Tiny Serie zu verbessern. webcams, including Tiny 2 Lite, Tiny 2, Tiny 4K, Tiny 1080P, Tiny SE, and the OBSBOT UVC to HDMI Adapter 2nd Gen. This smart remote provides intuitive control over various camera functions and AI features, offering a more convenient and pleasant usage experience.
It combines the functionality of a remote control with a presentation clicker, allowing for seamless control during video calls, live streaming, and presentations.
Packungsinhalt
- OBSBOT Tiny 2 Remote Control
- USB Receiver Dongle (stored inside the remote's battery compartment)
- User Guide/Instructions
Video: Unboxing and initial setup of the OBSBOT Tiny Remote Control, including battery installation and USB dongle location.
Aufstellen
1. Einlegen der Batterie
- Öffnen Sie den Batteriefachdeckel auf der Rückseite der Fernbedienung.
- Legen Sie zwei AAA-Batterien ein und achten Sie dabei auf die richtige Polarität (+/-).
- Schließen Sie den Batteriefachdeckel.
2. USB-Empfängeranschluss
- Locate the USB receiver dongle inside the remote's battery compartment.
- Plug the USB receiver dongle into an available USB 2.0 or higher port on your computer.
3. Software Setup (OBSBOT TinyCam)
- Ensure your OBSBOT Tiny series webcam is connected to your computer and the OBSBOT TinyCam software is running.
- Navigate to the settings within the OBSBOT TinyCam software.
- Scroll down to find the "Remote Control" option and enable it.
- The remote control should now be paired and ready for use.
Bedienungsanleitung
Layout und Funktionen der Fernbedienung
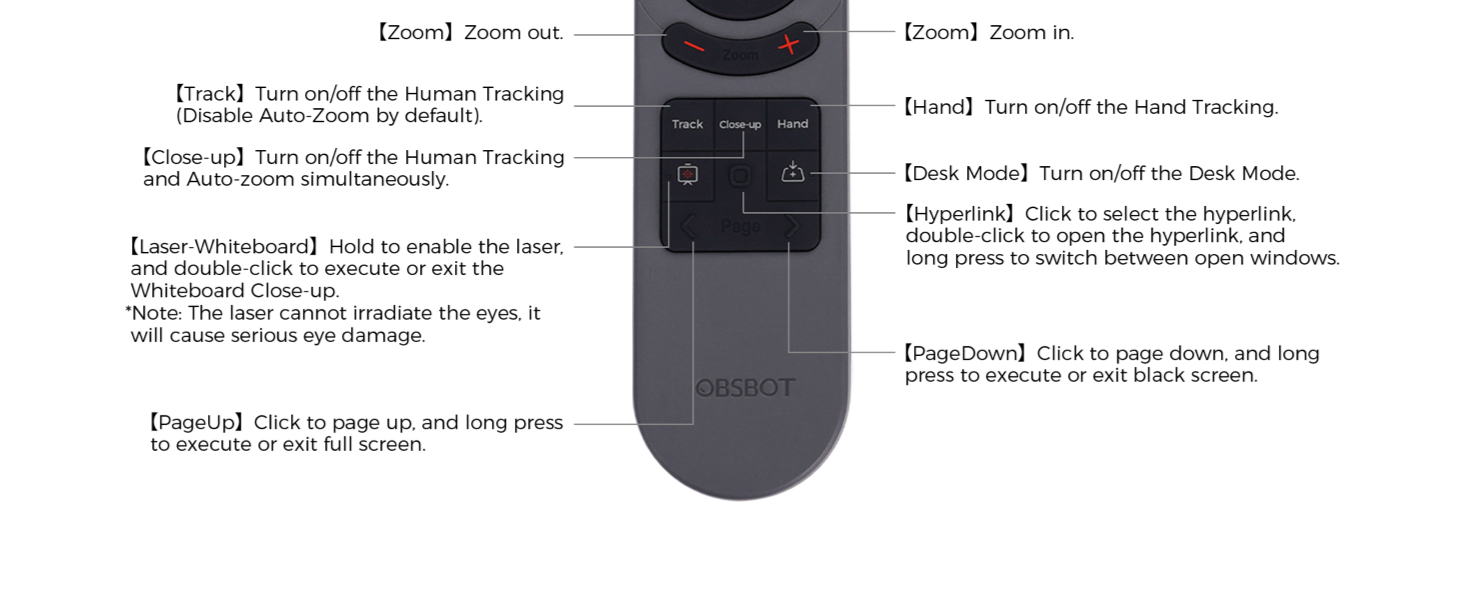
Bild: Detailed diagram illustrating the buttons and their corresponding functions on the OBSBOT Tiny 2 Remote Control.
- Netzschalter: Turns the connected OBSBOT Tiny series webKamera ein- oder ausschalten.
- Richtungstasten: Control the pan and tilt of the webNocken.
- Reset-Taste: Resets the camera's position to its default (square zero).
- Device Selection Buttons (Left/Right Arrows): Allows switching control between multiple connected OBSBOT devices (if connected to the same computer).
- Zoom-Schaltflächen: Stellen Sie den Zoomfaktor der Kamera ein.
- Tasten P1, P2, P3: Preset buttons to save and recall specific camera positions and zoom levels.
- Track-Schaltfläche: Toggles Human Tracking on/off. Disables Auto Zoom by default.
- Nahaufnahme-Schaltfläche: Activates Close-up mode, turning on Human Tracking and Auto Zoom simultaneously.
- Handknopf: Toggles Hand Tracking on/off.
- Schreibtischmodus-Taste: Schaltet den Schreibtischmodus ein/aus.
- Laser-Whiteboard-Taste: Hold to enable the laser pointer. Double-click to execute or exit Whiteboard Close-up. Note: The laser cannot irradiate the eyes; it will cause serious eye damage.
- Hyperlink-Schaltfläche: Klicken Sie, um einen Hyperlink auszuwählen. Doppelklicken Sie, um den Hyperlink zu öffnen. Halten Sie die Maustaste gedrückt, um zwischen den geöffneten Fenstern zu wechseln.
- Bild-ab-Taste: Click to page down. Long press to execute or exit a black screen.
- Bild-auf-Taste: Click to page up. Long press to execute or exit full screen.
Wichtiger Hinweis: Some keys on the remote controller will not work with OBSBOT Tiny 4K and OBSBOT Tiny, as the features controlled by those keys (e.g., Close-up, Hand, Laser-Whiteboard, Desk Mode) are not integrated into those specific models.
Sprachsteuerung
The OBSBOT Tiny 2 webcam supports voice control for various functions, including waking up the device, initiating tracking, and adjusting zoom. Refer to the OBSBOT TinyCam software settings for a full list of voice commands and to enable/disable this feature.
Video: Demonstration of the OBSBOT Meet Remote Control features and functions.
Anwendungen

Video Meetings: Control your camera's focus and framing during online conferences.

Remote Classes: Utilize presentation clicker features and camera control for engaging online teaching.

Live-Streaming: Adjust camera angles and zoom on the fly for dynamic broadcasts.
Wartung
- Keep the remote control clean and dry. Use a soft, dry cloth for cleaning.
- Avoid exposing the remote to extreme temperatures or direct sunlight.
- Wenn die Fernbedienung längere Zeit nicht benutzt wird, sollten die Batterien entfernt werden, um ein Auslaufen zu verhindern.
- Store the USB receiver dongle securely within the remote's battery compartment to prevent loss.
Fehlerbehebung
- Fernbedienung reagiert nicht:
- Prüfen Sie, ob die Batterien richtig eingesetzt sind und ausreichend geladen sind. Tauschen Sie sie gegebenenfalls aus.
- Ensure the USB receiver dongle is securely plugged into your computer.
- Verify that the "Remote Control" option is enabled in the OBSBOT TinyCam software settings.
- Restart the OBSBOT TinyCam software and/or your computer.
- Specific features not working:
- Confirm that your OBSBOT webcam model supports the specific feature (e.g., Close-up, Desk Mode). Refer to your webcam's manual for compatibility.
- Ensure your OBSBOT TinyCam software and webcam firmware are up to date.
- Interferenz:
- Avoid using the remote near strong electromagnetic interference sources.
Technische Daten
| Technische Daten | 10 x 2 x 0.01 Zoll |
| Artikelgewicht | 1.76 Unzen |
| Artikelmodellnummer | OBS-200002 |
| Batterien | 2 AAA-Batterien (nicht im Lieferumfang enthalten) |
| Marke | OBSBOT |
| Besonderheit | Ergonomisch |
| Farbe | Schwarz |
| Maximale Anzahl unterstützter Geräte | 4 |
| Kompatible Geräte | OBSBOT Tiny series webcams, OBSBOT UVC to HDMI Adapter 2nd Gen, Personal Computer |
Garantie und Support
For warranty information, technical support, or further assistance, please visit the official OBSBOT webBesuchen Sie die Website oder kontaktieren Sie direkt den Kundenservice. Bewahren Sie Ihren Kaufbeleg für Garantieansprüche auf.