1. Produktüberschreitungview
The iTOMA CKS209 is a versatile alarm clock radio designed to enhance your bedside experience. It features dual wireless charging capabilities for your smartphone and earbuds, along with two additional USB ports for other devices. Enjoy your favorite music via Bluetooth 5.1 technology or tune into digital FM radio. The clock includes dual alarms with customizable wake-up modes, a large 1.4-inch orange LED display with auto and manual dimmer control, and a 2-level orange night light.
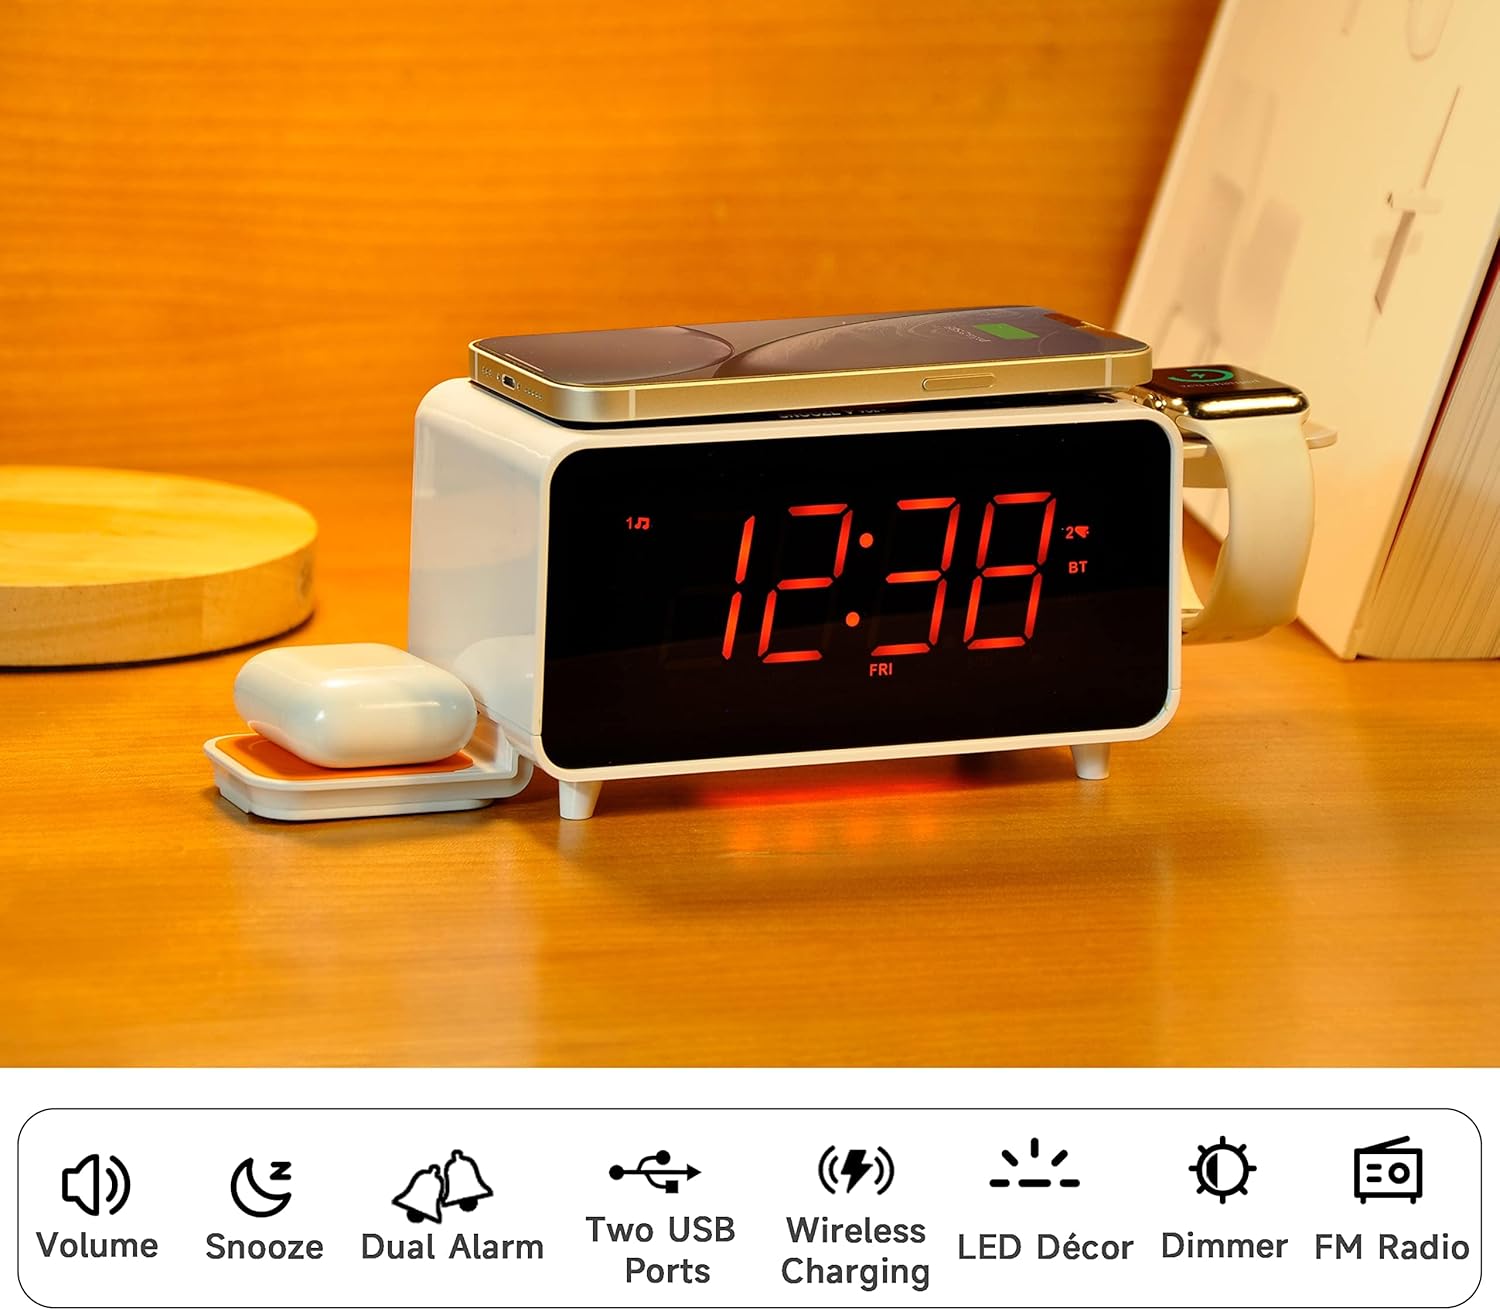
Image: The iTOMA CKS209 alarm clock radio displaying the time, with a smartphone wirelessly charging on top, earbuds on a side wireless charging pad, and a smartwatch on its holder.
Hauptmerkmale:
- Kabelloses Laden: 15W ultra-fast wireless charger for smartphones and 3W foldable earphone wireless charger. Includes a watch wireless charging support holder (charging cable not included).
- Bluetooth 5.1: Seamless audio streaming from your Bluetooth-enabled devices.
- Dual USB Ports: One USB-A and one USB-C port (5V 2.1A) for additional device charging.
- Smart Dual Alarm: Set two independent alarms with options to wake to radio or buzzer. Features snooze, crescendo wake-up, 15-level volume control, and 4 alarm week modes (Every day, single day, weekdays, weekends).
- 1.4" Orange LED Display: Clear 12/24-hour format display with 3-level dimmer brightness and auto-dimmer function.
- Nachtlicht: 2-level orange night light for ambient illumination.
- Digitales FM-Radio: 20 programmable preset stations with external wire antenna for enhanced reception.
- Backup-Batterie: Maintains time and alarm settings during power interruptions.
2. Einrichtung
2.1 Stromanschluss
- Unpack the iTOMA CKS209 unit and all accessories.
- Connect the provided AC adapter to the DC IN jack on the back of the unit.
- Plug the AC adapter into a standard wall outlet. The display will light up, and the clock will automatically set the time.
2.2 Initial Time Setting (Manual)
While the clock features auto-time setting, you can manually adjust the time, date, and year if needed.
- Halten Sie die UHRZEITEINSTELLUNG button located on the top panel until the year flashes on the display.
- Verwenden Sie die TUNE +/- buttons (or rotate the SNOOZE/VOL dial) to adjust the year.
- Drücken UHRZEITEINSTELLUNG again to confirm and move to the month setting. Repeat the process for month, day, hour, and minute.
- Drücken UHRZEITEINSTELLUNG one last time to save your settings.
2.3 Time Zone and Daylight Saving Time (DST)
- Halten Sie die SCHLAF/ZEITZONE button to enter time zone setting.
- Verwenden Sie die TUNE +/- buttons (or rotate the SNOOZE/VOL dial) to select your desired time zone.
- Drücken SCHLAF/ZEITZONE again to toggle DST ON or OFF.
- Drücken SCHLAF/ZEITZONE Ein letztes Mal bestätigen und beenden.
Video: This video demonstrates the time setting and Bluetooth operation for a similar iTOMA CKS207 model, which shares similar functionalities with the CKS209.
3. Bedienungsanleitung
3.1 Kabelloses Laden
The iTOMA CKS209 features multiple wireless charging options:
- Smartphone Wireless Charging: Place your Qi-compatible smartphone on the top charging pad. The charging indicator on the display will illuminate to confirm charging.
- Earbud Wireless Charging: Place your Qi-compatible earbuds on the foldable 3W wireless charging pad located on the side.
- Smartwatch Holder: Utilize the integrated holder for your smartwatch. Note: A separate smartwatch charging cable (not included) is required and connects to one of the USB ports.
Image: A smartphone is placed on the top surface of the iTOMA CKS209, indicating wireless charging in progress.

Image: A close-up of the side of the iTOMA CKS209 showing the integrated holder designed for a smartwatch.
3.2 USB-Ladeanschlüsse
In addition to wireless charging, the unit provides two USB ports (one Type-A and one Type-C) on the back for wired charging of other devices.
- Connect your device's USB charging cable to either the USB-A or USB-C port on the back of the alarm clock.
- Ensure your device is properly connected and charging.

Image: A smartphone is connected via a USB cable to one of the charging ports on the back of the iTOMA CKS209.
3.3 Bluetooth Lautsprecher
Streamen Sie Audio kabellos von Ihren Bluetooth-fähigen Geräten.
- Drücken Sie die EIN/AUS Taste, um das Gerät einzuschalten.
- Drücken Sie die MODUS button repeatedly until 'BT' appears on the display and starts flashing, indicating pairing mode.
- On your mobile device, enable Bluetooth and search for 'iTOMA CKS209' (or similar model name).
- Select the device to pair. Once connected, 'BT' will stop flashing and remain solid.
- You can now play audio from your device through the alarm clock speaker. Adjust volume using the LAUTSTÄRKE +/- buttons or your mobile device.

Image: A smartphone displaying music playback is positioned near the iTOMA CKS209, indicating a Bluetooth connection.
3.4 UKW-Radio
Hören Sie Ihre Lieblings-FM-Radiosender.
- Drücken Sie die EIN/AUS Taste, um das Gerät einzuschalten.
- Drücken Sie die MODUS button repeatedly until the FM frequency appears on the display.
- For automatic station search, press and hold the TUNE +/- buttons. The radio will scan and save available stations.
- For manual tuning, short press the TUNE +/- Tasten zur schrittweisen Frequenzeinstellung.
- Stellen Sie die Lautstärke mit den LAUTSTÄRKE +/- Schaltflächen.
3.5 Doppelwecker
Richten Sie bis zu zwei unabhängige Alarme ein.
- Drücken Sie die AL1 or AL2 button to select the desired alarm. The alarm time will flash on the display.
- Verwenden Sie die TUNE +/- buttons (or rotate the SNOOZE/VOL dial) to set the desired alarm hour and minute.
- Drücken AL1 or AL2 again to select the wake-up source (Buzzer or FM Radio).
- Drücken AL1 or AL2 again to select the alarm week mode (Every day, single day, weekdays, or weekends).
- Drücken AL1 or AL2 one last time to confirm and activate the alarm. The alarm indicator will appear on the display.
- Um einen Alarm zu deaktivieren, drücken Sie die entsprechende Taste. AL1 or AL2 Drücken Sie die Taste so lange, bis die Alarmanzeige aus dem Display verschwindet.
- Schlummerfunktion: Wenn der Alarm ertönt, drücken Sie die SCHLAFEN Taste zum vorübergehenden Stummschalten des Alarms für 9 Minuten.

Image: The iTOMA CKS209 alarm clock radio displaying the time on a bedside table, ready for use.
3.6 Display & Dimmer Control
Adjust the brightness of the 1.4-inch orange LED display.
- Drücken Sie kurz die DIMMER button to cycle through 3 brightness levels (High, Medium, Low).
- The unit also features an auto-dimmer function that adjusts display brightness based on ambient light conditions.
Image: A visual representation of the iTOMA CKS209 display at different brightness levels, from bright to invisible, and the auto-dimmer setting.
3.7 Nachtlicht
Activate the ambient orange night light.
- Drücken Sie die LED Knopf zum Einschalten des Nachtlichts.
- Drücken Sie die LED button again to cycle through 2 brightness levels.
- Drücken Sie die LED button a third time to turn the night light OFF.
4. Wartung
To ensure the longevity and optimal performance of your iTOMA CKS209, follow these maintenance guidelines:
- Reinigung: Reinigen Sie die Außenseite des Geräts mit einem weichen, trockenen Tuch. Verwenden Sie keine flüssigen Reiniger oder Scheuermittel, da diese die Oberfläche beschädigen können.
- Belüftung: Stellen Sie sicher, dass das Gerät in einem gut belüfteten Bereich aufgestellt wird, um eine Überhitzung zu vermeiden. Blockieren Sie keine Lüftungsöffnungen.
- Netzkabel: Überprüfen Sie das Netzkabel regelmäßig auf Beschädigungen. Bei Beschädigung das Gerät nicht mehr verwenden und den Kundendienst kontaktieren.
- Lagerung: Wenn Sie das Gerät über einen längeren Zeitraum lagern, ziehen Sie den Netzstecker und bewahren Sie es an einem kühlen, trockenen Ort auf.
5. Fehlerbehebung
If you encounter any issues with your iTOMA CKS209, please refer to the following common troubleshooting steps:
- Kein Strom/Display aus:
- Stellen Sie sicher, dass der Netzadapter sowohl an das Gerät als auch an eine funktionierende Steckdose angeschlossen ist.
- Prüfen Sie die Funktionsfähigkeit der Steckdose, indem Sie ein anderes Gerät anschließen.
- Kabelloses Laden funktioniert nicht:
- Vergewissern Sie sich, dass Ihr Gerät Qi-kompatibel ist.
- Ensure your device is centered correctly on the charging pad.
- Entfernen Sie alle dicken Handyhüllen oder metallischen Gegenstände, die den Ladevorgang beeinträchtigen könnten.
- Vergewissern Sie sich, dass das Gerät eingeschaltet ist.
- Probleme mit der Bluetooth-Kopplung:
- Ensure the alarm clock is in Bluetooth pairing mode ('BT' flashing).
- Stellen Sie sicher, dass Bluetooth auf Ihrem Mobilgerät aktiviert ist.
- Move your mobile device closer to the alarm clock.
- Falls das Gerät zuvor gekoppelt war, versuchen Sie, die Kopplung aufzuheben und das Gerät erneut zu koppeln.
- FM Radio Static/Poor Reception:
- Extend the external wire antenna fully for better reception.
- Reposition the antenna or the unit to find a location with better signal strength.
- Alarm ertönt nicht:
- Ensure the alarm (AL1 or AL2) is activated and its indicator is visible on the display.
- Überprüfen Sie die Einstellung der Alarmlautstärke.
- Verify the alarm time and day settings are correct.
6. Spezifikationen
| Besonderheit | Detail |
|---|---|
| Marke | iTOMA |
| Modellnummer | CKS209-CA |
| Farbe | Orange Led Display |
| Technische Daten | 16.8 x 3.81 x 9.1 cm |
| Artikelgewicht | 820 g |
| Material | Plastik |
| Anzeigetyp | LED |
| Besondere Merkmale | Auto Dimmable, Charging Port, Charging Station, Foldable, Multiple Time Zone |
| Kabelloses Laden | 15W (Phone), 3W (Earbuds) |
| Aufladen über USB | USB-A, USB-C (5V 2.1A) |
| Bluetooth-Version | 5.1 |
| FM-Frequenz | 87.5–108 MHz |
7. Garantie und Support
For warranty information, technical support, or any inquiries regarding your iTOMA CKS209, please refer to the documentation included in your product packaging or visit the official iTOMA webWebsite. Sie können sich auch direkt an den Verkäufer wenden, um Unterstützung zu erhalten.