1. Einleitung
The Easyfone T200 is a 4G feature phone designed for ease of use, featuring large buttons, clear sound, and essential functions. This manual provides detailed instructions for setting up and operating your device.
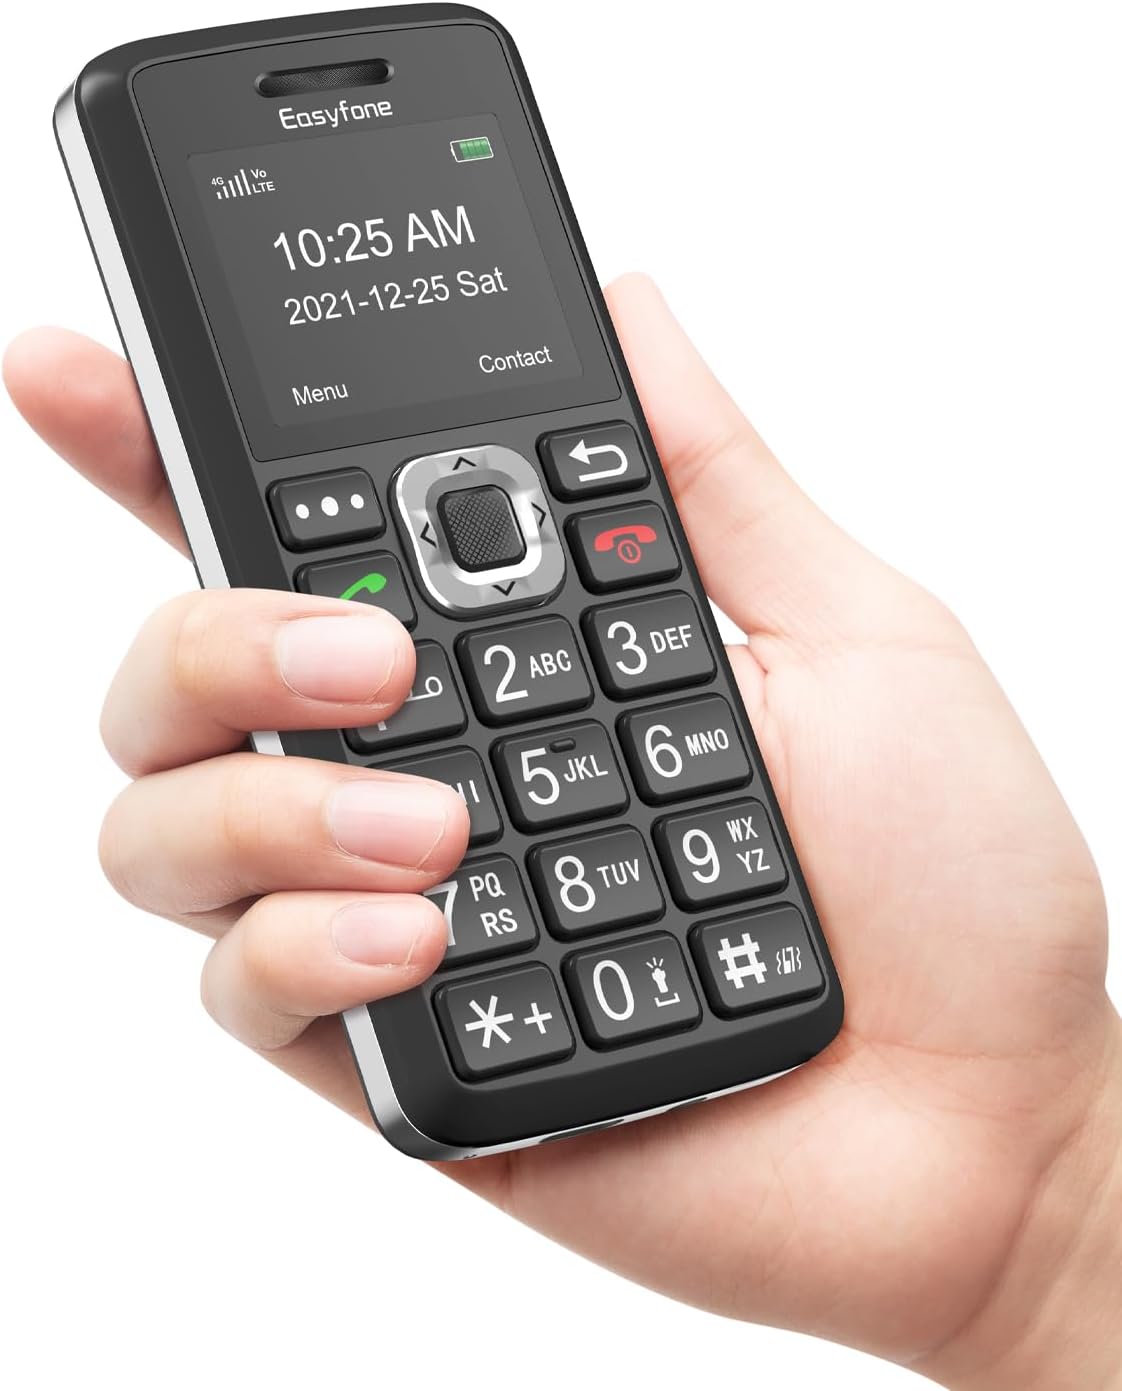
Image: The Easyfone T200 phone, held in a hand, highlighting its user-friendly design with large, well-spaced buttons and a clear screen displaying the time and date.

Image: A banner displaying the Easyfone T200, emphasizing its design as an easy-to-use big button cell phone.
2. Packungsinhalt
Bitte kreuzen Sie das Kästchen für die folgenden Elemente an:
- Easyfone T200 Mobile Phone
- Bedienungsanleitung
- Akku (1050mAh)
- USB-Kabel Typ C
- Ladestation
- Netzteil
- Schlüsselband

Image: An illustration showing all items included in the Easyfone T200 product package: the phone, user manual, battery, charging dock, power adapter, USB cable, and lanyard.
3. Gerätelayout
Familiarize yourself with the physical components of your Easyfone T200.
- Bildschirm: Shows time, date, signal, battery, and menu options.
- Tastenfeld: Large, well-spaced buttons for dialing and navigation.
- Navigationstasten: Central button for menu selection, directional keys for navigation.
- Anruf-/Auflegetasten: Green button to make/answer calls, Red button to end calls/power off.
- SOS-Taste: Dedicated button on the back for emergency calls.
- Taschenlampe: Integrierte Taschenlampe für mehr Komfort.
- Tastensperrschalter: Side switch to easily lock and unlock the keypad.
- Non-slip Back Cover: Textured back for a secure grip.
- Ladeanschluss: USB Type-C port for direct charging.
- Ladekontakte: Located at the bottom for use with the charging dock.
- 3.5-mm-Audiobuchse: Für Kopfhörer oder externe Audiogeräte.

Bild: Eine detaillierte view of the Easyfone T200 keypad, illustrating the generous size of the buttons (12.8mm by 9.2mm) for easy pressing.

Bild: Ein Seitenprofifile of the Easyfone T200, highlighting the convenient keypad lock/unlock switch and the textured non-slip back cover for improved grip.

Image: The Easyfone T200 with icons indicating its loud speaker and compatibility with hearing aids, ensuring clear audio for users.
4. Einrichtung
4.1 Einlegen der Batterie
- Entfernen Sie die Rückseite des Telefons, indem Sie sie vorsichtig an der Aussparung aufhebeln.
- Insert the battery into the battery compartment, ensuring the gold contacts align with the phone's terminals.
- Bringen Sie die Rückseite wieder an und drücken Sie sie fest, bis sie einrastet.
4.2 Installation der SIM-Karte
The Easyfone T200 supports 4G GSM networks. Ensure your SIM card is compatible with T-Mobile, MetroPCS, SpeedTalk, or Tello Mobile. It is not compatible with AT&T, Cricket, Verizon, Sprint, or Boost Mobile.
- Nachdem die Rückseite und der Akku entfernt wurden, suchen Sie den/die SIM-Kartensteckplatz/-steckplätze.
- Carefully insert your SIM card(s) into the designated slot(s) with the gold contacts facing down, following the diagram on the phone.
- If using a MicroSD card for additional storage, insert it into the MicroSD card slot.
- Bauen Sie den Akku und die Rückabdeckung wieder ein.

Abbildung: Die Rückseite view of the Easyfone T200 with the back cover removed, illustrating the battery compartment, SIM card slots, and MicroSD card slot for installation.

Image: A graphic listing compatible network carriers for the Easyfone T200, including T-Mobile, Metro by T-Mobile, Tello, Red Pocket Mobile, and Speedtalk Mobile.
4.3 Aufladen des Telefons
The phone can be charged using the included charging dock or directly via the USB Type-C cable.
- Verwendung der Ladestation: Connect the USB cable to the power adapter, then plug the adapter into a wall outlet. Connect the other end of the USB cable to the charging dock. Place the phone into the dock, ensuring the charging contacts align. The phone will indicate charging.
- Direktes USB-Laden: Connect the USB cable to the power adapter and plug it into a wall outlet. Insert the Type-C end of the cable directly into the phone's charging port.
A full charge takes approximately 2.5 hours. The 1050mAh battery provides up to 6 hours of talk time and 96 hours of standby time.
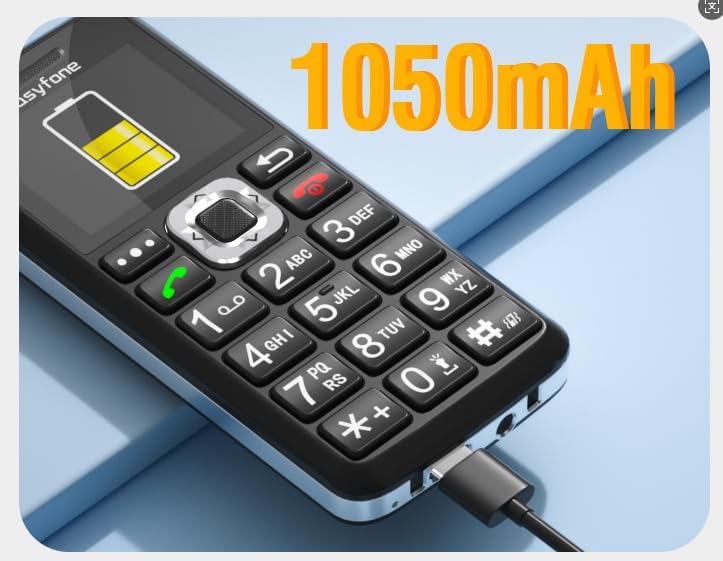
Image: The Easyfone T200 connected for charging via a USB cable, with an overlay indicating its 1050mAh battery capacity.

Image: The Easyfone T200 being charged both in its dedicated dock and directly via USB, emphasizing its long standby time of over 96 hours.

Image: A still from a video demonstrating how to connect the charging base to the Easyfone T200 and how to charge the device.
5. Bedienungsanleitung
5.1 Ein-/Ausschalten
- So schalten Sie das Gerät ein: Halten Sie die Red (End Call/Power) gedrückt, bis der Bildschirm aufleuchtet.
- So schalten Sie das Gerät aus: Halten Sie die Red (End Call/Power) button until the power off confirmation appears, then select 'Yes'.
5.2 Telefonate führen
- Geben Sie die Telefonnummer über die Tastatur ein.
- Drücken Sie die Green (Call) Taste zum Starten des Anrufs.
- Um den Anruf zu beenden, drücken Sie die Red (End Call) Taste.

Image: A person holding the Easyfone T200 to their ear, demonstrating its use for making or receiving calls.
5.3 Anrufe entgegennehmen
- When a call comes in, the phone will ring and display the caller ID.
- Drücken Sie die Green (Call) Taste, um den Anruf anzunehmen.
- Um den Anruf abzulehnen, drücken Sie die Red (End Call) Taste.
5.4 Senden und Empfangen von SMS
- Navigieren Sie zum Menü „Nachrichten“.
- Wählen Sie „Nachricht schreiben“, um eine neue SMS zu verfassen.
- Geben Sie die Nummer des Empfängers ein oder wählen Sie eine Nummer aus den Kontakten aus.
- Type your message using the keypad (multiple presses on a key cycle through letters and numbers).
- Wählen Sie „Senden“.
5.5 SOS-Funktion
The SOS button is located on the back of the phone. In an emergency, press and hold this button to activate the SOS function.
- The phone will automatically call and send emergency SMS messages to up to five pre-set SOS contacts.
- Ensure SOS contacts are set up in the phone's settings.
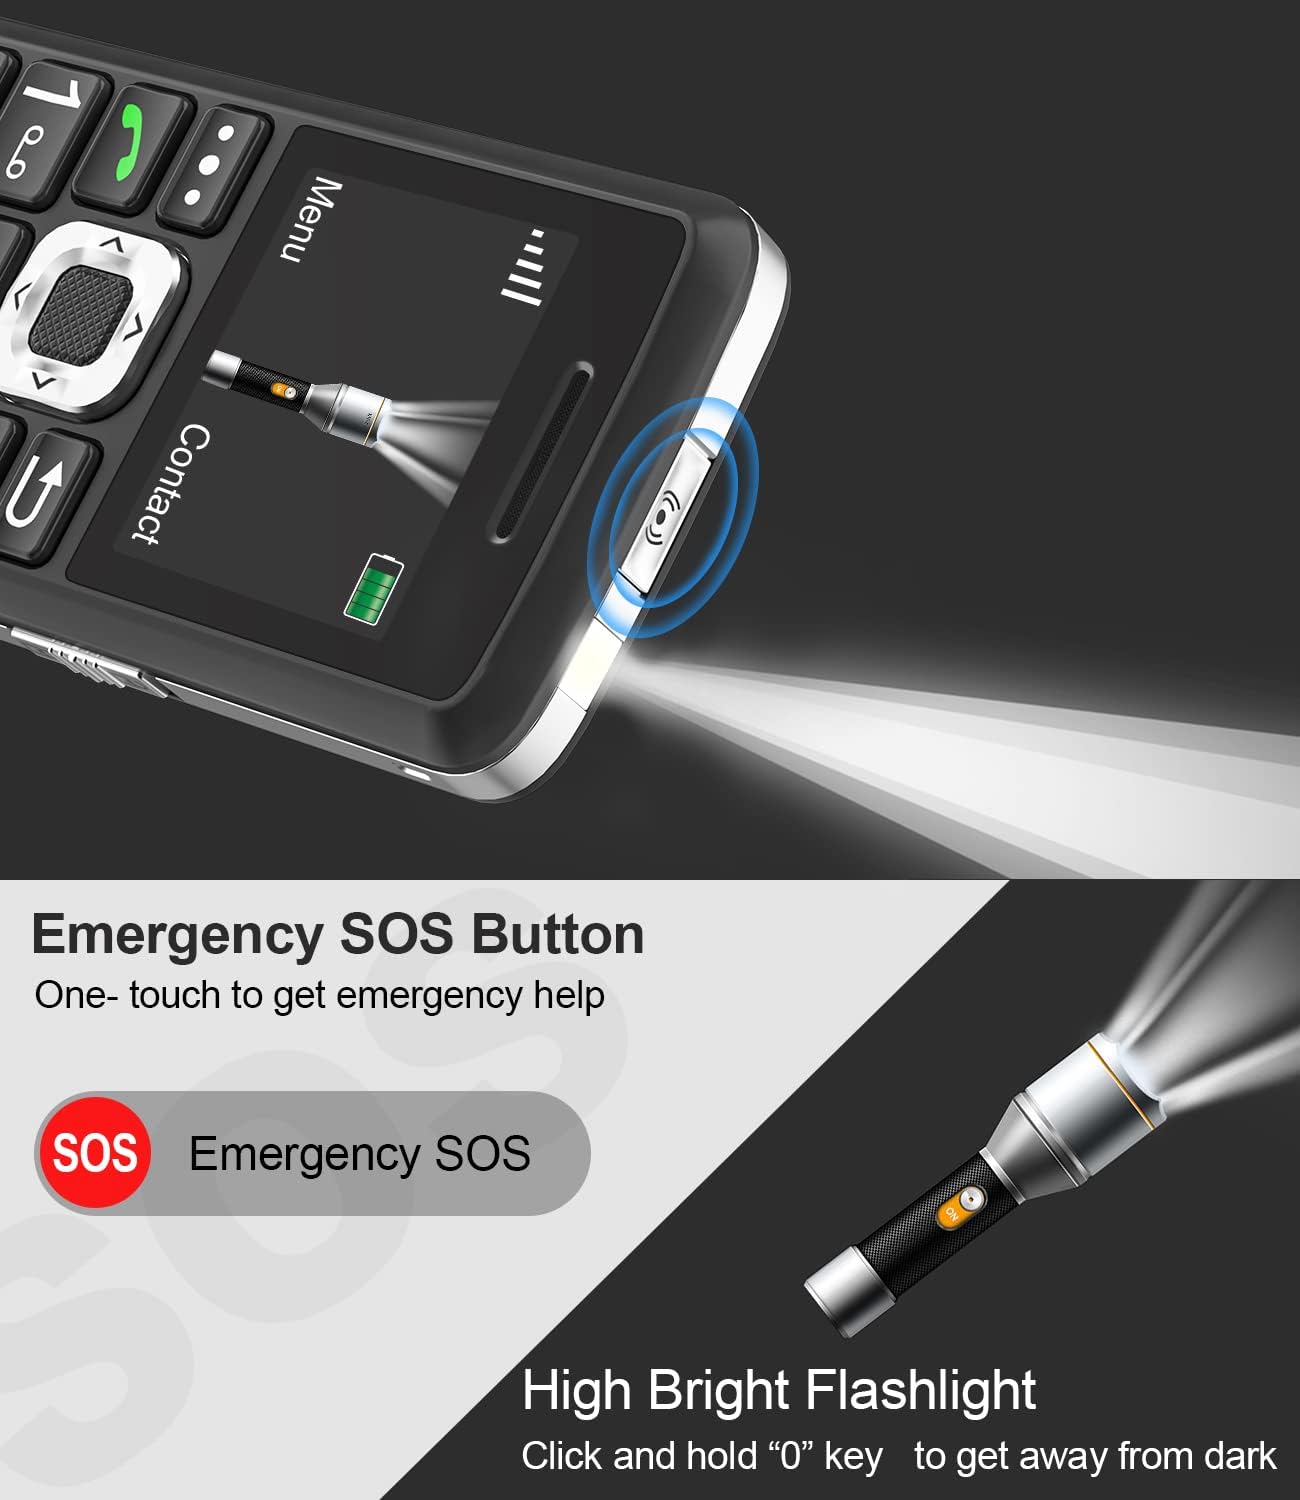
Image: The Easyfone T200 highlighting its dedicated SOS Emergency Button and the integrated high-bright flashlight.

Image: The Easyfone T200 illustrating the SOS Emergency function, showing how it triggers both emergency calls and messages to pre-selected contacts.
5.6 Kurzwahl
You can assign up to eight speed dial contacts to the number keys (2-9).
- Go to 'Settings' > 'Speed Dial'.
- Select a number key (e.g., '2') and assign a contact from your phonebook.
- To use speed dial, press and hold the assigned number key on the keypad.

Image: The Easyfone T200 keypad demonstrating the speed dial feature, with numbers 2 through 9 assigned to specific contacts like 'Amy', 'Son', 'Dad', 'Dr.Li', 'Mom', 'Tom', 'Sam', and 'Bob'.
5.7 Tastensperre/Entsperrung
Use the dedicated switch on the side of the phone to lock or unlock the keypad.
- Schieben Sie den Schalter nach oben, um das Tastenfeld zu entsperren.
- Schieben Sie den Schalter nach unten, um das Tastenfeld zu sperren.
Image: A still from a video demonstrating the Easyfone T200's big buttons with a talking number feature and the simple side switch for locking and unlocking the keyboard.
5.8 Taschenlampe
To activate the flashlight, press and hold the '0' key on the keypad.
5.9 Weitere Funktionen
The Easyfone T200 includes several useful features:
- FM Radio: Hören Sie lokale Radiosender.
- Wecker: Mehrere Alarme einstellen.
- Musikplayer: MP3 abspielen files werden auf einer MicroSD-Karte gespeichert.
- Hinweise: Erstelle einfache Textnotizen.
- Taschenrechner: Führe einfache Rechenoperationen durch.
- Kalender: View Termine festlegen und Ereignisse hinzufügen.
- Bluetooth: Verbinden Sie sich mit kompatiblen Bluetooth-Geräten wie Headsets.

Image: The Easyfone T200 screen surrounded by icons representing its various functions, including FM Radio, Alarm Clock, MP3 Player, Calendar, SMS, Flashlight, Calculator, Bluetooth, Memo, and Voice Recorder.
6. Wartung
- Halten Sie das Telefon trocken. Feuchtigkeit kann elektronische Schaltkreise beschädigen.
- Vermeiden Sie extreme Temperaturen. Hohe Temperaturen können die Lebensdauer elektronischer Geräte verkürzen und Batterien beschädigen.
- Verwenden Sie keine scharfen Chemikalien, Lösungsmittel oder aggressive Reinigungsmittel zum Reinigen des Telefons. Wischen Sie es mit einem weichen, trockenen Tuch ab.amp Tuch.
- Behandeln Sie das Telefon vorsichtig. Lassen Sie es nicht fallen, stoßen Sie es nicht an und schütteln Sie es nicht.
- Do not attempt to disassemble the phone. Unauthorized modifications can void your warranty.
7. Fehlerbehebung
| Problem | Mögliche Lösung |
|---|---|
| Das Telefon lässt sich nicht einschalten. | Ensure the battery is correctly installed and charged. Connect to charger for at least 30 minutes. |
| Ich kann keine Anrufe tätigen oder empfangen. | Check if the SIM card is properly inserted and activated. Verify network coverage in your area. Ensure your carrier is compatible (T-Mobile, MetroPCS, SpeedTalk, Tello Mobile). |
| Schlechte Gesprächsqualität. | Move to an area with better network signal. Ensure the speaker/microphone is not obstructed. |
| Der Akku entlädt sich schnell. | Reduce screen brightness. Close unused applications. Limit background data usage (if applicable). Ensure the battery is not old or damaged. |
| Die Tastatur reagiert nicht. | Check the keypad lock switch on the side of the phone. Slide it to the unlock position. |
| Die SOS-Funktion funktioniert nicht. | Ensure SOS contacts are correctly set up in the phone's settings. Verify that the contacts are valid phone numbers. |
8. Spezifikationen
| Besonderheit | Detail |
|---|---|
| Modellnummer | T200 |
| Technische Daten | 4.57 x 2.23 x 0.55 Zoll |
| Artikelgewicht | 2.88 Unzen |
| Betriebssystem | Nucleus OS |
| Bildschirmgröße | 2 Zoll |
| Batteriekapazität | 1050 Milliamp Stunden (mAh) |
| Telefongesprächszeit | 6 Stunden |
| Telefon-Standby-Zeit | 96 Stunden |
| Ladezeit | 2.5 Stunden |
| Zellulartechnologie | 4G LTE |
| Konnektivität | Bluetooth, USB |
| Audio-Buchse | 3.5 mm |
| Besondere Merkmale | Big Button/Font, Charging station, High Volume, Long standby time, SOS feature, Speed dial, Flashlight, FM Radio, Alarm clock, Audio Player, Notes, Calculator, Calendar |
9. Garantie und Support
For warranty information and technical support, please refer to the documentation included with your purchase or contact Easyfone customer service. Contact details can typically be found on the manufacturer's webWebsite oder der Produktverpackung.