1. Einleitung
The EVTSCAN Peakmeter PM8213C is a portable digital multimeter designed for various electrical measurements. This instrument offers stable performance, high precision, and low power consumption, making it a reliable tool for both professional and DIY users. Its compact appearance and comprehensive features ensure accurate readings for voltage, current, resistance, continuity, non-contact voltage (NCV), frequency, and duty cycle.
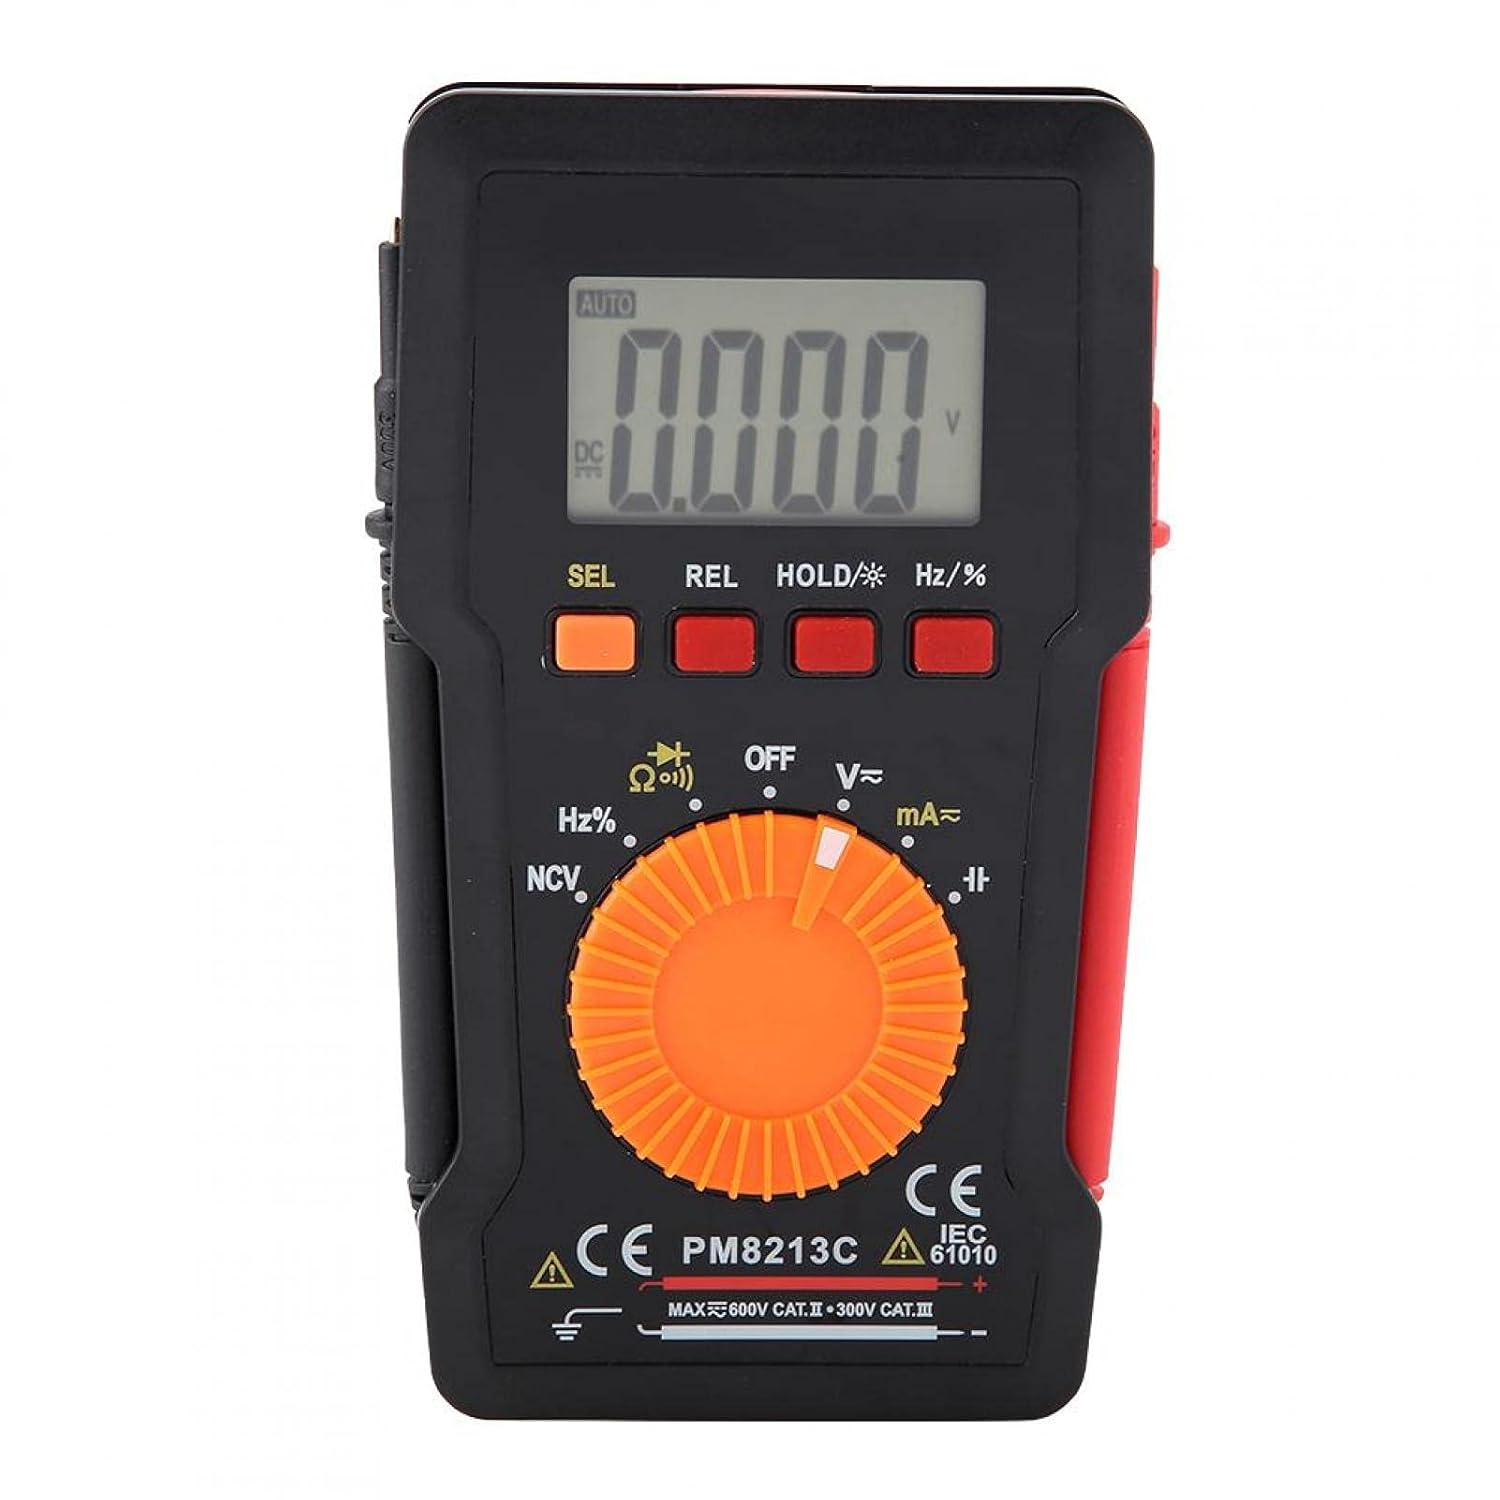
Abbildung 1: Vorderseite view of the EVTSCAN Peakmeter PM8213C Digital Multimeter.
2. Sicherheitshinweise
To ensure safe operation and service of the meter, please read this manual carefully before use. Failure to observe safety warnings can result in serious injury or death. Always adhere to local and national safety codes.
- Die maximalen Eingangsgrenzen für keine Funktion dürfen überschritten werden.
- Seien Sie vorsichtig beim Arbeiten mit VolumentagEs liegt über 30 V AC RMS, 42 V Spitze oder 60 V DC. Diese SpannungentagEs besteht die Gefahr eines Stromschlags.
- Before measuring current, ensure the meter's test leads are connected to the correct input jacks and the function switch is set to the appropriate current range.
- Always disconnect the test leads from the circuit before changing the function switch position.
- Tauschen Sie die Batterie sofort aus, sobald die Anzeige für niedrigen Batteriestand erscheint, um genaue Messwerte zu gewährleisten.
- Do not operate the meter if it appears damaged or if the protective casing wird entfernt.
- Halten Sie Hände und Finger während der Messungen hinter den Sondenbarrieren.
3. Produktüberschreitungview
3.1. Komponenten
The PM8213C multimeter consists of the following main components:
- LCD Anzeige: Zeigt Messwerte, Einheiten und Funktionsindikatoren an.
- Funktionstasten: SEL (Select), REL (Relative), HOLD (Data Hold), Hz/% (Frequency/Duty Cycle).
- Drehschalter: Used to select the desired measurement function (e.g., V~, V-, Ω, Continuity, NCV, Hz%, mA~, A~).
- Eingangsbuchsen: Terminals for connecting test leads (COM, VΩHz, mA, A).
- Messleitungen: Red and black leads for connecting to the circuit under test.
- Schutzhülle: Provides protection for the meter.

Figure 2: Key features of the PM8213C Multimeter, including LCD screen and compact design.
3.2. Symbole anzeigen
Familiarize yourself with the symbols that may appear on the LCD display:
- WAGEN: Auto-ranging mode is active.
- Gleichstrom/Wechselstrom: Gleichstrom / Wechselstrom.
- V: Volt (VoltagUnd).
- Ω: Ohm (Widerstand).
- Hertz: Hertz (Frequenz).
- %: Arbeitszyklus.
- NW: Kontaktloses Volumentage Erkennung.
- HALT: Data Hold function is active.
- REL: Relativer Messmodus.
- Batteriesymbol: Zeigt eine niedrige Batterieladung an.
- OOL: Over-range indication.
4. Einrichtung
4.1. Einlegen der Batterie
The PM8213C requires one CR2032 (3V) button cell battery for operation. The battery is typically not included in the package.
- Stellen Sie sicher, dass das Multimeter ausgeschaltet ist.
- Suchen Sie das Batteriefach auf der Rückseite des Messgeräts.
- Use a suitable tool (e.g., a small screwdriver) to open the battery compartment cover.
- Insert the CR2032 battery, observing the correct polarity (+ and - markings).
- Setzen Sie den Batteriefachdeckel wieder auf und befestigen Sie ihn.
4.2. Testleitungsanschluss
Connect the test leads to the appropriate input jacks before taking any measurements.
- Verbinden Sie Schwarz Test führte zu COM (gemeinsame) Eingangsbuchse.
- Für die meisten Messungen (Vol.tage, resistance, frequency, duty cycle, continuity), connect the Rot Test führte zu VΩHz Eingangsbuchse.
- For current measurements (mA), connect the Rot Test führte zu mA Eingangsbuchse.
- For higher current measurements (A), connect the Rot Test führte zu A input jack (if available and distinct from mA). Note: The PM8213C typically uses a single current input for mA/A, check the dial for specific ranges.
5. Bedienungsanleitung
5.1. Ein-/Ausschalten
To turn the multimeter ON, rotate the function switch from the OFF position to any desired measurement function. To turn the multimeter OFF, rotate the function switch to the OFF position. The meter features an automatic power-off function after approximately 30 minutes of inactivity to conserve battery life.
5.2. Funktionsauswahl
Use the rotary switch to select the primary measurement function. For functions with multiple modes (e.g., AC/DC voltage, continuity/diode), press the SEL button to toggle between modes.
5.3. Messung der Gleichspannungtage (V-)
- Connect the red test lead to the VΩHz jack and the black test lead to the COM jack.
- Set the rotary switch to the V- position.
- Schließen Sie die Messleitungen parallel an die Gleichspannung an.tagdie Quelle oder Komponente, die Sie messen möchten.
- Lesen Sie den Bandtage-Wert auf dem LCD-Display.
5.4. Messen der Wechselstromlautstärketage (V~)
- Connect the red test lead to the VΩHz jack and the black test lead to the COM jack.
- Set the rotary switch to the V~ position.
- Schließen Sie die Messleitungen parallel an die Wechselstromspannung an.tage Quelle oder Komponente.
- Lesen Sie den Bandtage-Wert auf dem LCD-Display.
5.5. Widerstandsmessung (Ω)
- Vor der Widerstandsmessung muss sichergestellt werden, dass der Stromkreis spannungsfrei ist.
- Connect the red test lead to the VΩHz jack and the black test lead to the COM jack.
- Stellen Sie den Drehschalter auf die Position Ω.
- Schließen Sie die Messleitungen an das Bauteil an, dessen Widerstand Sie messen möchten.
- Lesen Sie den Widerstandswert auf dem LCD-Display ab.
5.6. Kontinuitätsprüfung (Ω))))
- Stellen Sie sicher, dass der Stromkreis spannungsfrei ist.
- Connect the red test lead to the VΩHz jack and the black test lead to the COM jack.
- Set the rotary switch to the Continuity position (often shared with Resistance or Diode). Press SEL if needed to select continuity.
- Schließen Sie die Messleitungen an das Bauteil oder den Draht an.
- Bei Durchgang (niedrigem Widerstand) gibt das Messgerät einen akustischen Signalton von sich.
5.7. Berührungsloses Volumentage (NCV) Erkennung
- Stellen Sie den Drehschalter auf die Position NCV.
- Move the top edge of the multimeter close to the conductor suspected of having AC voltage.
- Das Messgerät zeigt das Vorhandensein von Wechselspannung an.tage through an audible beep and/or visual indicator (e.g., LED).
5.8. Messung von Frequenz (Hz) und Tastverhältnis (%)
- Connect the red test lead to the VΩHz jack and the black test lead to the COM jack.
- Set the rotary switch to the Hz/% position.
- Schließen Sie die Messleitungen parallel an die Signalquelle an.
- Drücken Sie die Hz/% button to toggle between frequency and duty cycle measurements.
- Lesen Sie den Wert auf dem LCD-Display ab.
5.9. Measuring Current (mA~, A~)
- WARNUNG: Schließen Sie das Messgerät niemals parallel an einen Spannungsregler an.tage source when measuring current. This will blow the fuse and can damage the meter.
- Stellen Sie sicher, dass der Stromkreis spannungsfrei ist.
- Schließen Sie das schwarze Messkabel an die COM-Buchse an.
- Für Milliampere (mA) measurements, connect the red test lead to the mA jack. For ampere (A) measurements, connect the red test lead to the A jack (if separate).
- Set the rotary switch to the appropriate mA~ or A~ position.
- Open the circuit where you want to measure current and connect the meter in series with the load.
- Schalten Sie den Stromkreis wieder ein und lesen Sie den aktuellen Wert auf dem LCD-Display ab.
6. Wartung
6.1. Reinigung
Wischen Sie das Gehäuse des Zählers mit einem Desinfektionsmittel ab.amp Mit einem Tuch und mildem Reinigungsmittel reinigen. Keine Scheuermittel oder Lösungsmittel verwenden. Die Eingangsanschlüsse sauber und trocken halten.
6.2. Batteriewechsel
When the low battery indicator appears on the display, replace the CR2032 battery promptly to ensure accurate measurements.
- Turn the multimeter OFF and disconnect all test leads.
- Öffnen Sie die Abdeckung des Batteriefachs auf der Rückseite des Messgerätes.
- Entfernen Sie die alte CR2032-Batterie.
- Insert a new CR2032 (3V) button cell battery, ensuring correct polarity.
- Schließen Sie den Batteriefachdeckel sicher.
6.3. Sicherungswechsel
If the current measurement function stops working, the fuse may need replacement. The fuse specification is F 400mA/250V.
- Turn the multimeter OFF and disconnect all test leads.
- Open the meter's casing (refer to the battery replacement section for access, or consult the full service manual if necessary).
- Locate the blown fuse.
- Carefully remove the old fuse and replace it with a new fuse of the exact same type and rating (F 400mA/250V).
- Reassemble the meter's casing sicher.
7. Fehlerbehebung
If the meter does not function correctly, check the following points before seeking service:
- Keine oder nur schwache Anzeige: Überprüfen Sie den Batterieeinbau und tauschen Sie ihn gegebenenfalls aus.
- Falsche Messwerte: Ensure test leads are correctly connected to the appropriate input jacks and the rotary switch is set to the correct function and range. Check battery level.
- Strommessung funktioniert nicht: Check and replace the fuse if blown. Ensure test leads are connected in series with the circuit.
- "OOL" displayed: The measured value exceeds the selected range. Switch to a higher range or ensure the input is within the meter's capabilities.
8. Spezifikationen
| Höhe | Weniger als 2000 m |
| Betriebstemperatur | 0 ~ 40 °C |
| Luftfeuchtigkeit bei Betrieb | <80% RH (not considered at <10 °C) |
| Lagertemperatur | -10 ~ 60 °C |
| Luftfeuchtigkeit bei Lagerung | <70% RH (remove batteries) |
| Temperaturkoeffizient | 0.1 precision/°C |
| Max. zulässige Voltage (Input to Ground) | 600V DC oder AC Effektivwert |
| Sicherungsschutz | F400mA/250V |
| Sampling-Rate | Ungefähr 3 Mal pro Sekunde |
| Automatische Abschaltung | Ungefähr 30 Minuten |
| Anzeige | Maximum 3999 counts |
| Überbereichsanzeige | "OOL" |
| Stromversorgung | CR2032 (3V) button cell battery |
| Gewicht | Approximately 120 - 142 g |
| Abmessungen (L x B x H) | 127 x 70 x 12.5 mm (ca. 12.8 x 7.5 x 1.3 cm) |
8.1. DC-Voltage (PM8213C)
| Reichweite | Auflösung | Genauigkeit |
|---|---|---|
| 4 V | 0.001 V | ± (0.1 % + 3 Ziffern) |
| 40 V | 0.01 V | ± (0.1 % + 3 Ziffern) |
| 400 V | 0.1 V | ± (0.1 % + 3 Ziffern) |
| 600 V | 1 V | ± (0.1 % + 3 Ziffern) |
8.2. Packungsinhalt
- 1 x Digital Multimeter (PM8213C)
- 2 x Messleitungen
- 1 x Schutzhülle
9. Garantie und Support
Informationen zur Garantie oder technische Unterstützung erhalten Sie direkt vom Verkäufer oder Hersteller. Bewahren Sie Ihren Kaufbeleg als Kaufnachweis auf.